
Want to make one of these DIY Bathroom Shelf with towel hooks for your home? Well, today you are in luck.

Do you remember when I shared with you the recent remodel of our girls bathroom here? Well today I am going to share with you how we made the shelf that holds their towels. This is so simple that anyone can make one.
You will need:
3 foot length of 1 x 12 Pine (or composite wood) (back of shelf)
4 foot length of 1 x 6 Pine (or composite wood) (top of shelf)
5 feet of 3 and 5/8 inch Crown Molding
4 feet of 1 and 1/8 inch decorative molding
miter box saw
finishing nails
painter’s caulk
wood glue
putty
primer
paint
1. We purchased a 1 x 12 pine board for the back of the shelf (the part that is flush with the wall). We cut it so that it measured 36 inches (3 feet).
2. Then we took some crown molding that was 3 and 5/8 inches in width and cut it so that the base of the crown molding also measured 36 inches at the inside of the angle that sits flush on the other board. (We cut ours on a mitre box saw(or chop saw)on the crown molding angle setting. The top of the crown molding should measure roughly 40 and 1/4 inches at the outsideedge.
3. Then you will need to cut 2 side pieces. Ours measured 1 inch at the bottom of the crown molding at the edge of the inside angle. The top measured 3 inches at the outside edge of the molding.
 4. Now take the 1 x 6 board (FYI–technically it is called a 1 x 6 but in reality it measures 3/4 by 5.5 inches)and cut it to measure 45 and 1/4 inches (this allows it to have a 2.5 inch overhang around all edges of the shelf.
5. Attach it to the top of your shelf with a few finishing nails along the back edge making sure to center it properly. This will not be very sturdy, but strength will be added after attaching your crown molding.
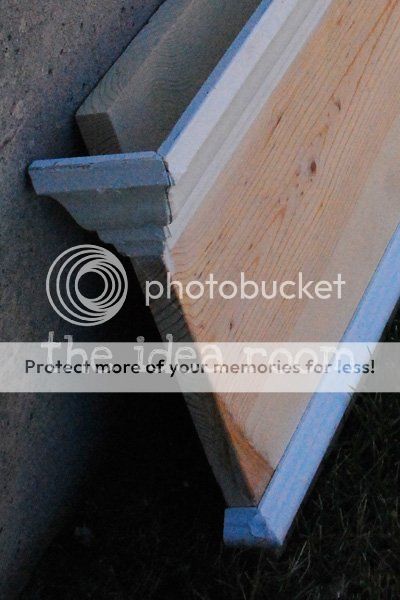
6. Now place the long strip of crown molding on the flat board at an angle and make sure that the top of the crown molding 2.5 inches from the edge underneath the top shelf. (In the picture we have removed the top board to show how the crown molding should connect together…let’s just say we learned how NOT to attach the top board )
7. Check and see if your side pieces fit nicely with the position of your crown molding. Adjust your molding if necessary. It might be helpful to turn the shelf upside down so that you can attach it easier. Then attach the crown molding to the board with a nail gun or a few finishing nails.
8. Take your side pieces and attach them to the shelf with a finishing nail in the top section and anchoring it to the bottom of the top shelf (Be very careful not to drive the end of your nail through the top of the shelf!). You can also nail the bottom of the side pieces into the flat board.
9. For the bottom trim we took a piece of 1 and 1/8 inch of decorative molding and cut it so that it measured 36 inches at the inside edge and the end being cut at a 45 degree angle. The outside edge measurement will vary based on the thickness of the molding you use.
10. Cut 2 side pieces at 45 degree angles so that the inside edges measure 3/4 inches. You may have to eyeball this and see what works best with your particular shelf.
11. Then we simply attached the long piece with finishing nails and then glued the side pieces on with wood glue.
12. Take your painter’s caulk and fill in the cracks on the long edges and seams. We used painter’s putty on the corners of the crown molding so that we could sand it into a nice finish and hide any cutting or attachment errors.
13. After the putty dries, sand the edges so that they are nice and smooth. Wipe off excess dust with a damp cloth and then prime and then paint it your desired color.
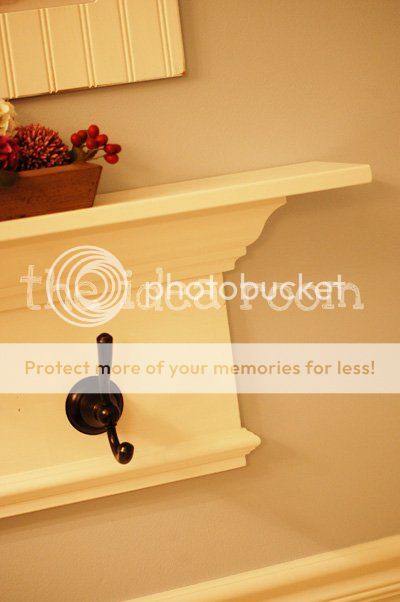
14. Attach your hooks. Be sure and center them where you need them based on how many you need. We purchased our hooks at Lowe’s.
Whew! That was a lot more technical and difficult to explain than the actual process. Just be sure to check and double check before making any cuts. These measurements are approximates and are based on OUR particular shelf. The products you purchase may vary slightly so please make note of that.

I would be happy to answer any questions you might have about this shelf and as always, if you end up making one, I would love to see some pictures!

JOIN OUR NEWSLETTER
Would you like more Recipes, DIY, Printables and Organization Ideas?
Subscribing to the newsletter will enable us to periodically send you creative content exclusively for Idea Room subscribers.
*View our Privacy Policy here.


Okay, you are one smart cookie. I love the shelf and want one for my bathroom. Thanks for the directions on how to do it.
Oh awesome idea Amy, and it looks fabulous!
So cute! What color did you paint the bathroom walls? I love it!
I love this idea and I love that you made it on your own…awesome. Looks so beautiful.
http://stayhomeandplay.blogspot.com
So cute! Did you make the bead board frames also?
You are pretty amazing!
I love this idea and I want to make this for my daughters closet that I am redoing. It looks awesome and thank you for the directions… Great Job..
That's fantastic! Thanks so much for the details, I'll be linking.
Love it – particularly the pictures in the frames! They're perfect bathroom decor.
So simple, so cute and elegant!
Very nice! Can you tell me how you made the beadboard frames, or where you got them? Thanks!
I definitely want one in my upstairs bathroom and am bookmarking this post for future reference!
This is exactly what my bathroom needs! Thank you for the tutorial, I will have to try this soon!
love the shelf going to try one this weekend but can you tell me what did you use to hang it up on the wall?
Yes – please tell how or where you got your picture frames! I've been looking for those everywhere!
I love it…I am not very crafty, but I just might ask my fiance to help out with this one :-) Thanks for sharing it
So, you're saying a girl in VA has not hope of finding them:) Maybe you could do a DIY…
Those look beautiful!! I want to make some now!
Thank you so much for posting this tutorial. I'm hoping I can make one of these to use over a bed in a guestroom….saw one very similar in Pottery Barn catalog for a mere $399! Don't think I'll be ordering that one. How did you attach it to the wall?
Judy
Hi Amy, I just found you through Miss Mustard Seed's Furniture Friday Linky party. I LVOE your bathroom shelf and such a fabulous tutorial – thank you for sharing. I would love to make a shelp like this to go above our bed. Not sure it is within my capabilities, but will give it a go! Yours looks AMAZING! ~ Tina
I love it, I love it, I love it! Look at you Miss DIY!!
I love this! I am featuring it on CrazyDomestic.com this Tuesday! Thanks for the fun idea!
-Steph
I told my husband I wanted hooks instead of a towel bar in our guest bathroom, but I wasn't sure how I wanted to do it. This is perfect! I will send pics when it's done! Thank you for posting this!!
I fell in love with this shelf the minute I saw it. I printed out the directions and gave them to my daa who is beginning wood working. For Christmas he built it for me. I love it. But since it is rather heavy we are at a loss for how to hang it flush on the wall. How did you hang it? Thanks.
Found this pic on pinterest and thankfully it brought me back to your website for a how to!! LOVE IT! Just what I was looking for ! I hope to put a tutorial on my blog (probably next month) and if it is ok, I will link back to this post. Hoping that is ok!! Let me know.
Thanks, Jen
athomeinthenorthwest.blogspot.com
This is a darling towel hanger/shelf I just pinned it on my bathroom boards. Darling! Also love the girls bathroom remodel. Great job. Glad i found your blog had fun looking at all your posts. I have been meaning to frame our mirrors and looking at yours makes me want to jump right into it. Thanks for the inspiration.
Lindsay
Love this idea for the bathroom! Where did you find the frames you used?
how didyou attach it to the wall?
Walt–Great question. We simply screwed it into the wall straight through the board that the hooks are on. We made sure to find the wall studs as our kids tend to “hang” on things and we did not want it to be pulled down. Then we covered up the nail holes with a little putty and painted over the spots with some primer and paint. You can barely see where the screws are if you look very closely and then can find them if you need to remove the shelf from the wall sometime. We just wanted the shelf to be on the wall securely.
So how did you mount this to the wall securely? What did you guys use?
I loved your shelves and in fact I made 2 (although a little modified). These were my first attempt at making anything with a compound miter saw, or anything using wood. Your instructions were great – especially for a novice like me. Click on my new blog if you’d like to see how I did. Thanks.
LOVE THIS! Just wondering what color did you use to paint the shelf?
I want to make this exact shelf for my bathroom but im having a hard time understanding the instructions….im not very diy savvy but this is exactly what I want for my bathroom ..please help…
This is what we need
I’m a novice woodworker, (but have big dreams!) I made this shelf tonight and it looks great!! I had a few problems with the molding angles but nothing a little caulk couldn’t take care of. Thank you so much for the wonderful instructions!
What did you use to mount the shelf? I made one like yours but painted it a dark teal. I love it!
What did you use to mount the shelf? I made my husband make this shelf but painted it a dark teal. I love it!
We determined where the studs were in the wall where we wanted to hang the shelf. Then we drilled pilot holes in the flat bottom part of the shelf and then screwed it right onto the wall. Then we jus putties over the screw holes and did a little touch up paint. You could also use some really heavy duty Molly bolts if the first wont work for you!! Love that you painted it teal!! Yay! Would love to see a pic if you have one ;)
Just finished mine….love love love it ;) Thanks!!
I love this shelf. I had my dad build me one for the living room and one for the bathroom because I loved them so much. How did you hang yours by the way?
Love this! I’m in the middle of building this and have run into a problem with the corners of the crown molding. I can’t seem to figure out size/angel of the cut. Can you explain how you did this please?
I love so many of those too, but many of them are expensive. What’s your budget?
LOVE! Need to make some for all my bathrooms!
How high off the ground did you hang the shelf?