
*Update–Many of you have had questions about how to “twist” the paper. I have made a quick video showing you how. You can find the video for how to make tissue flowers here:
How to Make Tissue Flowers Video
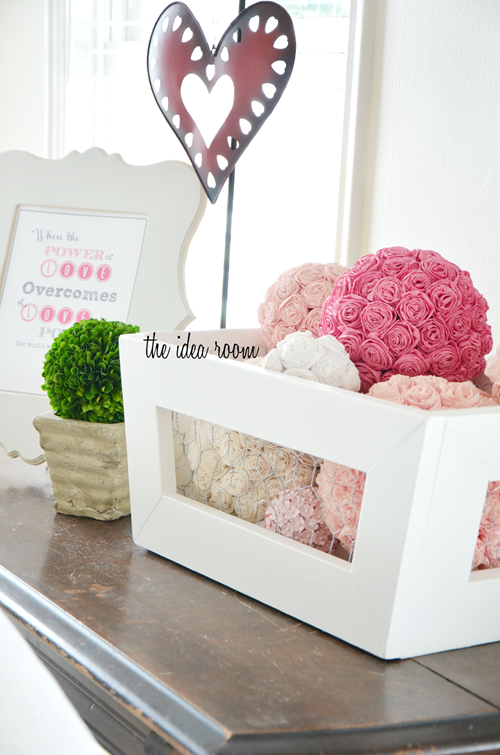
Valentine’s Day Crate Tutorial
Thanks everyone for all your sweet comments about my last Valentine’s day project…the “Be Mine” Framed Art. I had some requests for a tutorial on how I made the tissue paper rosette decor balls {kissing balls}. Well, lucky day, I had this post already scheduled to go!

Many of you will remember that I have made these before and have them hanging in my daughter’s room. We also made the wooden box that I displayed the rosette balls in. I will share the tutorial for that in a future post. I actually made it a couple of months ago with this table saw from Sears Outlet.

First off you will need a couple of rolls of tissue paper streamers. You can find them many places in many colors. Mine were $1 each.
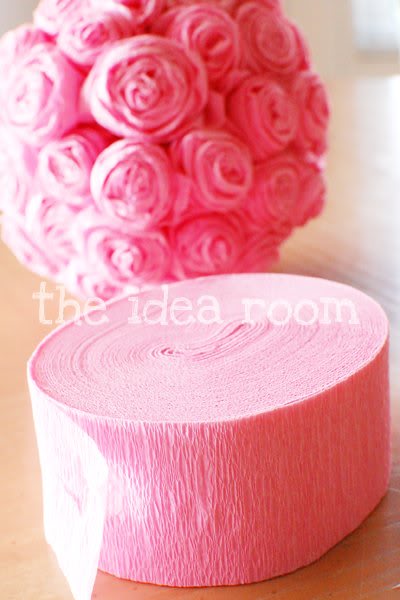
Start by cutting the paper into strips about 24 inches long. Then crumple them up to make them softer {this part is optional, depends on what look you like–experiment}. Then fold the top 1/3 of it down so it is not as wide. {again…optional}

Now take your strip and start on one end and begin rolling it up between your fingers.

After you have a few rolls, continue to roll it up but now twist the paper.

Now just continue to roll and twist until you have reached the end of the strip. I liked to add a drop of hot glue to the end so they did not unravel.

After you have a few rosettes made, start gluing {I used a glue gun} them onto a round styrofoam ball. I used 2 and 3 inch ones to make them in different sizes. Just glue them close together and fit them in where they sit together nicely.

On this particular rosette ball, I did not twist the paper. I did some both ways and like that they come out a bit different. Below is a picture of one that I rolled AND twisted the strip of paper. Does that make sense? Can you see a difference?

The fun thing is to just try different things. You will eventually find something that works for you and your taste preferences.
Pretty easy right? These are the perfect thing to do when you are snowed in and watching your favorite TV program or chic flick! Can’t find tissue paper streamers? You can get some here: Tissue Paper Streamers

P.S. Many of you emailed me and asked how I made this felt rosette kissing ball. I made these last year and the tutorial for them can be found here. I was inspired to make these after making this heart wreath. And just in case some of you are wondering about the decorative snowball men…they can be found here.


OMG! What a great idea!! I can't wait to do this when we move!
I love these. My daughter is getting married this summer and I have been looking for ideas to decorate. I have seen these to buy but they are so expensive. Thank you so much!
I would LOVE to see your DIY idea’s for your daughters wedding..Mine is getting married in Oct this year ;) Thanks and I hope you dont mind my asking :)
love them too and really ez for my girls group
whoa cool its really nice
this is my favorite artwork! I've been making roses from this kind of paper. The only difference I did is I cut the paper and rub it with scissor to emphasize the rose petals. I've learned the craft back when I was in elementary more or less 15 years ago!
These are stunning Amy. I was eyeing them yesterday in the background of your other post, glad you posted the tutorial. Who knew they were so easy! I featured them on Craft Gossip this morning :) http://homeandgarden.craftgossip.com/tissue-rosette-kissing-balls/
What a cute idea!
ADORABLE!
These are BEAUTIFUL! You did a great job! I really want to try it!
Oh these are so cute! I want to make some asap.
I love these! Such a great idea! Can't wait to make them! I also love the box you made…can't wait for that tutorial!
OOh how easy! I have some left over streamers from a baby shower i hosted. i think that i found my next craft to do. :)
Thank you for sharing. I need to make some of these for a baby shower.
I love these, have the supplies and been meaning to make them but you have me inpsired once again! Thank you.
I like these, so pretty! Thank you for posting. i had kidney surgery about a week ago and have limited mobility right now. These I can do though!
~Ilsa
To DIE for! I am hosting Bunco this month and HAVE to make some of these for prizes. You are going to make it so that I am popular and everybody loves me. I can't thank you enough for sharing this idea!
Thanks!!!!
so cute and easy I am so trying this!!! thanks
who knew you could do more with streamers than decorate for a kids party! ;-) Sucha cute project!
Oh my gosh I love your idea! Thank you so much. Off now to find crepe paper streamers.
Thanks everyone! And Thanks Amanda for featuring them on Craft Gossip :)!
These are beutiful, I will have to give it a try!! Thanks for sharing!
xoxo
Kelli @ loveoursimplelife.blogspot.com
thank you thank you thank you!!! I'm totally doing these TONIGHT!!
These are so beautiful! My friend's bridal shower is coming up and I think these would be perfect for adding to centerpieces!!
I'm attempting to make these AND the heart wreath this weekend! I'm excited! After I've bragged so much about my excitement on my blog (www.mareksmusings.blogspot.com), I've gotten tons of co-workers who are excited about doing them, too!
what a great and CHEAP idea! I would have never guessed those were made from tissue paper! So pretty! BTW, I got my family fun today and couldn't wait to flip through it to find your project! It was so exciting to see! Funny, I've never met you but I felt like one of my good friends was being published!
This is pure genius and seriously cute!!
these are adorable! what did you do to hang them in your daughter's room?
Oh, I love this!! Thanks for sharing!
You must have the most amazing patience in the world for all the wonderful projects you test out! I sure hope it rubs off on me to make some cute stuff you have listed!! This is adorable!!
This is such a cute idea! I love your blog! I am a new follower at http://breakingfreefromoldways.blogspot.com. Come check out my blog I have valentine's day ideas
What a lovely project! Thanks for sharing with us. You always have such nice projects and ideas here.
Thanks for the great project! Can't wait to get to it- it's officially added to my list!
Hello from a new follower. I found you via Craft Gossip and I adore these kissing balls. What a great project for Valentines Day. I shared it on my blog. Thanks for the idea.
@Randi–I hung them in my daughters room on some lengths of ribbon. I simply folded up the end of one ribbon and stuck it to the foam ball with straight pins. It actually holds really well. Then I als stuck the top end into the drywall on the ceiling with straight pins as well. This was more challenging and I had to have the hubs help me push them in. But it works like a charm and if you want to remove them, you have only a tiny pinhole to patch up.
featured this today Amy!! love it!
OMG!! I LOVE these pretty little things!
L"OVE all the valentines day stuff…its how i got hooked to your blog last year!!!
I love the little snowmen faces in the apothacary jar – how did you make those?
You always inspire me! Promising to send you pics of my heart wreath!
Okay, now I have two perfect projects to do from you. I love the "Be Mine" plaque and the tissue paper rosette balls! With those ideas and the great heart wreath, I am truly becoming your biggest copycat!
-Shannon @ oursevendwarfs.com
What a great idea! I can't wait to use my leftover birthday crepe paper for these! I shared them on my blog because I think they are such a good idea. I love your site!
agooddealofsavings.blogspot.com
Thanks for sharing this idea! I made some and they turned out so cute, I want to make more. I blogged about them on my personal blog with a link to yours. Thanks again!
I am probably going to sound like an idiot…but I have been trying to make them and do the "twist" part and I feel a little confused. Do I just twist the stem or the own strip as I curl up?? Help! :)
@Brenda–I have actually been emailed that same question…so it is not dumb! Just hold the little "stem" that forms when you start wrapping. Twist the long length of streamer as you are rolling it up. Roll and then give it a twist…then roll it up and then twist it and son on. Does that make sense??
I am so confused on the “twisting” part!!!! HELP!!!!!!
Can you be more specific….about the twisting and roll deal….HELP!!!!!!!!! uploading a video will be the solution….thanks
I love it! I can't wait to make some of these!
-Angelica
I hope you don't mind, but I shared your link! It is so cute and I had fun making mine – with only a few burns from the stinkin' glue gun!!!
Thanks for sharing,
Megan from orangepeanut.com
Yours turned out so much better than mine! I gave you credit over at http://www.addicted2tutes.blogspot.com :)
This was a great idea! I linked you on my blog with my finished photos posted up too! Thank you for sharing! And keep up the fab work!
Hi there,
Your balls turned out really pretty. I love the different colors. I just wanted to let you know that the original idea came from my blog. :)
Thanks,
Danielle
I am stressing out. I started doing this, but I don't understand what you mean by "twist." I crinkled the paper, then folded the top 1/3 down, and started rolling. It looks to perfect, and I can't figure out how to twist!!! PLEASE HELP!!!
Love the idea and I would really enjoy trying it but I don’t know what you mean by your step that says as you are rolling them to also twist? Twist what? Where? In what direction?
very cute. been wondering how to do this myself..so glad u posted this. thank u !
I just finished this project for my little girls room! Thank you for sharing. I have no idea how to “track back”, so I will send you an email.
Blessings,
Anna
http://annabledsoe.blogspot.com/2011/07/kenzies-room-update-diy-project-3.html#more
I love these! I just shared a link to this post on my blog where I did a little pom pom tutorial. Thank you! I’ll have to try this version!
what a cute idea!
Amy, love this tutorial. Thanks for sharing. PS. how did you make the little snowball heads in the glass jar. Just wondering what you used? Thanks for sharing.
Thanks Kristy! You can find the tutorial for the snowmen heads here: http://www.theidearoom.net/2010/02/decorative-snow-ball-men.html
Presh ideas!!!
Keep it up!!
Hello I stumbled upon your website via Pinterest and was wondering if you ever posted about how to make the wooden box featured in this post. I did a search on your website but didn’t see it. I would love to know if you have a tutorial. Thanks!
Hello – I found your site via Pinterest and was wondering if you have a tutorial on the wooden box pictured in this post. I did a search on your site but didn’t see it- if you do I would love to see it- thanks!
What an awesome idea!! Thanks for the tutorial! A lot of people are looking for ways to DIY and this fits right in with doing things for weddings on a budget.
http://weddingunder5k.com/2011/10/paper-flower-bouquet/
I suck at this lol. I couldn’t get it to look anything like a flower lol!!! I guess some crafts aren’t meant for everyone! :)
How many rolls does it take to do one styrofoam ball?
oh my goodness!!! I have a bin full of those tissue rolls that i had no idea what to do with!!! I love this idea!!!! genius!
I don’t understand or see how you twist them and I can’t see any instructions in the comments here. Can someone please help me out?
I love this
Hi Amy, I love these! But mine are not coming out as full? Any suggestions for me :)
Hi Amy,
I love these! I made a few but don’t look as full or big as yours. Any suggestions? Thank you!
Hey there Amy!
I love this idea for flower girl and aisle pomanders at my friend’s upcoming wedding. I wanted to know what size styro balls are you using and how many flower balls did one roll of crepe paper cover?
Thanks!
New follower here. Great idea….they look beautiful!
I don’t understand the twisting part either. I’m sitting here doing different things and it’s just not working. Has someone figured this out yet?
Now could you us tissue paper?
This is gorgeous! Thanks so much for sharing the tutorial with us, I’ll be featuring it today.
Thanks so much Janet! I really appreciate you featuring it! I will stop on over!
LOVE THEM! Thanks for sharing your talent and idea! :)
I love this. I’m going to give it a try for you flower shop. Thank you.
These are lovely! But I feel like a jerk because I don’t understand the twisting part. You mean you turn the paper over (twist over) as you’re rolling it or you twist the bottom half of the roll as you’re rolling it? I really want to make these but I don’t want to screw it up..Thanks.
Hey – I tried looking for an email to send this privately, but I couldn’t find one. I found your tutorial (the one from this post) complete with YOUR pictures on this site – http://diycraftstomake.blogspot.com/2012/01/tissue-rosette-kissing-balls.html
and thought that you should know.
Blessings
Honey
I’m going to do the same thing but With much bigger Styrofoam Balls and i am going to hang a few from my nieces bedroom ceiling. i for-see it being very cute.
I think it’s great that this post is still coming up in top ideas! I made these for my sil’s baby shower. Everyone loved them!
http://justmejuliejulie.blogspot.com/2011/09/baby-shower-kissing-ball-centerpieces.html
What an adorably cute and fun idea! I love it! Thanks for sharing. :-)
I love the look! Beautiful and simple! Can’t wait to make them!
Sooooo adorable!! Great idea!
I just posted a video tutorial for these here: http://www.theidearoom.net/2012/01/video-tutorialtissue-paper-rosettes.html
Oh my gosh I love this… So cute. I’m going to try & make some. Wish me Luck!!! =}
By any chance …. Can u please Please PLEASE, Invite me to Pintrest ? Thank you
These are beautiful! I had to pin it on the CraftBliss Sweet Valentine Bliss Board on Pinterest and link back to you. ~Dee
very nice idea. amazing :)
So cute! I love it!!!
Beautiful
Thank you soooo much! I totally had to feature it! I sent a private message about it, but I really wanted to thank you again. :)
I like the lighter pink rosette ball a little more-what is the difference? Rolled and twisted? You demonstrated the roll but what does the twist look like? I’m sure this is really easy I just can’t see it!
Thanks,
Jess
How did you get yours so full? When I roll them they become really thin! I’ve gone through almost 2 rolls of crepe paper and hardly have 1/2 a ball done. Any secrets there?
Thank you! I am so glad someone else has this issue. I have tried this over 20 times now and i cant get them to look anything like it. They look horrible and im beyond frustrated.
found you via pinterest, love the look of these! I tried them tonight, some twisted some not, and they are more like rosebuds rather than roses. Not nearly as full, are you certain you only used 24 inches of the tissue per flower? I don’t know what you did to make yours look so great but I apparently don’t have your crafty touch.
Hi! Sorry I haven’t emailed you but I have used your tutorial to make my own kissing ball and then linked back to your blog to give people instructions! Hope that is ok? I haven’t used any of your photos. Here is the link to my post http://roselindy.blogspot.co.uk/2012/03/kissing-balls-of-roses.html please get in touch if there is any problem!
Amazing article!! Thanks!
I’m not doing it right I guess! I followed your tutorial on here and the video tutorial. Mine are still not coming out as full as yours. I tried the 24 inches and 48 inches and they’re not as full! Any tips or suggestions? I’m trying to practice making these. I’m wanting to make a white one for my bridal shoot! Love yours! Thanks!
How did you hang them? And I am making some for .my room super cute!
I love this idea!! I would love for you use this for my Granddaughter!!
This is such a lovely craft and I love the fact that it can be used in a variety of ways.. this can come in handy for a flower girl bouquet ball or wedding decorations at a ramen noodle price! Thanks for sharing!
i’m making these for my wedding with hot pink, orange, and yellow roses. they look beautiful! such an easy and affordable project to add so much personality to a room. thank u!
Love this. This ball is made of styrofoam?
This is such a pretty project:) I linked you up on my blog:
http://loverlyshe.com/2012/04/20/five-great-diy-projects/
Thanks for sharing!
LOVE this and the minute I saw this posted on Pinterest I KNEW I had seen these before! HERE!!! We’re creating these for our Choir Awards Banquet and using with our Alice in Wonderland theme! Thank you so much for the tutorial and inspiration!!!
Love this!! Im getting married in August and I’ve decided to use these for the flower girls to carry.. Thanks!!
Hi I was wondering what size these styrofoam balls are?
Love the look of these, but how do you get yours so big and puffy? Mine are turning out more like tight little rose buds! :(
Hi there…found you through a ‘Pin It’ of your crepe Paper rossettes..thank you for sharing such a beautiful creation..glad i found you and will be following your great ideas
I love this idea I work in a nursing home always looking for ideas
Me encanta.
Me encanta.todos los trabajos manuales especialmente los de mesa.
Amy,
Hi! I recently made some topiaries and made them with tissue paper roses. I put your video on my post, hope that’s ok.
My blog is http://topiaryrose.blogspot.com
I did mine similar to yours. Thank you so much for the tutorial.
I am following you now.
Pat
This is fantastic!!!! I’m going to make a bunch and decorate my room with it!
Thanks Annie! I hope you enjoy making them and they add a lot of fun to your room!
Was wondering if u had posted the tutorial on how to make the wood box. Love the roses.
I have not shared that. I really should though. Thanks for the suggestion.
I just love these kissing balls!!!! I’m currently trying to make some for a bridal shower but they’re not as full looking as your roses. They’re really small and tight. What am I doing wrong?? Thanks!!! :)
I love that!!! I need to try that!:)
Bonjour,
Simplement magnifique..Super!!
J’ai aimé faire!!
Merci pour bpartager!!
Bonne Année à tous
Izabel
What a great idea. Do you mind if I share this page on my website?
I used your Tissue Rosette ball idea as part of the stage decor for my engagement ceremony – got so many compliments and had guests requesting to take a few balls with them! – Thank god I stumbled across your website when I did. Hope to see some more DIY crafts ideas from you that I could possibly ‘borrow’ for the wedding! thank you
these are great projects
Splendid work!! Very creative DIY and thanks for sharing it.
Hello,
These look wonderful! I would love to have these hanging from the pews during the ceremony at my wedding! Unfortunatly I am extremly un-crafty. Are these for purchase anywhere? I have been searching etsy and haven’t found anything like this either.
Any help would be appreciated!
Thanks,
Erika
I am making these for my daughters tea party instead of buying fresh. :) $ I like the look of the not twisted ones better but can’t make mine look like yours. You roll loosely, is that right? It also looks like they are kind of angled like a cone, smaller on bottom and wider on top… How do you do that? Either way I’m loving the twisted ones and so excited to use theses for two dollars ( humongous roll of streamer found at target) instead of 150.00, which I was going to pay for fresh! My husband thanks you…lol!
I am a bride on a budget! I saw your post and started making these for my wedding centerpieces! Thank you from the bottom of my heart!!! They look expensive but are very affordable!! Thank you again!!!!!
So happy to hear that you are able to use them for you upcoming wedding. Good Luck with all your preparations. It is such and exciting but busy time!
Excellent post. I was checking continuously this blog and I’m impressed!
Extremely helpful information specifically the last part :
) I care for such information a lot. I was seeking this certain info
for a long time. Thank you and best of luck.
did pine over these adorable tissue paper kissing balls on TheIdeaRoom.
A website is an excellent platform to promote any
business and it has a high potential of generating more business enquiries and more revenues if website will be properly developed and managed.
Since residential painting is such a localized market, it’s a waste
to bid on keywords and phrases that aren’t in your real target market.
Incorporating citations and references to your website can truly help you down
the road.
Thank you for your tutorial. It was quite detailed and easy to follow.
Might I ask a question about your wall colour? I am looking for a yellow paint and yours seems to be perfect. Could I please inquire what paint colour and brand you used? Thank you.
Jan
Want to read customer reviews and information signs can also check out their about us.
It commercial grosfillex is a soft brush, and each piece.
With one of these materials is available in different material types, and mineral deposits can cause the price of teak.
It is important to keep water away from it. Every piece of furniture that spends a
fine grain is great because then you need to prep the timber with a warranty.
These are so adorable.
There are so adorable.
Asia specialist operator with a terrific selection of tours, excursions plus accommodation on their web site which has, quite appropriately, won an award (Travelmole Web Awards 2009)
to be user-friendly.
Whats up are using WordPress for your blog platform? I’m new
to the blog world but I’m trying to get started and set up my own. Do you need any html coding knowledge
to make your own blog? Any help would be really appreciated!
It’s actually a nice and useful piece of info. I am happy that you simply shared this useful info with us.
Please stay us up to date like this. Thank
you for sharing.
Everything is very opwn with a really clear description of the challenges.
It was really informative. Your site is vsry useful. Thank you ffor sharing!
These are fun to make. My 6 yr old tried but it was a bit to hard forher little fingers. But she mesured and cut while my 5 yr old crumpled. Thanks look forward to many more ideas.
They do take some figuring out and can make the fingers tired especially after so many! Glad the kids were able to help you out!
What a invormation of un-ambiguity and preserveness of valuable experienche regarding
unexpected feelings.
You have lovely ideas. But styrofoam balls? Really? Please find an alternative. Styrofoam is awful for the environment.
I’m amazed, I must say. Rarely do I encounter a blog that’s both equallly educative and interesting,
and let me tell you, you have hit the nail on the head.
The issue is something not enough peoplke are speaking intelligently about.
I’m very happoy that I found this during mmy search for something concerning this.
These are so beautiful and such a great addition for the DIY projects for Brides, showers, little girls rooms- the uses are endless!! Thank you! =)
Excellent post. I was checking constantly this blog and
I’m impressed! Very useful info specifically the last part :
) I care for such info a lot. I was seeking this particular information for a very
long time. Thank you and good luck.
It’s so nice and easy to make. Can’t wait to try this on my next event. Thanks for sharing!
Great goods from you, man. I’ve understand your
stuff previous to and you are just extremely excellent. I really likme what you
have acquired here, certainly like what you’re
saying and the way in which you say it. You make it entertaining and yyou still care for to keep it sensible.
I can’t wait to reasd far more from you. This iss really a terrific web site.
How big of a styrofoam ball did you use?
I used 2 and 3 inch ones to make them in different sizes.
I want to do with me. This is a great shot!
Thank you!
I used the instructions given for the tissue paper flowers and made flowers from ivory lace, chiffon and tulle for my daughter’s vintage wedding. Paired with some pearls, they look great!