
*This is a sponsored post on behalf of Lowes.
I have been wanting to make an American Flag out of a wood pallet for a couple of years now. I have a long list of projects that I hope to be able to get to (someday) and it feels nice to be able to cross one off of the list. Will I ever get tired of projects? Ha! I am not sure. I really enjoy creating things and the whole creative process…so I doubt it!

I have a spot on my back deck that I thought would be a great place to display this flag during the summer for the Fourth of July. We had picked up a few pallets almost two years ago when we needed some to make my son’s Pallet Headboard and a Wood Pallet Map for his room. So, I just used what we had left over in our stash. We picked up the pallets from a local nursery who just gave us a few for free!

The wood slats can be VERY difficult to remove from the pallet itself due to the long nails they use. So we just take our saw and cut the wood slats near the end nails and then pull out the nails in the middle. It takes some elbow grease to get it done…in my case, my husband was a great sport and took care of it. I used 7 wood boards from the pallet. Don’t worry if they are beat up…I like that they add some fun texture and an aged look to the map.
If you don’t have access to a wood pallet, cedar fence post from Lowe’s are perfect for this! They can be found in the lumber section. Line up your boards and then staple or nail them to three strips of wood that are on the sides and in the middle of the boards in back. This will hold all your boards together.

I googled an American Flag and studied it very closely to know how I should paint the wood pallet boards so that it resembled a real flag. I had one board that was missing a section on the lower corner so I just used that board on the bottom of the flag so that it looked like the flag had a piece missing on the bottom stripe. I then drew out where I wanted the blue section and the 13 stripes. I started with a red stripe and ended with a red stripe.
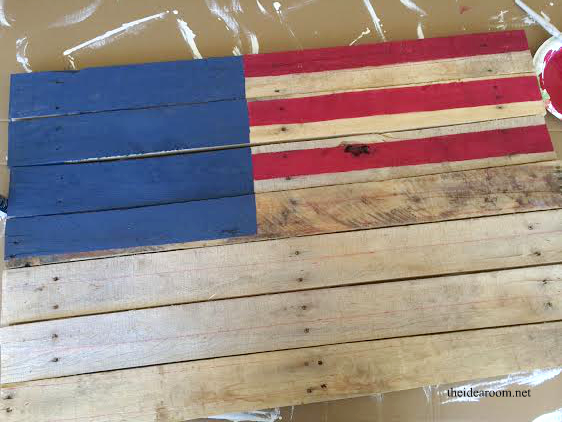
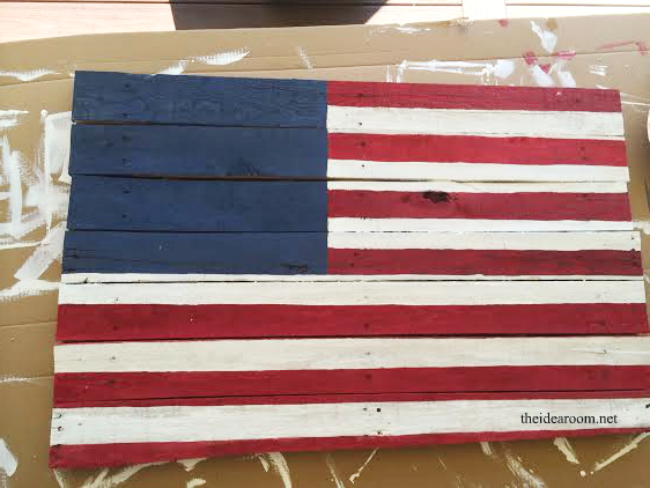
I painted the blue section first and made the bottom of the blue section line up exactly with the bottom of the seventh stripe. Then I painted the red stripes by starting at the top and moving down. By the time I had finished painting the red stripes, they had dried enough for me to start painting the white stripes.
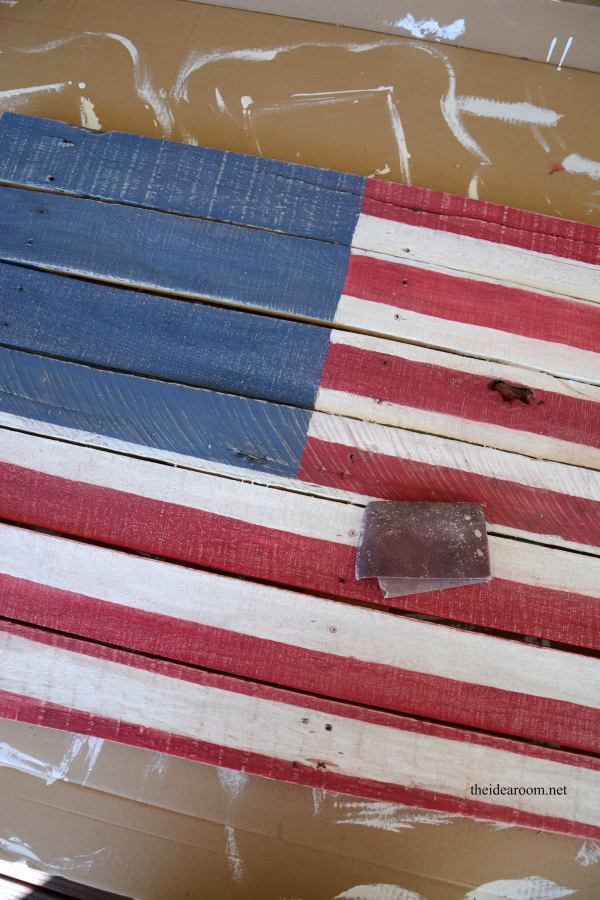
When everything has had a chance to dry and cure, you can take some sandpaper and rough it up a bit. I actually did the roughing up part before I painted the stars on because I was still trying to figure out how big of a star I wanted to do. I finally just decided to go with a star stencil I had on hand from Martha Stewart. It ended up being the perfect size for my taste.
We relied heavily on a picture of the American Flag to get the dimensions and the layout of all 50 stars as correct as possible. It ended up being 5 rows of 6 stars with 4 rows of 5 stars in between the rows. Then when the stars were all painted on and dried we roughed them up a bit too.

To hang the flag, we put a couple of screws on the back and threaded some heavy wire around them so they could act as a picture hanger. This makes it super easy to hang it up.


Now we are ready to host the Fourth of July BBQ! Want to see some of our other Fourth of July projects? Check out these past Idea Room posts:

How do you celebrate the Fourth?

*Disclosure–In accordance with the FTC Guidelines, I am disclosing that I received compensation from Lowe’s for my time and participation in the Lowe’s Creative Ideas Influencer Network. However, all opinions and statements are mine and mine alone.

JOIN OUR NEWSLETTER
Would you like more Recipes, DIY, Printables and Organization Ideas?
Subscribing to the newsletter will enable us to periodically send you creative content exclusively for Idea Room subscribers.
*View our Privacy Policy here.


Beautiful! I actually love how the bottom stripe looks to be missing part of the stripe. I have been wanting to make one of these as well and now I am feeling inspired. Thanks! :)
LOVE it. Amy!! So patriotic but one you can keep up all year long. Great job. :)
Thank you Kristyn! I think I will keep it up all summer!!
Love it!! Love the rustic feel of it. Thanks for the tutorial :)
Old Glory never gets old, I love this so much. Now if only I could convince my husband to help me take the pallets apart….LOL ;)
haha! For sure that is the most difficult part of the whole thing! Thanks so much for stopping by and commenting!
What brand/exact colors did you use for this project.
Love your work.
Ronny
I love the pallet flag. I was wondering what the name of the shade of blue that you used. Could you let me know? Thanks!