
*For a printable version of this tutorial click here.
Now I’ll talk about the next step which is multi-point auto focus. Yes, I use auto focus as opposed to maual focus. Meaning I don’t turn my lens to focus just by eye (I don’t trust my eyesight) I use the sensor on the camera to assist in focusing for me.
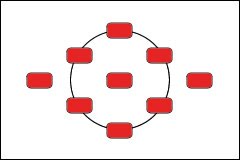
When you first get your slr cameras and shoot on auto mode, the camera is focusing the full frame for you. Everything is in focus, all lights are red, nothing artsy about it. Though I only shoot in full manuel, I hear that AV mode and the other non-auto modes can use the multi-focus points, too.
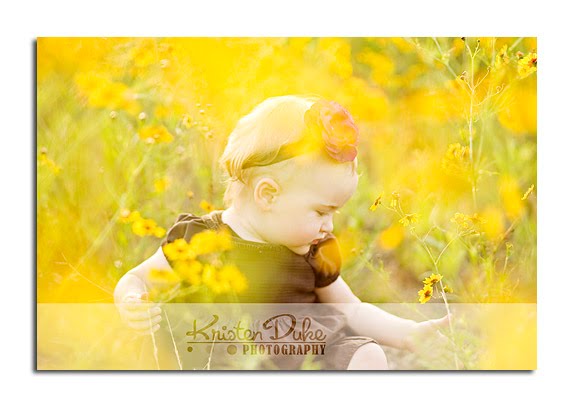
Take a shot like this (my baby turned 1 pics)
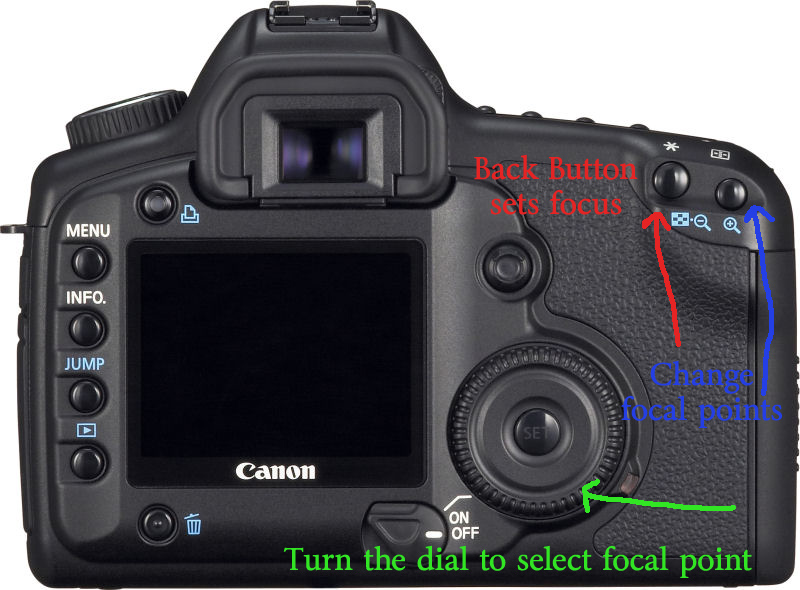
1. Go to MENU, custom function 4 and set it to setting 1. (setting 0 is default)
2. Turn your AF setting to AI Servo. (I’ve used One Shot and seems to be ok, but my research is showing AI Servo, so I am trying it out.
Ok, so now that you are set on back button (have you located the cute * near where your thumb grips?) lets try another focal point.
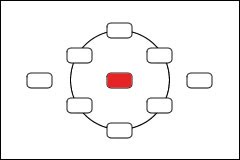
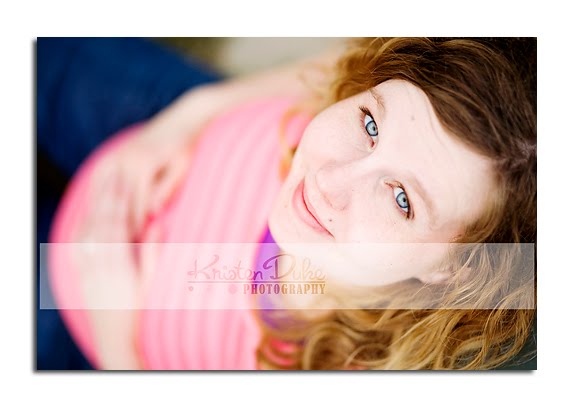
To get those great off-center portraits, I use the focal point (or little red light) all the way to the right or left. I more often use the left, as in this shot below:
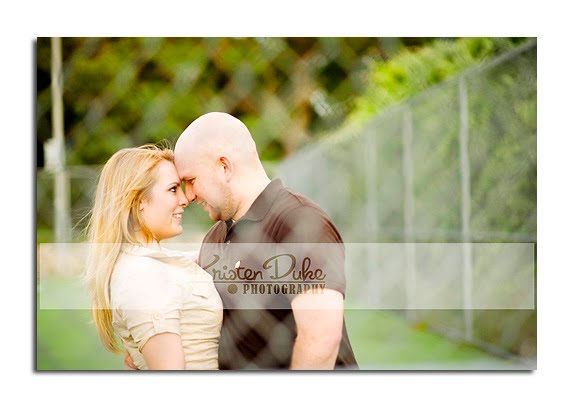
I actually did a similar shot as the one with the flowers above and focused on their faces (off to the left) through a chain link fence. (Both sessions I photographed in the past week). The little red dot was RIGHT on their faces. If it wasn’t, I’d focus on the fence and they would be blurred (which can be a cool artistic shot in and of itself).


**Grab a button and you will have access to all of Kristen’s posts in one click!

<a href="https://www.theidearoom.net/search/label/Kristen%20Duke%20Photography" target="_blank"><img border="0" alt="Photobucket" src="http://i285.photobucket.com/albums/ll45/huntleygang/idearoom/idearoomkristendukebutton.jpg"/></a>JOIN OUR NEWSLETTER
Would you like more Recipes, DIY, Printables and Organization Ideas?
Subscribing to the newsletter will enable us to periodically send you creative content exclusively for Idea Room subscribers.
*View our Privacy Policy here.


Wow. I get it. Thanks Kristen, this will make a difference in my shots as I am always frustrated the red dots aren't lighting up on the part I want to focus on. I'll just do it myself!
Not that taking pics of fabric and paint brushes is as exciting as faces, but I can make it a close second :)
Thank you for this info! I did not know about the * button for focusing. I will have to try that. I have really enjoyed your photography posts, they have been very helpful to me.
Questions: What f-stop would you set your camera on to get everyone in a group of 4-6 people in focus and still get nice bokeh?
Do you have any tips for taking pictures/camera settings of children, who are always moving?
Do you use custom or auto white balance? If custom, how does that work?
I consider myself a photographer who knows just enough to be dangerous. I know how to adjust many of the settings but still really struggle with how to get them to work all together. Perhaps some posts on the following:
ISO – what it means, when to use it/adjust it, what combos of shutter speed, aperture and ISO work best in which situations (i.e. Indoors vs outdoors). Why does higher ISO make my indoor pics come out grainy?
How to take good indoor pictures when lighting is not good.
Night time photography tips.
How to use that meter you see inside the camera when looking thru the lens. Is it a light meter?
What do the numbers on the various lenses mean? How
do you understand these numbers so you will know what the lens is capable of.
Loving your posts so I know anything will be helpful. Thanks!
I'm like Krista (above) – I know enough to be dangerous. Thank you for arming me with more knowledge so I can be even more dangerous! I'm bookmarking this post for later study!
Melanie, you will be surprise how taking pics of fabric and paint brushes can be fun with great photography! Using this focusing technique will be sure to help:)
Jennifer, I covered some of your questions in previous posts (group photography, white balance), but I can include others in future posts.
Krista, check for my 2nd post where I talked about ISO, indoor, but light meter is a good suggestion.
Lynn–go for more dangerous!
it sounds interesting. Complicated, but interesting. I have the * button on my original Canon drebel, but I cannot find the function buttons to change. I'll need to open up the manual and see if its possible.
It feels a bit overwhelming!
thanks for the tutorial. I'm sure I'll get it sometime!
I have always wondered about this! Thank you so much for giving us this information. You are wonderful!
Thanks for this great post! Now I need to figure out how to do this on my Nikon…
I don't have the dial on my model, but I'm sure I can figure out how to jump between the points ~ thanks for the tip!
Right now I am doing something similar ~ I set my focus to always be the center dot, put that dot on what I want to focus on & press down the shutter button part way to lock the focus. Then I move the camera over to frame the shot the way I want & then take the picture. It's great because I can quickly move the focus all over without having to change any settings.
Thank you! This is a tip I have never heard before. I can't wait to give it a shot!
we're on the same wavelength – I posted about "focus" yesterday – – I used to change around my focus point like you (picking different red dots) but then I took a photography class and learned the trick of "focus lock" where you keep your red dot set on the middle and then lock your focus and slightly pan over – that way you don't have to keep adjusting your focus point – – I posted about it: http://craftedition.blogspot.com/2010/05/photography-tips-focus-lock.html
anyways, love all your tips!! i think getting a good focus point is what makes the picture great
Thank you so much for posting this…I have never heard of Back Button Focusing. I will give it a try. Getting that look is one of the things I am struggling with right now. I think that I have the white of the eye focusing…the red dot is right on the inside corner of the eye, but then I see them on the computer and it's not as sharp as I would like. Hopefully this will help. :)
Love all your posts…thank you!
I love these photo series. You explain it very well. I am currently trying to shoot everything in manual and I'm sure as you know it is a lot of trial and error. I know on my camera it will tell me what each picture "combo" (iso, shutter speed and f-stop) I used, but when I transfer my files onto iphoto I cant find that information again, and I like to delete the photos off my camera after I've uploaded to the comp. Do you know how I can find out what "combo's" I used for each picture on the comp.? Does that make sense?
Also, I'd like to learn more about lenses too. Any tips on that? Thanks so much!!!
Taylors–I don't use iphoto, but in PS, I can right click on the image and have options to view the data in the pop up bar. I also talked about lenses in a previous Idea Room Post:)
Mandy–from what I understand if you are using the center focal point and recomposing, it won't matter too much if you high a higher fstop, but if you have a really low fstop as I often do, it will be focusing in the middle with your subject off to the side a bit out of focus.
Thank you again for sharing, I'm enjoying all of your posts :) I can't wait to try this on my camera!
Kristen, that is amazing! I had no idea my camera could even do that, and it solves so many frustrations I've had lately. Thank you so much!
My Canon body is slightly different, I noticed other commenter(s) couldn't find the dial, it is near the shutter button on mine.
Amy – I couldn't find the right function settings right off either, but try putting the camera in one of the manual shooting modes, any mode above auto on the dial.
That makes the "menu" items change. (at least for me)
Over all, I found that to be one of the most (surprisingly) simple new techniques to walk through.
Thanks again, Kristen!
You're so kind to share all this with us. :)
Thank you, thank you, thank you. I get it! I was always confused be the whole back button focusing, but you explained it very well.
thank you, thank you, thank you for this post! i tried it yesterday & WOW what a difference that made it getting my focus right on. love it when someone is able to explain something & i actually have that "ah ha!" moment.
i would love a post on nailing exposure. that is something i still struggle with….
Thank you so much for this post! I swear I've been losing my eyesight as I've tried to manually focus some of my images and the auto focus sometimes doesn't quite cut it either, so I will be trying this out!
Also, I'm not sure it it's been covered, but I was wondering if you have any suggestions on posing people. I struggle to pose teenagers, adults and families so that they look natural and so that the arrangement looks balanced. Any advice would be very appreciated!
Thanks again!
Thanks Kristen for another awesome, informative and educational post! I have learned so, so much from each posting! I have to admit that some of the photoshop posts went over my head, but everything else has taught me more than I've ever learned in any photography class or book. Your photography is so inspiring! Perhaps you could think about teaching an on-line class this summer. I know I would sign up!!
Thank you SO much! You explained this with great clarity! I can't wait to go try it out… :)
I did made the changes on my Canon Rebel, but when I focus, there are no red lights at all? Any help? Thanks!
hello i just wanted to thank you for this article, i have the 60D i think my back button is in a different place up next to the * button… also it actually says af-on when i hold it down it focuses for me the * button wont do it on my model just wanted to let you and anyone else know that might be wondering the same thing.. :)