
I knew it was Thursday today. I’ve got my daughters preschool group here, I knew they were coming on Thursday. Just yesterday when Amy and I were emailing, I thought to myself, “I need to get my post ready for Thursday.” In my mind at that moment, it was Monday, so it seemed too far in advance to get my post started. Then Amy kindly emailed me today wondering if I had a post. After all, my past posts I’ve had done Wednesday night scheduled to post Thursday morning.
“Agh, it’s Thursday!”
Luckily, I have a topic in mind.
First, let me mention that Amy has been working hard at getting all of our photography posts together. I now have my own label on her blog and a button that combines our two logos! On her sidebar, you’ll see this:

Click on it and you will get all the posts I’ve done on the idea room. I plan to post that at the end of each of my posts to make it “more easier” as my kids would say. Plus, she’s also made them printable in a pdf. Isn’t she awesome?!?
Head Swaps
*For a printable version of this tutorial click here.
Now let me say that the actual “head swapping” isn’t too tricky, it’s the clean up that can be daunting. A few years ago, I couldn’t do it at all, but I’ve practiced and now get quite pleased with myself after it’s done. For clients, I don’t usually do it unless they ask. Every once in a while, I’ll see the perfect shot–except someones eyes are closed, and I’ll swap before showing them. I’ve found that if I swap after they’ve seen the images, they know what to look for, and even if it looks seamless, the image bugs them b/c they know “something” happened.
Let me show a few samples that I’ve done.
This first one was a clients’ session that I just shot a few weeks ago. She wanted a lot of candid, but I was surprised when she ordered the above image b/c 2 of her kids were looking away while the others were all looking at me. There were other great shots of everyone looking, but she was holding her daughter, and I think she wanted an image of her not holding her (I would too if I looked as slender as her in that cute dress).
She didn’t ask for a swap, but when I saw it, I said I’d give it a try. Though there were other smiling images, they weren’t in the same setting and I don’t like to attempt swaps like that because it is a lot less natural. (See the two on the left)
Before–above. After–below.

I could have tried to find one of the boy on the left without his arm swinging, but he was on the trail and the background was tan, so thought I’d keep the arm. The tree around his head still needs a little work, but if you didn’t know it was swapped, I think one might not know.
I first look for a simple background, and here we have the trees. Not too tough to work around. I swap mostly heads or sometimes head/shoulders. I’ve tried to do just eyes, but haven’t found that to work to my advantage.
Another of my family…
I loved this image below (taken by my friend Katie Evans I put my logo on to prevent others taking it) but my oldest daughter was covering her face and my baby looked cuter in the shot below.

This one I liked the girls…but not everyone else. I used the shot above and transferred the girls into it. Tough b/c my older daughter had her legs up.
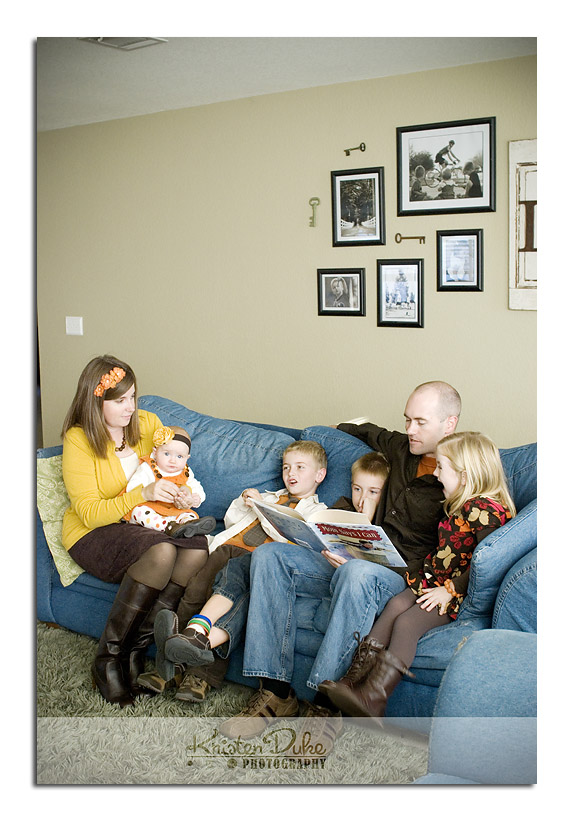
Voila!
After cropping, editing out the lightswitch, picture frames, and glare on the wall, I turned it to black and white because I wanted to freeze the moment and the colors distracted a bit more (though I love the colors in other shots). I love this moment frozen in time. We often squish on this couch and read, so this just makes me happy. Does it make it more jaded because you know about the swap? Not to me. I’m ok with it:)
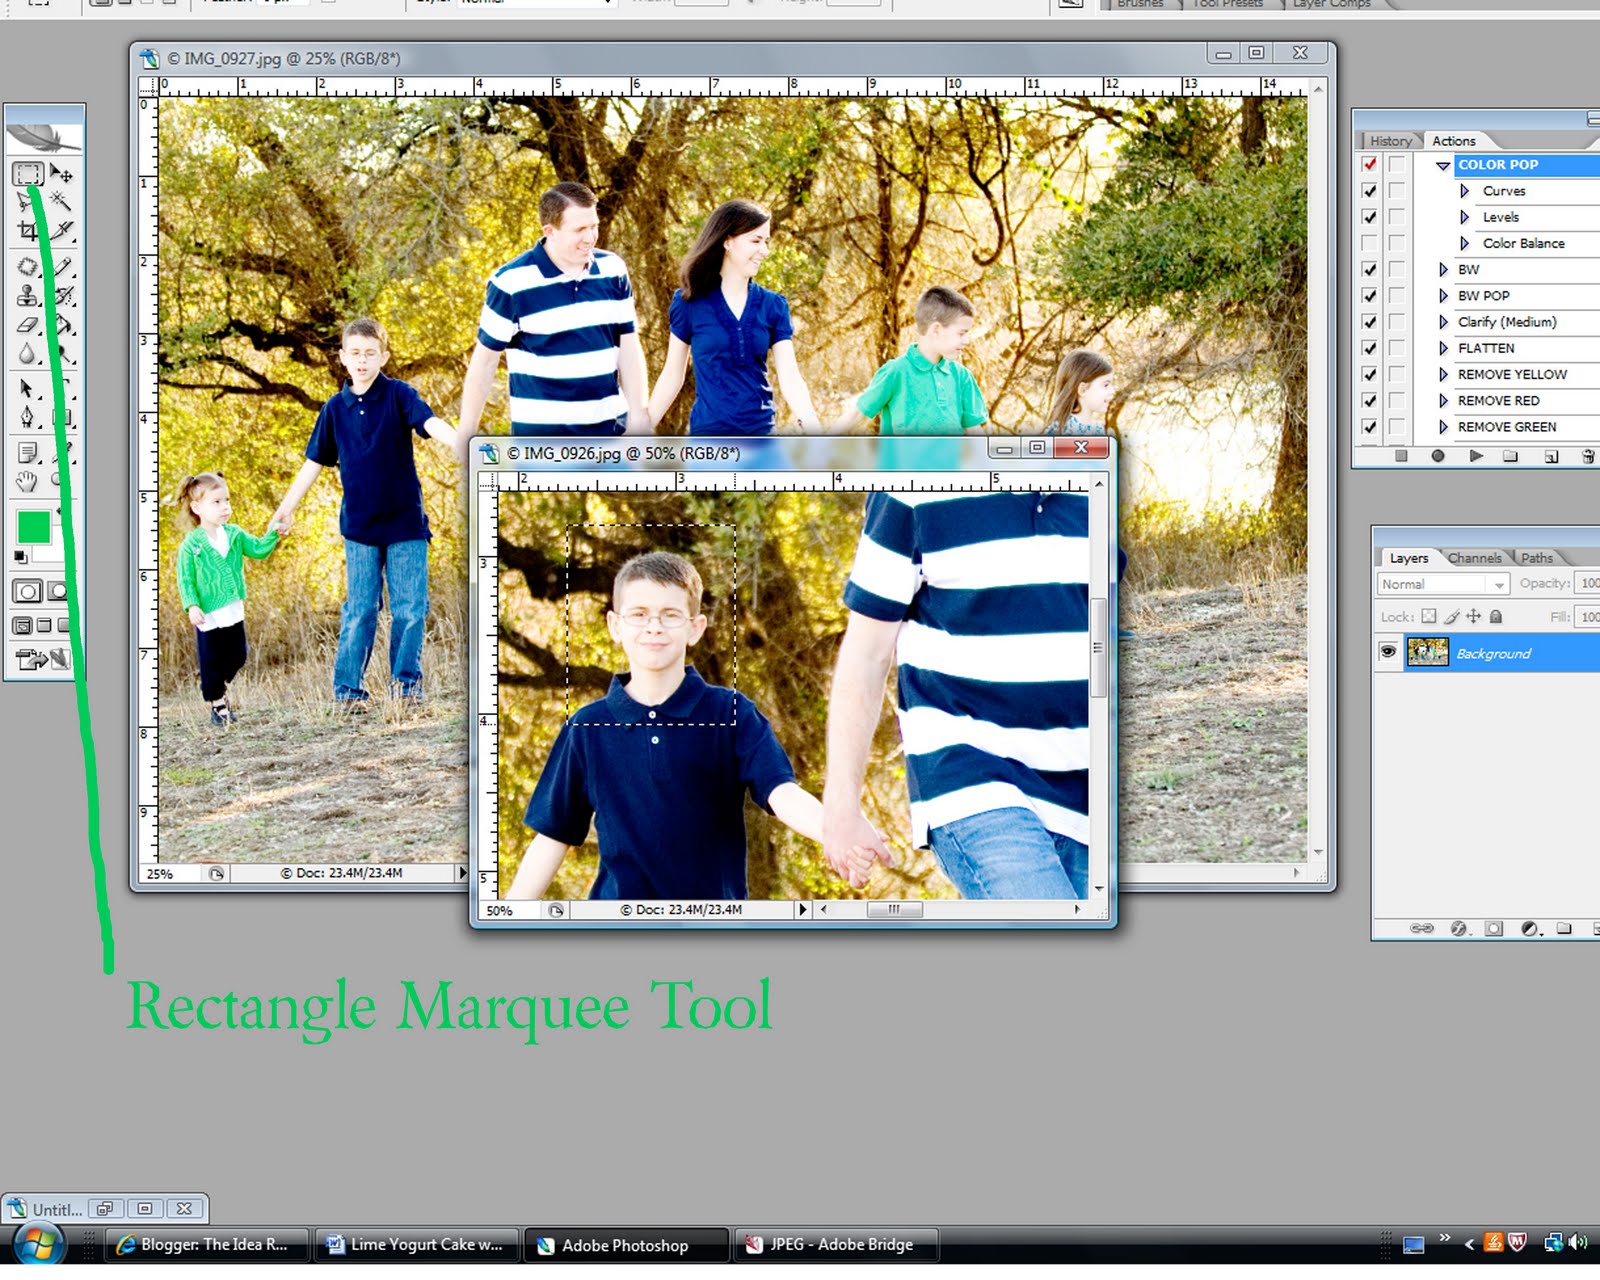
As with most things photoshop, there are several ways to do this but this is how I do it. Image below, I will swap the head of the boy in blue with the image below.

For easier swaps, I used the rectangular marquee tool. It draws a box around the area . This is harder to use with a busier background, but with the tree here, it works. We will just have to clean up the branchy area behind his head.

I hit control T for the square to highlight and drag it over to the “other” head. See below.

After lining up the shoulders the best I can, I hit the rec. marq. tool and it takes out the outline. I can tell if I need to re-shift it at that point. I need to flatten the layers to clean up the edges, so I do that. Layer, flatten. You can see where the edges need to be cleaned.
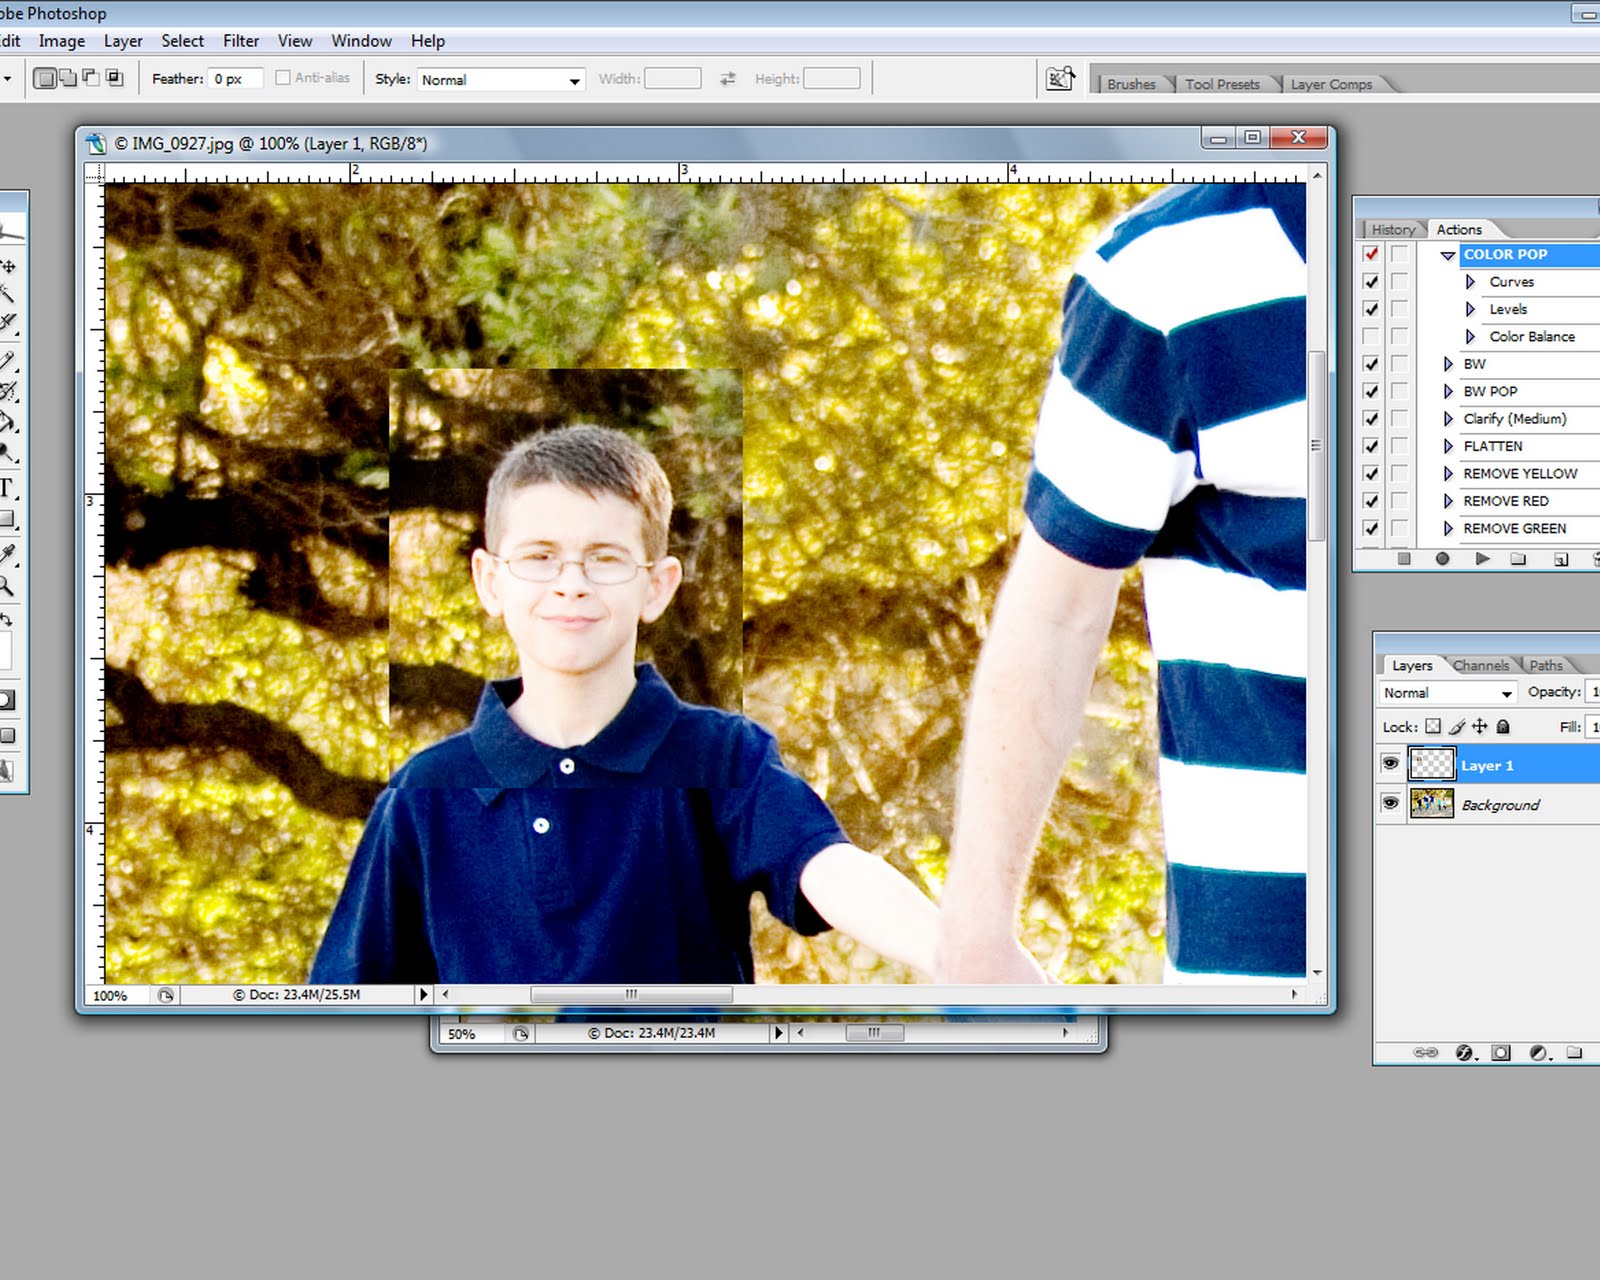

Notice below, its been cleaned up pretty well. Shirt and collar had to be “adjusted” as well.

The magnetic lasso you can get a lot closer edge. You can do right next to the head/skin, but I only use it when the background is really cluttered. Most people probably prefer this, so give it a try, too.

Here is our final image. Turned out pretty well, huh?

Can you tell what item I omitted in the swap? A little mystery find for ya.
Let me know if you have any questions!!!
**Amy here…another great post by Kristen…Here is a button that you can add to your site if you would like. Then when you click on it, you will automatically be re-directed to all of Kristen’s AMAZING and helpful photography tips and tutorials.
<a href="https://www.theidearoom.net/search/label/Kristen%20Duke%20Photography" target="_blank"><img border="0" alt="Photobucket" src="http://i285.photobucket.com/albums/ll45/huntleygang/idearoom/idearoomkristendukebutton.jpg"/></a>JOIN OUR NEWSLETTER
Would you like more Recipes, DIY, Printables and Organization Ideas?
Subscribing to the newsletter will enable us to periodically send you creative content exclusively for Idea Room subscribers.
*View our Privacy Policy here.


his button!
That's great! Thanks for sharing!! I'll have to see if I can tackle this.
Kendra “Domestic Princess in Training”
the 2nd button…
great tutorial!
I've always wanted to learn how to do that. Thanks for sharing. You are so talented!!!
XOXO
Jen
Head Swaps make me nervous! lol.
But this is definitely a great tutorial on it. :) I'm adding your button to my blog, because I've been referring friends that are asking me questions about photography to your series of posts! It's just so great for a beginner. Thank you for putting all together.
Blessings!
-Sarah
kristen,
thanks for the post. i will be practicing this like crazy. also, love the headband you have in your hair – did you make it?
pssst…the little girl on the far left is also switched out.
Wow! Thank you!!! I’ve been wondering how to do this!!!
-CK
Button on his shirt :)