
I wanted to share with you my latest project that I created for my post as a Dare Blogger with the DIY Club. I have never really worked with Styrofoam other than using the styrofoam balls to make the various kissing balls I have shared here with you. So when I received some rectangle sheets of Styrofoam I had to really think out of the box.
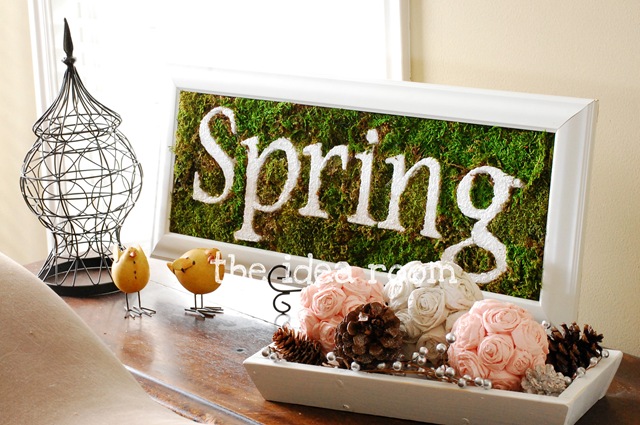
I decided to challenge myself and made this 3-dimensional stryrofoam Spring Sign. I was a bit nervous when I started and was nervous about how it might turn out. But overall, I am really happy with how it turned out. I didn’t realize you could do so many fun things with Styrofoam.
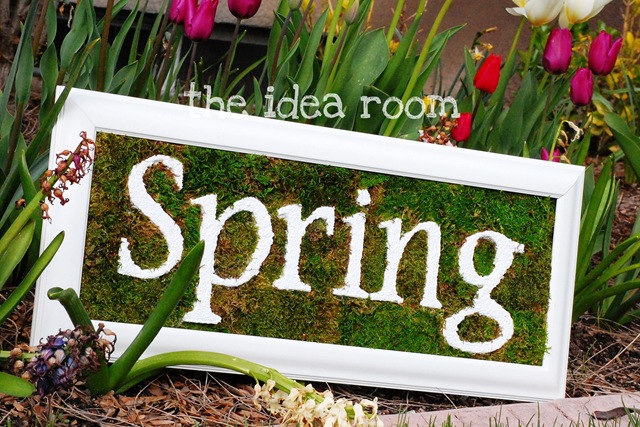
Here is how I made it. First I found a frame that measured 24 inches by 8 inches. I really liked the shape of the frame and thought it was perfect for what I was going to use it for.
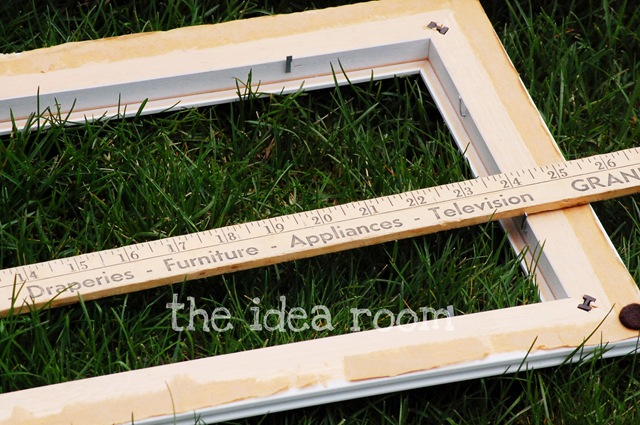
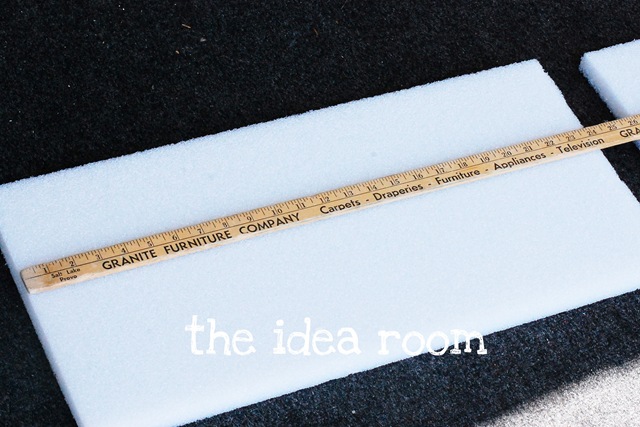
I took a rectangular piece of Styrofoam that originally measured 36 inches in length and cut it down to 24 x 8 inches so that it fit perfectly into the frame. I simply cut it with a box cutter that had a new razor blade in it. It worked like a charm.
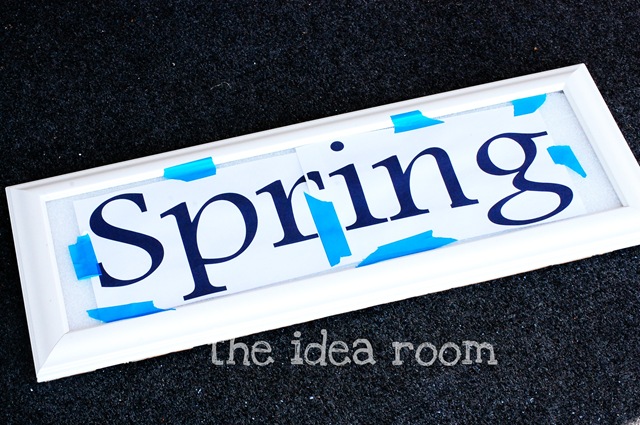
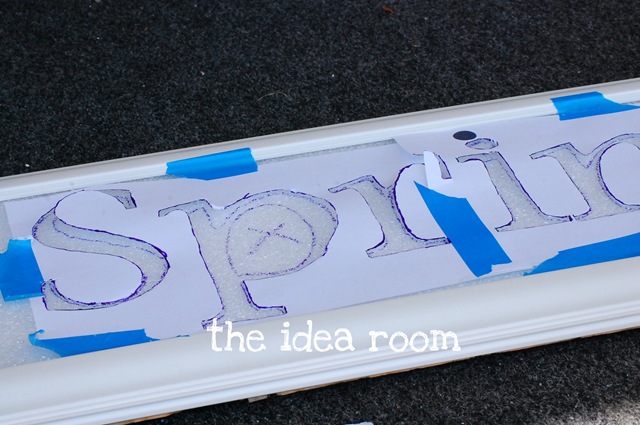
Then on my computer program I measured out the word Spring so that it measured 22 inches by 6 inches. I wanted to have an inch around the entire word. Then I printed it out onto two separate sheets of paper to contain the whole word. Then as you can see below, I taped the word together and centered it in the frame. The Styrofoam is under the word and set into the frame.
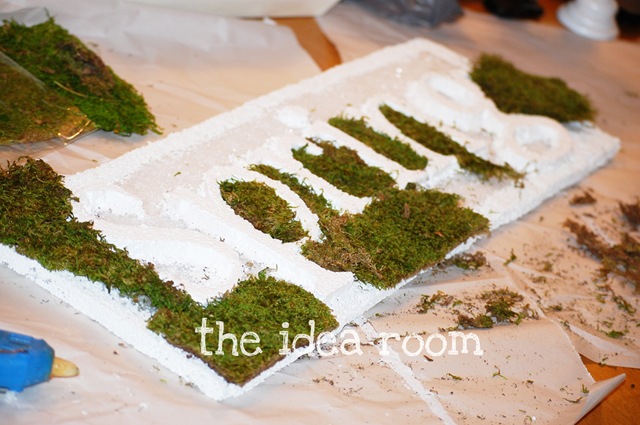
Then taking the box cutter, I cut out each letter. *DO NOT CUT THROUGH THE ENTIRE STYROFOAM!! I only cut down into the middle of the Styrofoam. Then I took a Sharpie marker and traced around the letters so I would know exactly where the letters were when I removed the stencil.
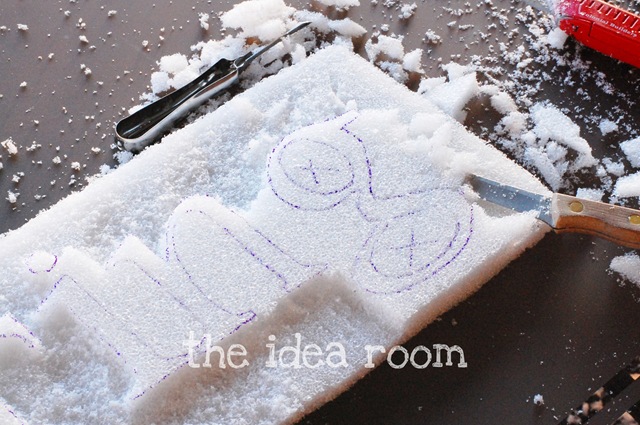
Then I took a sharp kitchen knife and sliced sideways into the Styrofoam. I cut away all of the excess Styrofoam but made sure to leave half of the bottom layer. Does that make sense. When I was close to the letter, I used the box cutter to make more precise cuts so that I did not cut away any of the letter. I put x’s on the insides of the letters where I needed to cut away material so I wouldn’t accidently make a mistake. I found that if I used a vegetable peeler, the tip of it was a perfect tool for scooping away material in the tight small areas!
When all the excess Styrofoam was removed, I took this Magikote from DecoArt and painted the tops and sides of the letters. This will make the surgace hard and will allow you to lightly sand and paint your styrofoam. Isn’t that pretty cool? It soaks up quickly though so make sure you have enough to cover what you are making. I ended up having to do two coats and ended up having to do two coats and ended up having a little less than half of the Magikote left over.
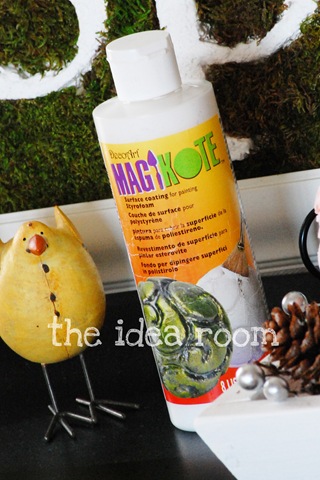
Let the Magikote dry overnight. This is very important!! When it has dried completely, you can paint it with paint. There are some paints that will melt your Styrofoam so be sure to test it on a small piece of scrap Styrofoam to make sure you aren’t going to ruin all your hard work.
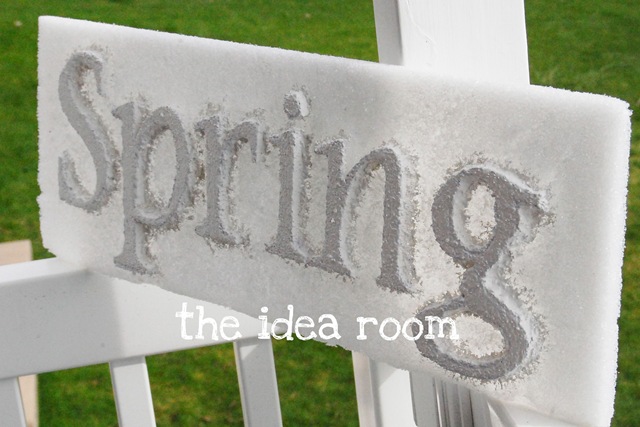
I painted mine white with this Americana acrylic paint by Decoart.
Then after the white paint had dried completely, I took some moss and covered all the areas other than the letters.

I used 1 and 1/4 packages of the moss to cover the entire sign. I glued the moss on with my glue gun and just pieced it together like a puzzle. Pretty easy really!
But really, really messy. This WHOLE project was actually really messy!

But I am really happy with how “springy” this project turned out. Nothing says spring to me like bringing greenery inside after a long dreary winter!
What do you think?

JOIN OUR NEWSLETTER
Would you like more Recipes, DIY, Printables and Organization Ideas?
Subscribing to the newsletter will enable us to periodically send you creative content exclusively for Idea Room subscribers.
*View our Privacy Policy here.


that’s such a great idea! awesome job amy! loving the moss.
I ♥♥ it, it looks awesome :)
Oh I love this! It looks awesome with the moss around the letters.
I love this! I never would have thought of doing that with a slab of styrofoam!
This turned out stunning!
That is gorgeous! You should wrap it in cling wrap before storing it, or you could just bring it to my house. ;)
I think it turned out super awesome!!
What a fantastic idea! I love how you sculpted the letters out of the Styrofoam! It looks wonderful!
xoxo,
Amy
I know you have a website now instead of blog, so maybe it’s different. But how do you make it so you can’t left click on the images to enlarge them and also so you can’t right click on the image to save it?
CUTE! Love it!
That is awesome, I love it!
Your creativity never ceases to amaze me Amy :) What a fantastic project! I’m thinking of all sorts of ways to use it… :)
I love how this turned out, Amy! Adorable! I’m in the middle of a project right now using Magikote. (wish me luck!)
This is a *darling* idea!!! I love it!
I love this idea Amy!! The moss around the letters is so great!
I love it…I would never think about making one I don’t think (not sure I could handle the mess) but I love the look of it…
That came out really nice! You did such a great job on those letters! Thanks tons for the how-to, I’ll be linking.
The moss definitely makes the word “pop.” So pretty! When I saw it this morning, I knew I needed to save this to my site for future refereence. I am featuring this today at somedaycrafts.blogspot.om
I really like the look of your sign! I especially love the moss, what a fantastic idea! I’m sure I’ll be re-creating one of these for my home. Thanks for the inspiration. :)
What patience! This turned out fantastic! Visiting from Someday Crafts!
What a great idea to use a packing material that I seem to get every couple months or so.
It looks great! I would have never thought about Styrofoam. I’d love for you to link this and any other projects you have at DIY Thrifty Thursday @ http://www.thrifty101.blogspot.com
~Michelle
Beautiful! I never would have thought of such a thing. I love it!
Adorable! I’ve been wanting to do a project with moss…I pass by it everytime I’m at Joanne’s, but I’m not brave enough to handle that mess yet! haha!
that looks REALLY cool!
love this so much!
You just took Styrofoam to a whole new awesome level. The frame really sets it off. Yeah for Spring!
This is fabulous work and original idea. I’m happy to found your site. Hugs from Europe.
Such a cool idea. You did a great job! Looks like something I could buy in HomeGoods : )
This turned out great. Reminds me of those really big lawn displays with the flowers making up the letters. Very spring-like and very pretty.
That is an awesome idea!!!
Wow! Great job! That is a really nice idea for additional decorations for the house without breaking the bank. Thanks!
I Love this idea! I’ve been looking for a couple of fun idea’s for the guest bedroom and this is great! I’m also going to put this in the cue to share with my readers! Thanks so much for sharing such a simple and fun idea!
I love this! What a great idea! I featured you as one of my five favorite finds for the week on my blog. Check it out and pick up a button if you’d like! Thanks for sharing this awesome project!
http://copy-cat-crafter.blogspot.com/2011/05/five-favorite-finds_14.html
You are such a genius, Amy! I love this!!
This is so inspiring. Thanks for sharing! Stop by anytime and show off your projects @ http://stirizsisters.blogspot.com/search/label/Link%20Party
I think this is such a great idea! Thanks for sharing. By the way, I love the metal birdcage/sculpture in the first photo. Do you mind sharing where you got it?
I love your sign. It turned out beautiful. However, I don’t think I will try the carving of the styrofoam. I don’t think my hand would be steady enough and would probably cut thru too deep.
Maybe I will paint some chipboard or wooden letters instead and then put the moss around them.
Thanks for the great tutorial, as always.
Have a Blessed Easter.
I love this idea so much!!! I want to make one for every season and hang it in my foyer. Any ideas for other seasons, I am far from creative.
I love your blog and all of your links to other bloggers. You are inspiring me to add more decorations to my home.
What font did you use?
Also what size font
Absolutely gorgeous. You really know how to put a beautiful ideas, thanks for sharing it with us :)
This is such a neat idea! I really like how you used the moss! I’ve featured it in a First Day of Spring Roundup at http://rchreviews.blogspot.com/2014/03/14-ways-to-celebrate-spring-equinox-2014.html.
Thank you so much for the feature! I will head on over to check it out!