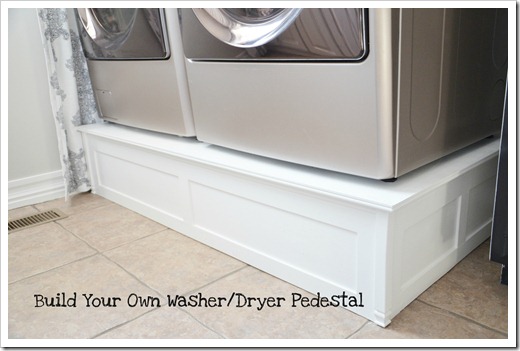
Back in October my husband and I decided to finally build a washer and dryer platform (pedestal) for our front loading washer and dryer. When we initially go them we decided against purchasing the matching pedestals that came with them because they didn’t quite fit into the space we had and we didn’t want to move the cabinets above them up. So we decided we would plan to build our own. A year later, we finally got around to it.
And then I decided to finally repaint the laundry room with a cleaner feeling, fresh coat of paint. Want to see what the laundry room looked like before? You can see the before pictures on this older Laundry Room post. We made a few more changes in here that I will share with you later.
Before
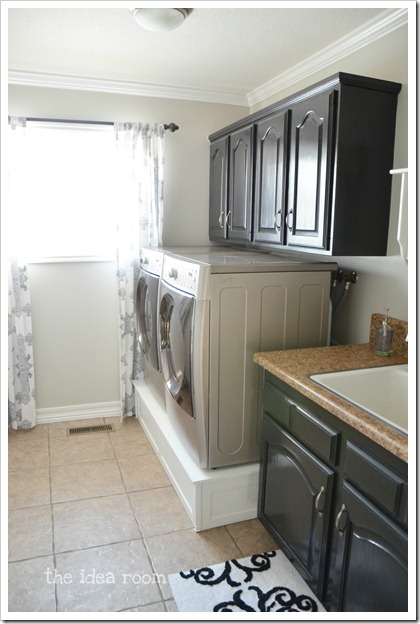
After
Here is how we made our pedestal. You can make one similar to ours but remember to make sure to get your measurements and adjust them for your particular washer and dryer and room constraints. We used the following items:
Three 8 foot long 2 x 10’s
One 4 foot x 8 foot piece of 3/4 inch plywood
Decorative molding
1/4 inch MDF board cut into 2 inch strips
2 pieces of decorative corner molding (located in the molding aisle at Lowe’s)
First we measured the width and depth of our washer and dryer and then added two inches to each length so the completed pedestal would have one inch of excess on the front and each side of the machines.
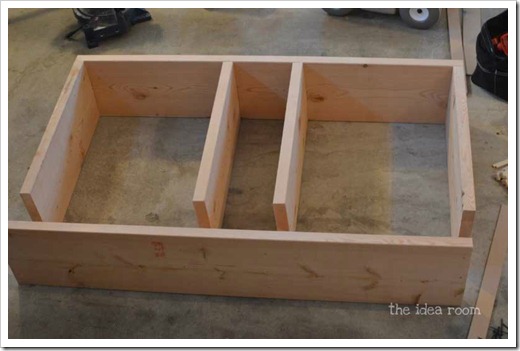
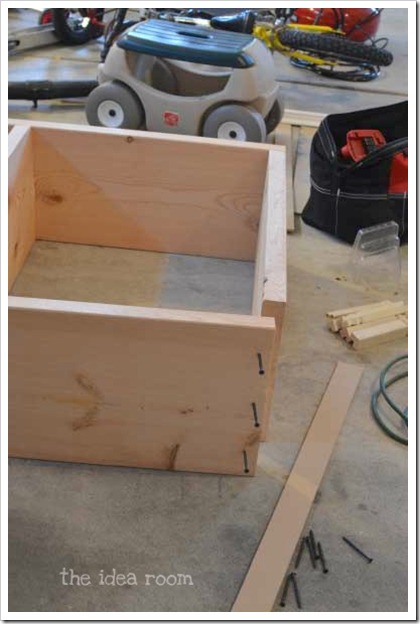
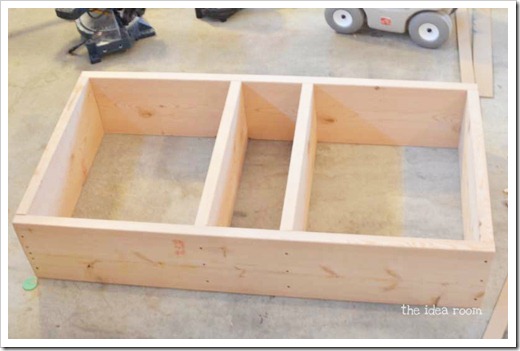
We wanted our pedestal to be a height of 12 inches so we used 2×10’s as our main construction. We made a rectangle with the 2×10’s and then added two more cross beams close to middle to support the middle of the pedestal. We tried to place these so that they sat under the feet of our washer and dryer to add additional support.
We drilled pilot holes for the screws so that the wood would not split at the ends. We used screws to make the rectangle and then to attach the two middle supports.
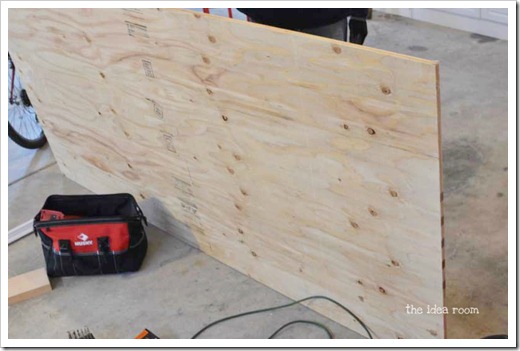
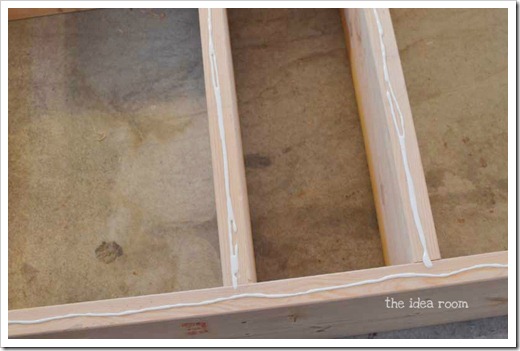
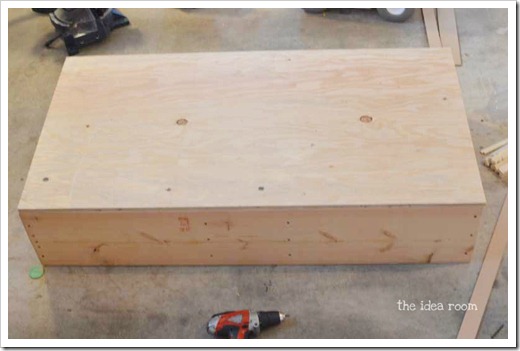
To attach the plywood top which you will have cut to fit your rectangle exactly, take some wood glue (we love Gorilla Wood Glue) and add it to all the tops of your base.
We used some finishing nails around the top edges of the frame where the cross support beams were and along the sides and front to provide a tight fit and seal for the glue to hold it all together.
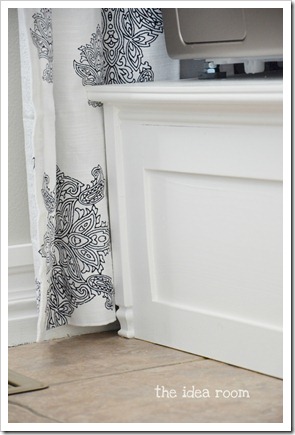
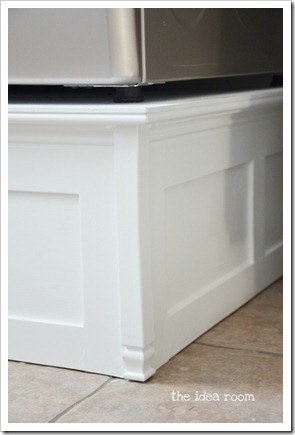
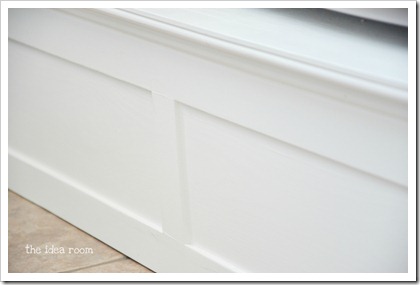
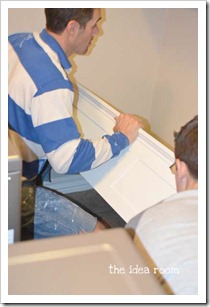
Then we cut and attached some 2 inch strips of MDF board around the front and sides to add a little bit of interest and style to the platform.
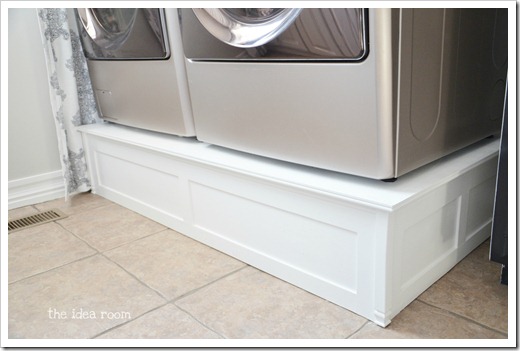
I forgot to take a picture of it in the building process, but you can see where we added it in the pictures below. We also added some decorative corner molding to the two front sides and a 2 inch strip of MDF down the front center of the pedestal too.
Use wood putty and painter’s caulk to fill any and all seams and nail holes. Let the putty dry and then completely sand all edges and surfaces until smooth. We primed it with Kilz Primer and then finally painted it with two coats of our favorite white semi-gloss paint.
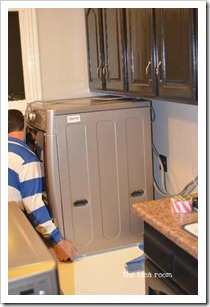
The hard part was maneuvering it into place because it was such a beast. But we managed. Then to get the washer and dryer onto it without damaging it, we placed the washer and dryer onto a towel on top of the pedestal. This allowed us to push them back without scratching the top. Then we simply tilted the machines and pulled the towel out from under it. We decided against adding some storage space in our pedestal simply because we are fortunate enough to have a room with plenty of storage. So adding drawers or cubby holes could be an option if you need more storage space. Phew! I hope I explained that well enough for you to understand. Please leave a comment if you need further clarification and I will be happy to try and answer your questions.
(*Hubs looking good in his painting/work clothes…same reason I am NOT pictured…ha ha!) It turned out pretty nicely don’t you think? And…it is a solid piece of furniture. I have to admit…I was a bit worried about the amount of weight it would be required to hold and withstand….but it is completely solid. And the machines don’t move at all when they are both running.
I can’t wait to share the other small changes we made to this room and will share the full reveal here soon! Okay…Now I have a question for you…we are debating whether or not to keep the cabinets black or to paint them white? What do you think?
Linking up here: Somewhat Simple, Tidy Mom
JOIN OUR NEWSLETTER
Would you like more Recipes, DIY, Printables and Organization Ideas?
Subscribing to the newsletter will enable us to periodically send you creative content exclusively for Idea Room subscribers.
*View our Privacy Policy here.





Oh I love it! SO much better than paying the extra 20o bucks they charge for the pedestals at the store! But I do love the dark cabinets the way they are!
I absolutely agree. Thanks so much for your comment.
Love your washer/dryer pedestal!! My husband is concerned about the washer ‘wiggling’ off. It doesn’t ‘walk’ across the floor when it spins but it isn’t still either. Did you anchor them down in any way?
Hi Amy – – I LOVE LOVE LOVE the pedestal!!! I have looked at many different DIY pedestals but once I saw yours I knew it was the one….my question is the top of it….it looks like you put the decorative molding around the edge of the top so that it is flush with the piece of plywood you put on for the top…yet in the after picture it looks like there is another board on top of that molding…. How did you do the top???
I forgot to add that I am very new at this …so I need more specific instructions lol lol
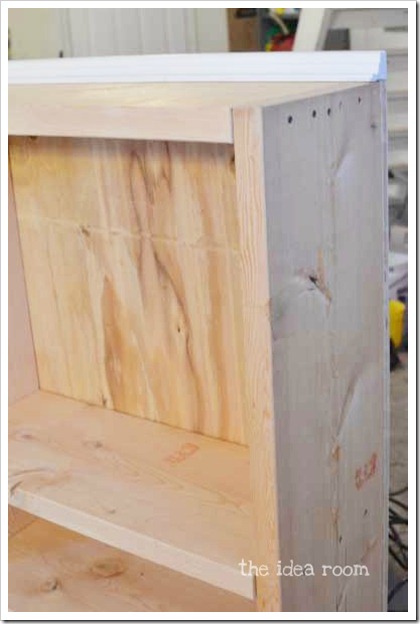
No Problem Mary. You are right. There is a piece of decorative trim molding around the top edge. We basically built a box frame and then added strips of flat straight mdf boards. Then on the top we put a small quarter round molding. We just glued it and nailed it around the top edges. Does that make more sense?
aaaahhh Yes …that does make sense!!! from the picture it kinda looked like crown moulding. I cannot wait to get started on mine!! Thank you so much for replying to me:)
But does it move across the floor at all when the washer/dryer are on or is it pretty sturdy?
I love that you made your own platform. Such a money saver! And the new color in the laundry room looks great. I think I’d love to see the cabinets white.
Saving money is always a great option. Those pedestals are pricey!
Did they mount or attach the box to the floor or does it float??
Dg
I love what you’ve done so far with the laundry. I definately think the cabinets should be white. It will make the room look so much bigger.
Here is a pin which shows white cabinets off beautifully.
http://pinterest.com/pin/71494712803994319/
That is really pretty! I do love that look! Thanks for weighing in Amanda!
I like the black. It provides a fun balance between the gray and white from the walls, the pedestal, the curtains, etc.
You will be glad you did if you can find the time. That is always the hard part!
I like the contrast of the dark cabinets! Love the platform, it’s on my to do list!
Love the platform! And I like the contrast of the black and white!
Thanks Jennifer!
Please, please, please, can you and your husband come over and make some for us???? please… :)
haha! I am sure he would love that ;)! Wouldn’t that be fun? The men could work and we could craft!
I love it! It’s been a year and we haven’t made any platforms for ours either! LOL I am bookmarking this page for future reference. Love your new laundry room too!!! Can’t wait to see the other changes…love following your blog.~
Thanks Audrey. Hopefully you can make some now for yours if you want. And thanks for following along. I really do appreciate all of you out there!
I think a gray/silver color similar to the washer and dryer would look really cool. That way there’s not so so much white, but there still not as stark a contrast with the other areas. And it would blend with the curtain really well. I love this! Wish I had a laundry room that size! Great job!!
Thanks Jenny. Ohhh….gray cabinets would be fun too…hmmmm!
Thank you SO much for posting this tutorial! I have had my washer and dryer for about 8 years and did not buy the pedestals at the time. I have regretted it ever since. I have looked into buying them but my set is a pewter color and they no longer make that color. I just saw a similar idea about the wooden ones on Pinterest and was just telling my husband this past weekend that I want him to help me make some. I am dying to revamp my laundry room this winter. This tutorial will make it SO much easier! Thanks again for sharing!
Thanks for sharing that. It makes it worth it even if it helps just one person. Glad you will be able to use it. Feel free to ask any more questions as you get going if needed. I would love to see it as well!
Amy, I so blown away by how you take matters like your washer/dryer platform into your own hands. Our magazine, Country Woman, would love to share a bit about your just-won’t-quit creativity and crafts with our readers. I’d love it if you could get back to me so we could chat about the possibility. Everyone should know about The Idea Room!
Awww…thanks so much. Let’s chat about it. I would love to be involved with you as well. You are too kind.
Amy, We’re very excited that you are interested in being a “Blogger in the Spotlight” on our Country Woman website.I have e-mailed you information about what it’s all about. After reviewing it, please let me know if we can set things in motion. You can contact me at [email protected]; or 414-423-3764. I’ll be eager to hear from you!
Wow, you make doing laundry look like fun! I would want to spend all day in that laundry room. I love the contrast between the pedestal and your appliances and cabinets. I can’t wait to see the final reveal!
Thanks Kristi…by the way…the laundry is not any more fun :) and it still piles up in there!
I love this idea! The pedestals you can buy are so expensive and don’t look as good as the one you built! My vote for the cabinets is to keep them black. I like the contrast with your new paint color.
Those pedestals are really expensive. This was a better alternative for us too.
I love the contrast of the light walls/floor/curtains and the black cabinets. If it were me i would paint the pedestal black as well to match. I think it looks odd being the only one that is white, and i think the room would be a little too vanilla if the cabinets were all white.
Yeah…we debated about painting it black. White won out as I am trying to lighten the feel of my entire house…but didn’t know if I could do all white.
Keep the black cabinets! I love the color of the walls with the white trim and I think the pop of darker color on the cabinets, which coordinates with the curtains and the rug pulls it all together and makes it interesting. Nice job!
Thanks Lisa! Glad to hear you like it.
Love the pedestals. We made some too when we got our new washer and dryer…the only difference is we put drawers in them so we had extra storage in the laundry room. They are holding up great…we’ve had them for about 2 years now!
Charmaine
Good to know! I was a bit worried about how well they would hold up. But after having it for 6 weeks I no longer worry about it. Glad to know 2 years later yours is still great.
The black cabinets look fantastic, and are finished. Why exactly would you want to paint them white? ;)
Do you have a tutorial on how you painted the cabinets? That is on my to-do list. (And now the pedestal is too!)
I know right? Because I have a problem ;) haha! I do have a tutorial coming for painting the cabinets. Hopefully next week time frame!
Amy, you amaze me again!! Looks fantastic! Keep the dark cabinets! I love them!
Thanks Connie! You are too kind!
Painting them white would make the room look to bland and stark. Leave them black or paint them another dark colour .
Thanks Andrea…definitely don’t want a bland look! I also need to get a fun accent color in there. Still thinking about that one!
I love the look of your laundry room. I know it’s wrong to covet, but I can’t help myself. I love the black cabinets; I think you should keep them.
Thanks Ashleigh…just some elbow grease and paint ;)
Love the black! :)
;)
Looks fantastic – great idea!! I like the look with the black cabinets but I really think that if they were painted white it would look awesome!! Wish my laundry room looked like yours!
Thanks Michele!
Looks great! Love the decorative detailing on the pedestal! Your cabs look great, too! Thanks for sharing.
Thanks so much for your sweet comment. We had to prettify it a little bit ;)
Could you have put storage in there, do you think? I love that but would love it even more if I could store stuff in there. I don’t have a room, just a closet.
We talked about making space for some baskets underneath or drawers when we were planning it out…but in the end decided against it. We are lucky though as that room has two closets and some lockers…so storage space was not an issue for us. But you could definitely design one to fit your storage needs.
Love the black! And the white pedestal blends with your baseboards. Personally, I think everything is perfect. But …. can kitty still get into her “room”? That was one of the most clever ideas I have ever heard of and definitely need to somehow incorporate in my home! Looks like you blocked it off now?
We made sure that the cat still had room to get into the cabinet through the cat door. It is a little bit tighter squeeze but he can still get in there. That was an important item for me. Wanted to still hide evidence of being a cat owner ;)
great idea! i actually think the cupboards would look better white… just my opinion!
Thanks Shari! I think they would look great in white too.
Look at that fancy laundry room. I probably wouldn’t mind doing laundry if mine was this pretty. Love that you painted the cabinets dark too.
Thanks Andrea. I am really loving the changes too.
I love the pedestal!!! Paint them White it make the room look brighter and bigger!!
Thanks Manuel! I do love white!
I love the pedestal link…I’m always thinking more storage, so I think when we do this I’m going to insert drawers! I could keep extra supplies for when I really stock up on items like dryer sheets, or extra dryer balls. Might solve the problem of where to keep all the rags! As far as black and white cabinets. Love them both, but I know I’m going with black for our laundry room. I guess having white appliances right now, the dust on the machines drives me crazy…maybe the black would help. I also worry about shoe marks, as ours will serve as a mud room as well. With your current wall color, I defintely would keep the contrast with the dark cabinets. I think I may paint our well an aqua color (pale) to help the cabinets stand out as well. Nice work!
Thanks Kirsti. I agree the dust bothers me too when I can see it. The black shows water spots and dust as well. It is a never ending battle. Aqua sounds so great. Fun way to add some color.
If it were mine then I would do white but go with what you like the best! No one else has to live with it!
Thanks for your input! I do love the fresh clean look of white. If only I could see it all done without actually having to do it first to see what it will really look like!
What I want to know (because we don’t have front loading units) is how you painted your cabinets to look sooo good!?
Christina–I actually do have a tutorial coming to share with you how we painted our Master Bathroom cabinets recently. We followed the same process as when we painted out laundry room cabinets. So stay tuned for that. We have had our laundry room cabinets painted for a year and a half and they still have held up very nicely…and that room gets some serious use as it doubles as the kids main entry and mud room.
I’d love for you to come link this up at my Tuesday Time Out Party!
http://www.reasonstoskipthehousework.com/2012/01/tuesday-time-out-110.html#.TwzHupjlyGc
Smiles,
Melanie
Reasons To Skip The Housework {The Blog}
Tinker B Boutique {The Shop}
The first thing I noticed was the black cabinets. They are perfect just the way the are I think. But then again it is you living with it so do what you like. You obviously have great taste.
Thanks Kristy. You are right. I do have to be the one to live with them. I do love the black cabinets too.
We needed this! THANKYOU!
Your Welcome Chelita! So glad you will be able to use it.
I think the black brings out the color in the washer and dryer. It looks good.
Thanks Ashley! I am partial to the black as well…:)
I like the black..it looks good, the entire room looks Fantastic! But..if it were me, I’d paint them white to not only brighten the room but white matches the pedestal and the sink. Brilliant post!
Thanks Jessica. That it my dilemna. I like matching too…I will be sharing more pictures on Friday of the other side of the laundry room and it will help you see my dilemna more. Thanks so much for stopping by.
I like the black too! Awesome laundry room..
Where can I get that curtain and rug? I am a big fan of black & white combination.
Thanks.
I got both at Target :)!! Thanks Selvi!
Paint the pedestal black!
I love your creativity and the wonderful way you lay out the instructions with step by step pictures! Love the black, for sure! Thanks for the idea!
It looks GREAT! I like the black cabinets the way they are.
I like the contrast of the dark cabinets. I love this idea! We didn’t buy the pedestals last year when we bought our front load washer & dryer last year because of cost & they wouldn’t fit. Our washer & dryer are in a closet in our kitchen with cabinets above, unfortunately our cabinets are quite a bit deeper than yours & we have little counter or cupboard space in our kitchen so the top of the washer dryer get used as counter/storage, so I’m not even sure if this would work, I’ll have to think about it. We did find a great deal at a clearance center on the center storage unit that fits between the washer & dryer, it doesn’t match our set but it coordinates well. Great job, I wish I had a laundry room!
This is fantastic! I think I want to do this when we re do the floor in our laundry room!
While manufacturers sell pedestals (and despite how great these look), it’s not what is best for your washer and dryer. A washer (especially) and dryer are meant to be on a solid floor with a drain. Anything other than that can cause problems.
If done right, this essentially is a solid floor; It’s built the same way as a floor. The problem with this particular design (though I’m sure it’ll hold up fine) is that the distance between the outer and inner “joists” is more than is specified for a floor. However, it is also over a very short span and holding a relatively light load (compared to what a floor has to hold). I decided on this build style for mine because of how sturdy it would be, only I ran two center supports lengthwise, resulting in a joist span considerably smaller than what’s used for a floor, meaning it is extreme overkill, not to mention the four layers of 1/2″ OSB on top of it (a 4′ x 8′ plywood/OSB can just exactly make two layers for a 3′ x 5′ pedestal, and I used two sheets with 2×12’s to make the pedestal 13.25″ tall). It is HEAVY though. I then covered it with self-adhesive linoleum tile, since I wanted it to look nice but didn’t have the time or care to make it look really nice, then put a 3×5 rug on it to keep the washer from walking around. I also didn’t bother with glue, just screwed everything together and sunk the screws slightly past flush so they wouldn’t interfere with the tile.
Another benefit to this, if your dryer exhausts out of the house higher up, is that you can eliminate ~1′ length of exhaust, which every bit helps. One thing you want to be sure you don’t do is raise the dryer on a platform and have the exhaust going down then back up. This will cause it to build up a lot of lint. Mine entered the wall near the floor, so I removed a section of drywall, cut the PVC pipe that’s in the wall a few feet up, and fed it through a new hole so now it comes out and goes down to the dryer at a 45 degree angle, reducing the length of the run and eliminating what would have been a U-turn. Also, Amy, I noticed you guys are using a flex conduit. Those are bad as they cause turbulence which slows down the airflow and leads to lint buildup in the exhaust. You should only use them if absolutely necessary and only the bare minimum length needed. And keep your 90 degree turns to a minimum as well. The dryer manual has a section on all this, which most people almost certainly don’t read, evidenced by the amount of fires caused by this.
I really like the black cabinets with white pedestal. I was wondering…can you post what color black you used? I’m having a hard time choosing between all the blacks…
I like the idea of the platform. We bought matching pedestals with our washer & dryer. Recently my washer broke, and now I’m trying to decide if I will buy another set or just a washer (when I have the extra money, of course – I was lucky enough that my dad gave me his old washer as he was moving into a condo and didn’t need it) But then I started to wonder if I got a new washer/dryer if the pedestals would fit. Well, time will tell!
Looks great! The before and after pics are like a totally different room. My friend and I started a laundry service from our homes a few years ago. When we started we decided that we should probably upgrade our washers and dryers. I like you did not want to pay the extra $200+ for the ones that came with the set. I think you may have just added a project to my husbands honey do list ;) Thanks for the post!
http://www.laundrycare.biz/cleveland-ohio-laundry-service/
My husband built stands for our Washer/Dryer but they are open so that I can store my laundry baskets underneath the stands. I do not have a lot of room in my laundry room so this was a perfect solution. Love Love Love them and it saved a lot of money not having to buy the stands. He was afraid the vibration they would “walk off” the stand, so on top of the stand, we bought 3/4 inch horse stall mats to cushion the vibration and then sat the washer/dryer on them. It did the trick! You can buy it for about $30 bucks at like Orschelins or Tractor Supply or anyplace that sells horse supplies.
Oh Glenda…thanks for sharing that. Sounds like it is perfect for you guys. I love the tip about adding the horse stall mats. Great idea. I will definitely keep that in mind. I don’t worry about the vibrations…yet. Our machines stay really still while operating. But as they get older that could become a concern. Thank you!
Think that worried me is getting behind them when they need service
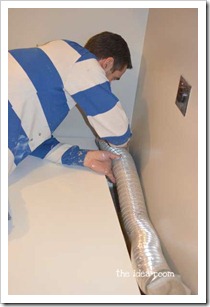
I noticed the picture of you husband routing the dryer vent along behind the pedestal… is your laundry room set up so that the dryer hookups are on the left, and the washer hookups are on the right?
Our is!!! Until we got front-loading machines, this wasn’t a problem. In fact, our house is only 7 years old, and our builder says the dryer/left, washer/right setup is the standard layout. However, when we got the front-loading machines, we discovered the washer HAD to go on the left due to the unchangeable door swing on the washer. So, we found a flat telescoping dryer duct at our home improvemnt store to solve the problem.
Just thought it was interesting someone else had the same ‘problem’!
I was going to use that but it wasn’t long enough even fully telescoped. Just make sure you (aluminum) tape the seams and any spots that aren’t fully sealed. Not a bad idea to tape over sharp spots, too.
A Home Depot employee told us that building your own pedestals would void the warranty of the washer and dryer. Don’t know if that’s true with every manufacturer, but something to check out for sure :)
Your updated laundry room looks fabulous! I love the contrast with the black cabinets.
I think it’s fabulous. The hubs and I have being discussing adding a platform to ours too and I really like your design. I like the black and white, nice contrast. I would suggest maybe changing the countertop color. Lowe’s and Home Depot sell kits.
My uncle made one similar but left the front open to slide laundry baskets underneath, would probably have to be taller but was the same idea.
I vote for keeping them black! They look wonderful! Nice work and great improvements!
Amy,
Wow, such a clean look! We just purchased new FL machines and I’m heading to the hardware store in the AM to get supplies. So easy and quick to do, I can tackle this one on my own! My husband wanted to buy the pedestals, the want $199 each for them. No way! Being the handy person of the house I can’t think of spending almost half of what my machines cost for drawers for them to sit on. I can’t thank you enough for posting this tutorial. I wish I had the time to blog, I admire you ladies (and men).
As for you cabinets, I can see you probably were thinking of doing the white when painting the pedestals, they say a gray brown is the new black. A dark color anchors a room and it would look nice with the new counter top. (I can’t find your blog on that yet…you how to paint a counter top)
BTW, I’m in love with the color of the laundry room, can you please share the color number/brand paint you used?
The paint color is called Revere Pewter by Benjamin Moore and it is one of my favorites!!
I and my husband built this for our front-load washer/dryer set and its beautiful. i cant believe how great it looks. everyone whose seen it thinks its a furniture piece we went out and bought. they can believe we’ve actually built it ourselves and its easy with your direction. we had to change some of the measurements because of the size of our washer/dryer set. so we had to take and give a little and tweak the measurements for our specific make and model washer/dryer set. the day our front load washer/dryer set was delivered. the delivery man ask where did we want the washer/dryer . he followed me to my laundry room when he saw the pedestal. he was amazed at the pedestal. he stood on it to see its strength. he ask me how did i make it and what type and sizes of wood he needed to build one for his front load washer/dryer . i told him….WWW.ideal room.net……thanks a lot for your pedestal ideals you save me $500.00 bucks for the actually front-load pedestal that are sold separately for my washer/dryer.
I am so glad to hear that you are loving it!!! Thanks for sharing that with us!
Is your base pushed up against the back wall or did you leave a space for the dryer vent hose thingie? I’m wanting to make one of these (yours is GORGEOUS) but I’m not sure how to work around all of the stuff behind the washer and dryer…
We did leave room behind the machines and the pedestal for our dryer vent. The one we have is fairly flexible. We also left room for it on the side by the window where the outdoor wall vent is as well. You will definitely want to take all of that needed space into account when building your pedestals.
I must be doing something wrong . . . my husband and I were so excited about the prospect of having a beautiful pedistal like yours in our laundry room that we got started on it right away. And right away, we ran into problems. We wanted our pedistal a little taller than yours, so we decided to make it out of 2×12 boards. Well, when we made the frame, none of the boards appeared to be the same height. So, we weren’t able to build a box that would be flat on both the top and bottom. Frustrating, but we thought we found a way to work around it. Then, our local Home Depot (and Lowes) don’t have any corner moulding (well, they did have one option, but it was just a rounded corner and not the look that we were going for). Then, no 1/4″ MDF (just 1/2″). Ugh! Anyway, we fudged a little here and there and ended up with something that I hoped would be acceptable — not the gorgeous pedistal of my dreams, but hopefully at least functional. Then, the filling and sanding began. I am now on my FIFTH trial of filling and sanding and I still can’t manage to get everything smooth. From your pictures, it looks like the face of your pedistal is completely smooth. Did you just manage to get really great lumber, or did you do a million “filling and sandings” also. I have knots that feel like I have got them okay, but then when I prime it, you can still see notches and tiny holes and stuff. FRUSTRATING! Any suggestions? Also, did I read someone else’s posting correctly that you added an mdf “edge” around the top edge of the pedistal (sitting on top of the whole structure)? I know this is a seriously annoying comment, but any help or suggestions you could give me would be great!
I also used 2×12’s to get some extra height, and even though it is pretty good lumber, I had some issues getting the tops and bottoms to line up. Not sure if the cause of this for you is the same, but for me it was that my tile floor in the laundry room is not flat and level. I ended up having to stand it up in various orientations and clamp it to line up the tops and bottoms of the two pieces I was screwing together. Of course, by the time I figured this out I had a couple pieces that were already together and a little off, but I just left them. Once the frame was done, it would rock on the floor a little, but with the OSB on the top and felt pads on the bottom, it was rock solid, completely stable. With the weight of the washer and dryer, it will only be better. I’m sure by now you’re done with it, but if not, and to any others with the same problem, my advice would be to check if clamping helps, and if not either get better wood or just go with it as long as it’s fairly close and let the plywood/OSB, felt pads, and the weight of the machines even things out for you.
THANK YOU for this project and the steps to make the w/d platform.
I have priced these metal indivdual platforms and they are outrageously expensive. And, I did not like that they were metal — might rust.
Now I can barter for carpentry skills and get my laundry room finished.
THANK YOU!
I love this idea. i hate how the pedestals that are made for the machines with the drawers look. this is actually exactly what I’ve been looking for. thank you so much for the idea. :)
Can you please send me a couple close-up pics of the top trim of the pedestal? I need to see how exactly you installed the pieces and what pieces went on first. Thank you so much!
I’m sorry if you mentioned it somewhere and I missed it, but approximately how much did this cost to make? Thank you
I did mine a little different (see above comments), but my cost was a little over $100 for the wood (2×12’s vs 2×10’s, so ~$14 more for that and two sheets of 4x8x1/2 OSB), screws, linoleum self-adhesive tiles, mat, and felt pads. For about 1/4 the cost of the pedestals, and considering it can be used with any washer and dryer and actually provides a little more height than they do, and is probably more stable, I consider it well worth it.
Love the platform! Did you or have you had issues or difficulty when connecting the machines in the back. Seems like it could be difficult without being able to slide them out? Thanks for sharing your laundry room, it’s beautiful! (I love the black cabinets, btw!
This is such a great idea! We are building a house right now and I can’t wait til it’s a little further along so I can use some of your ideas.
Thanks!
… so, I got here through stumbleupon … can anybody explain me what that thing would be for?
Also: awesome, your washer and drier in the “after” shot look much better than in the “before” shot, and that all just by putting them on a platform ;)
Wow I have been searching online forever this is the best and most detailed for this. I am more worried about moving my washer than anything now. If I wanted to double the highroad what do you think I would need to do?
I think it is a great look. I would have some misgivings though with it being one unit. If it was two separate platforms with wheels attached it would make it a lot easier to move out one of the units if some kind of service had to be done. Just a thought.
Very nice and Cool it`s hard to do just like that but i think i can…
I was wandering how you keep the washing machine in place as it really spins and it may fall off of the pedestal . thanks.
We have not had any problems with our washer or dryer bouncing around or falling off. If you have a washer that tends to bounce I might not put it on the pedestal. The front loaders don’t seem to have as many balance issues as my old top loader did.
Amy,
For over a year, I’ve been searching for a idea how we can build or have built a platform to hold our two Sentry floor safes. To access the safe combinations, we need to get down in the floor on the carpet and it is becomng very difficult for us to get down/up off the floor. I saw your tuitorial for your washer/dryer platform and I think that would work for raising our safes within eye level for us sitting in a chair to work the combinations. Did you use presure treated wood or regular wood? Overall how much did the boards raise your appliances off the floor? I’m going to show these plans of yours to my husband and see what he thinks. I think it would work but I’d like for them to be encased inside what looks like a cabinet with doors. Any suggestions for us? I’ll have to pay somebody to pick up the wood or have Home Depot or Lowes deliver it for us. We sold our truck 2 years ago but guess I could rent a truck from HD. Only trouble with that is somebody may have rented it before me and was a smoker. Can’t stand that odor anymore.
The nearest HD is 1 mile from us, it probably wouldn’t cost a lot for the truck rental if you have to pay for mileage used.
Once we got the platform built, maybe we could find a stock cabinet that we could built onto the platform or is that a stupid idea? What type of paint did you use for your washer/dryer platform?
Ours are in the garage, so I formed up, tied rebar, and poured a bench out of concrete. Much stronger and room for storage under.
Love the project. Keep the cabinets black and paint the pedestal to match. That way you don’t have to worry about scuff marks on the pedestal.
What a great project idea! How much did all the supplies cost for this project? I’d like to get a sense of that. :]
I think the cabinets being dark really balances out the other colors in the room nicely. I feel if the cabinets were white it would be too much white. Ya know? :]
Any idea about how much the materials cost? Love how it looks!
Chrisy, not sure about price. Under 100.00 though. Thank you!
Leave the cabinets black for interest.
What a great job you did!
Jim- Thanks for the suggestion.
Please leave the cabinets black to provide interest.
You did a great job!
Jim-Thank you for your suggestion!
I know this is an older thread so hoping you get this.
We have built our pedestal and it turned out amazing BUT …. we didn’t figure how difficult it would be to get it up on the platform. Could you detail how you did it more. Dryer not so hard but the washer is so heavy. We have a very tight space between custom cabinets. Also how hard was it to hook up? Was the hook up done first are after you placed on the pedestal.
Please help? All this work and it’s sitting in our basement.
Cheri- They are so heavy! We had lots of help lifting them onto the pedestal. We did attach the hoses before placing because it was so tight. The hard part was to get the washer and dryer onto the pedestals without damaging it, we placed the washer and dryer onto a towel on top of the pedestal. This allowed us to push them back without scratching the top. Then we simply tilted the machines and pulled the towel out from under it. Hope this helps. I would love to see pictures of the finished project!