

Pin It
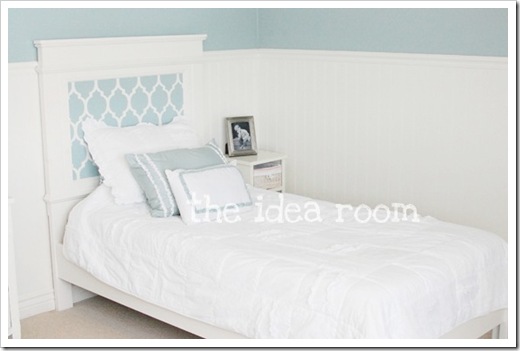
My baby is getting so big and will be outgrowing her toddler bed soon. We have three girls and only two “big girl” beds. We had shopped around and hadn’t found any that we loved that had a price tag to match. When I received my DIY Dare Club sponsor supplies for the month of February…I knew exactly what I would use them to make…a new bed for my oldest daughter!

We primarily used Ana White’s Farmhouse Bed Tutorial, but added our own little twist to go with my daughter’s room decor. Since Ana White obviously writes amazing tutorials, I am not going to rewrite it but will share with you how we used the different Sponsor products I received as part of being a DIY Dare Blogger.

Since the original tutorial was for a queen bed and we wanted to make a twin bed, we adjusted our measurements accordingly. We took a piece of wood and then painted it white and let it dry.

After it was completely dry I used this Casablanca Cutting Edge Stencil to make the pattern that is in the center of the headboard. The stencil is nice and large and is made up of a nice thick plastic. It is really sturdy and I found it very easy to work with.

Then I used some Mythic Paint, color Smooth Waves in high gloss and painted over the stencil onto the previously painted white board.

The paint color really seemed to be true to what I saw on the Mythic website and I was really happy with the color. I was a a bit nervous though because I just picked the color off of their website. Normally, I spend a lot of time comparing tons of paint chips before I can finally choose a paint color.

There was also a little mix up in the original order. I was accidently sent high gloss paint instead of the eggshell. Mythic was really great and quickly sent me out another gallon of the same paint in the correct sheen. It actually worked out perfectly and I was able to use the high gloss paint on the bed and then I painted her bedroom walls with the other gallon of eggshell.

There were a few spots that needed a little bit of touch up where the blue paint got underneath the stencil onto the white paint. So I simply took a small paint brush and touched up the few spots with this DecoArt Stencil paint. It worked like a charm.

Then I cut the board down so that it fit into the outer boards of the headboard frame. Then we added the other moulding on top of the painted board. We had a little help from Rapunzel {from Tangled} who kept trying to sneak in some modeling work in front of the camera.

I was also given some Gorilla Glue for this project. I have actually never used gorilla wood glue before this. I have always used another brand. But I honestly have to say that I really liked this. It really seemed to dry a LOT faster and did not leave yellow marks after it had dried. I think I found my new wood glue.

I ended up using over half the bottle on this entire project but almost every piece of moulding was glued on.

After the glue had dried I primed the headboard. I had pre-painted the trim that sits right next to the stenciled decorative center of the headboard. That way I only had to make a few little touch-ups and did not have to paint anywhere near the center area. SO MUCH EASIER!!

I used this beauty to paint my headboard with along with a small foam roller. Have you ever used a Purdy paint brush? LOVE!! They are so smooth and make painting and cutting so much easier.

I especially love that it has an angled edge. It was perfect for getting into the cracks between the different pieces of moulding.

In the meantime, we built the bed frame and attached the nice boards to the outside and painted it as well.

Then we sprayed the entire bed with the left over Deft Clear Wood Finishing Spray from Rockler to give it a nice protective coating of varnish.

I LOVE, LOVE, LOVE it!

And you want to hear something amazing? We were in TJ Maxx just browsing around one night after the hubs and I had gone out to dinner and I saw these two pillows {the blue one and the white one with the blue ruffle}. I thought they looked very similar to the paint color. And sure enough they were a perfect match! Wahoo! And the price at $12 and $10 was hard to beat! What do you think?
JOIN OUR NEWSLETTER
Would you like more Recipes, DIY, Printables and Organization Ideas?
Subscribing to the newsletter will enable us to periodically send you creative content exclusively for Idea Room subscribers.
*View our Privacy Policy here.


)
You did such an amazing job on this bed, it's just beautiful! The colors are so nice and the stencil is such a nice touch. Love it!
Wow! This is gorgeous. I love how the pillows look with the headboard.
What do I tink? Unbelievably adorable! I love it, the subtle color mixed with the white bedding and walls, so darn pretty. Great job, better than you could buy if you ask me!
That is gorgeous! You did such a beautiful job and I love the stencil. THe pillows look perfect too.
K. You are truely amazing! The decor at the RS bday party was amazing! I need you to come look at my room downstairs. HELP! What a talented adorable girl you are. Love you!
This is stunning!! What a beautiful, classic bed. I love the color, the stencil and the pillows.
This looks beautiful. You did such a great job. My daughter wants me to decorate her room in blue this year so I'll be saving some of your photo's for inspiration.
Thanks,
Sam
Congrats on a great finish. You made it look very easy.
So cool. I love it!
Wow! Great job! It's gorgeous! Your daughter must be thrilled with her big girl bed. Thanks for sharing.
I love the color you chose! How perfect that you found the pillows AFTER picking the color! Great job! Super cute!!
Love it! The pillows look so good on there! I bet the little princess will just love sleeping there!
Absolutely adorable! Ur daughter is very lucky!
Love it!! Love the color, that stencil (was thinking of doing stencil on one wall in living room!), I bet your daughter loves it! So classy looking. Awesome job!
Brilliant, what can I say – any little person would love it and especially if made yourselves which does in fact cut costs. It has a real fresh & airy feel about the whole room and as for the pillows – just great!
A-MAZING!!! I love it too!!! I'm in love with the color as well! Awesome score on the pillows too!
Absolutely beautiful! I love the colors and the detail of the headboard- amazing. All that molding is incredible. Great job- I'm sure your daughter is thrilled with her new room!
xoxo,
Amy
I just found your blog and am your newest follower. This headboard is sensational! Thank you so much for the tutorial and the beautiful project. I'm inspired and envious of your little girl's new digs!
This is amazing Amy you always do a fabulous job!!!
julia
http://www.sweetserendipity23.blogspot.com
The bed is fantastic. I'm inspired now to make some beds for my sons–different colors, of course! :)
LOVE LOVE that stencil and way to go making your own bed! I have many Ana White items bookmarked with plans to make them!
Now I want to see pics of the decor at your RS party;)
Gorgeous bedroom and what a fabulous find on the matching pillows! Luck you!
I love, love, love that!! The color is so beautiful and the stencil looks really great. SO much better than anything you could buy.
Beautiful Bed! I love the stenciling. We made our bedframe using an Ana White tutorial too!
This is absolutely adorable!
I LOVE THIS! It is so beautiful!!! I'm going to link to this from my blog. http://dreamingofstitches.blogspot.com/
Looks amazing! I really need to make all these awesome thing I am seeing!
Very cute!
Does the Deft Clear Wood Finishing Spray keep the paint from chipping away? I spray painted an end table, and now it is all chipped up, after about 9 months. I can't imagine how fast a kids bed would chip!
WOW Amy! Looks AMAZING! Good work! Love the colors.
How does that spray acrylic hold up? I just painted some night stands white and want to find a sealer that will protect them but will not yellow the white paint.
I LOVE this room!! Fresh and clean look. Beautiful job on the headboard.
absolutely STUNNING! Amy, you never cease to amaze me.
Michelle@Everyday Celebrating
LOVE THIS!!! I just stenciled a wall in my house with the Casablanca. I hope you'll stop by my linky party this weekend and share this project :) http://www.lovelycraftyhome.com
I'm sure it wasn't… but you certainly made this look easy and very do-able. Absolutely love the look of the headboard against the beadboard.Lovely colors, simple and elegant look, so nicely done!
Nice job! I love that you stenciled the headboard…your finish work is gorgeous! :)
We have been wanting to do this for a long time but I had not seen a plan I liked. So excited to find this, I am talking my husband into it now!
I think you did a great job. I LOVE how it looks in the room. Amazing fit.
btw you might want to try stencil glue next time, it will help the stencil from lifting up and having to be touched up.
wow! love it!
It's absolutely exquisite — the colors, the detail…beautiful!
This is awesome! We just got a new bed and I've been searching for ideas for a headboard and this is spot on to what I want. Thanks!
That looks incredible! Now I want to make one :-)
Rachel
Just beautiful Amy!!!
Thanks for linking up! I featured your post on my wrap up http://tidymom.net/2011/im-lovin-it-wrap-up-3-12-11/
Have a great weekend!
That is such a cool project! So inspired now.
wow that is beautiful – what a happy little girl she must be!
Beautiful job! I love the clean fresh look of it and am amazed at your handiwork in building the bed!
Amazing! I love it!!!
I am just speechless! This is beyond amazing! What talent you have! Thank you for inspiring me.
LOVE this idea! You're so creative. It's absolutely beautiful!
This is beyond stunning. I am coveting this headboard like nothing else! Thank you for joining our party! It was so great to see a friendly "face"! Kisses!
I love the color! What color of paint did you use on the walls?
Love it!!
I LOVE this!!
I need a new headboard….but can’t find anything I like for a decent price. You might have just inspired me to make my own!
Thanks for linking up!
Ashley
http://www.simplydesigning.blogspot.com
beautiful! I love the headboard
Jst wanted to share that your post inspired me to make a cal king version!
http://thebaezablog.blogspot.com/2011/04/diy-casablanca-headboard.html
This is seriously to die for! I love it! I will def be book making this to copy cat one day. Visiting from tip junkie
adorable headboard, you did a fantastic job and I love the color choices!
Hi!!
Can you give me some tips on which moldings you used? I am building something similar for our king bed and imwas overwhelmed looking at molding the other day. Help!!!!
This is darling! My husband made a headboard for my daughter’s bed years ago and I still have it. I have been wondering what to do with it. I am going to stencil it like this and give it to my granddaugher (she is almost 6…she will love it!!)
I just found this on pinterest. What a beautiful headboard! Nice job!
I LOVE this idea!!! So creative!
Absolutely beautiful.
Wow! Our younger daughter is a freshmen at Auburn University and has noticed that quite a few of the upperclassmen have brought headboards to adorn their very plan residence hall beds. I think that this will be the ticket for her sophomore year. I cannot wait to show this to her. And, it really looks as thought you made it with her in mind – she stencil is just right – not too frilly but classy! Thank you! Sue
how much was it in total to make this bed? and how could i do this for a full?
I want to make two of these fir my daughters bedroom. I’ve looked on Ana site found the bed but would love to have the measurements for the twin or at least how to figure them out. Please share
Jan G
Love your blog and this project featuring quatrefoil (one of my favorite patterns!) so I featured your project in my roundup of crafty quatrefoil projects here. Feel free to check it out and hope you like it!
-Mel the Crafty Scientist
Hi,
I was just wondering if you could post a cut list for this gorgeous. bed??? I would like to make three twin size bed just like it!!!!! Thanks Josie