

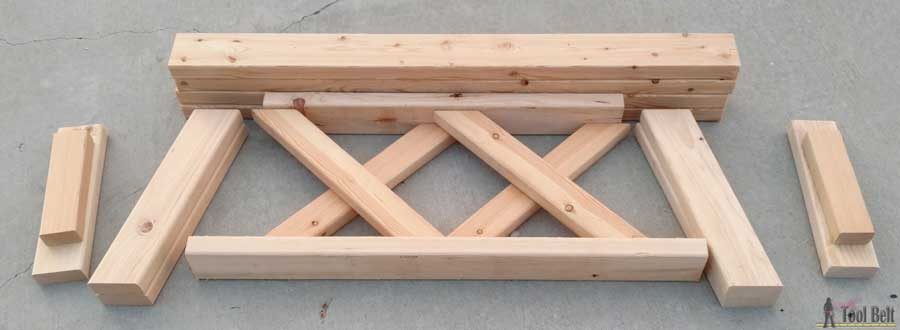
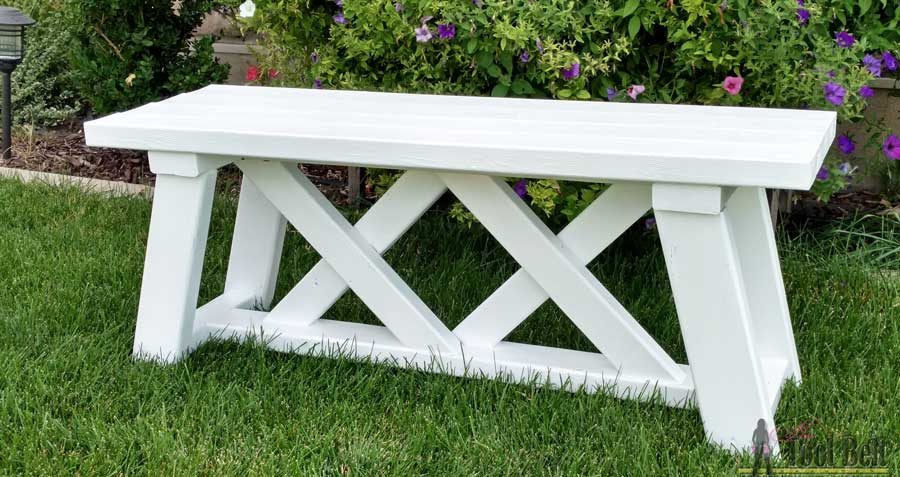
Hi, I’m Amy and I love to build things and share plans at Hertoolbelt! I am excited to be here and share how to build an outdoor bench made from 2×4’s. The lumber for this bench only cost about $13, so you can feel good about leaving it outdoors or it’s cute enough to bring inside. The inspiration for this bench came from this cute one that I spotted on Instagram.
I added an extra X and made it longer to fit my space.

How to Build a DIY Double X Bench

Materials
- 4 – 2″ x 4″ x 8′ boards (actual lumber dimensions 1 1/2″ x 3 1/2″)
- 1 – 2″ x 3″ x 8′ board (actual lumber dimension 1 1/2″ x 2 1/2″)
- 8 – 2 1/2″ pocket hole screws
- 32 – 2 1/2″ or 3″ screws
- wood glue
- sandpaper
- stain/paint
- vaseline – optional
- paint brush
Tools
- miter saw
- drill
- countersink bit
- corner cat sander
- measuring tape
- Kreg pocket hole jig
- These are the tools that I used, you can substitute for what you have.
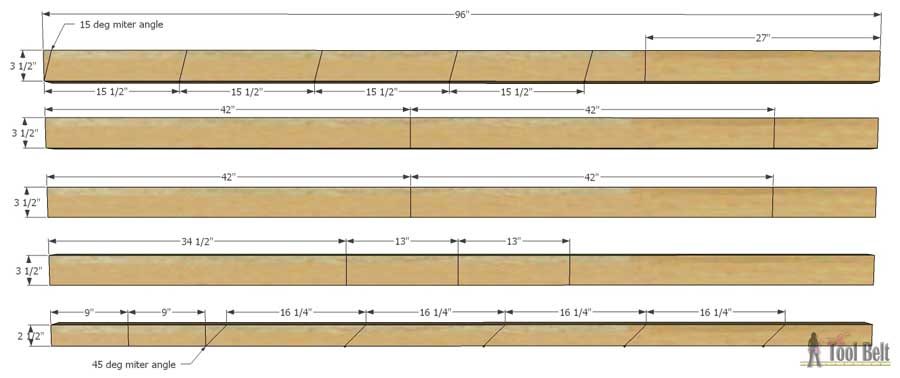
Cut List
- 4 – 1 1/2″ x 3 1/2″ x 15 1/2″ with 15 deg miter cut on both ends
- 1 – 1 1/2″ x 3 1/2″ x 27″
- 4 – 1 1/2″ x 3 1/2″ x 42″
- 1 – 1 1/2″ x 3 1/2″ x 34 1/2″
- 2 – 1 1/2″ x 3 1/2″ x 13″
- 2 – 1 1/2″ x 2 1/2″ x 9″
- 4 – 1 1/2″ x 2 1/2″ x 16 1/4″ with 45 deg miter cut on both ends
Cut all of the pieces for the bench, see the cut diagram for visual reference.
Cut Diagram
Step 1
If your boards are rough, you may want to lightly sand them before assembling the bench.
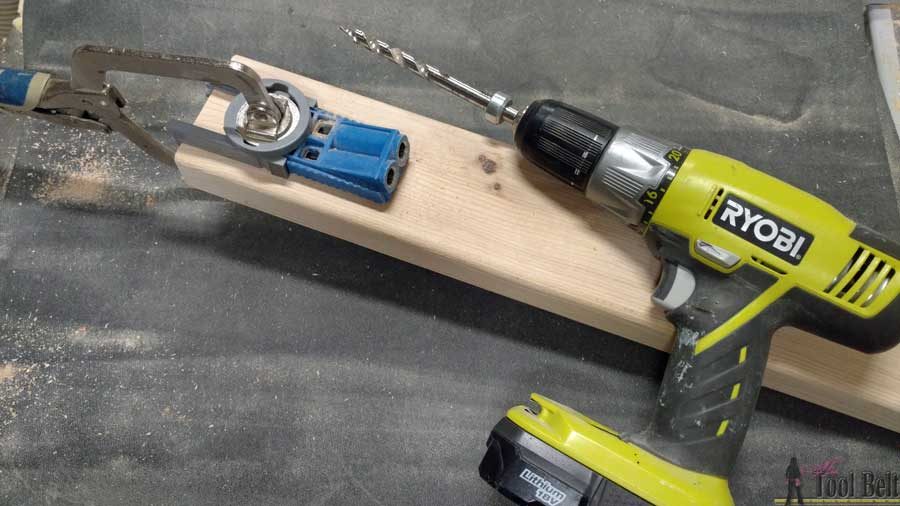
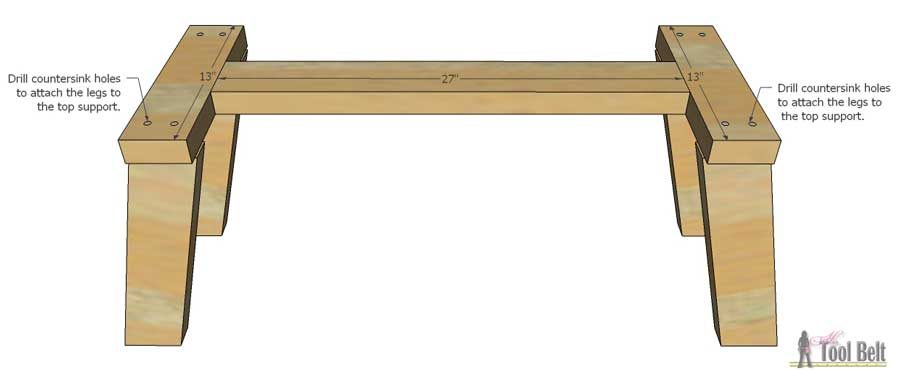
Drill pocket holes for 1 1/2″ material in both ends of the 34 1/2″ and 27″ boards.
Measure and mark the center of the 13″ and 9″ pieces, also mark the center of both ends of the 34 1/2″ and 27″ pieces. Using wood glue and 2 1/2″ pocket hole screws, attach the center of the 9″ pieces to the ends of the 34 1/2″ piece. Repeat for the center of the 13″ pieces and the 27″ piece.
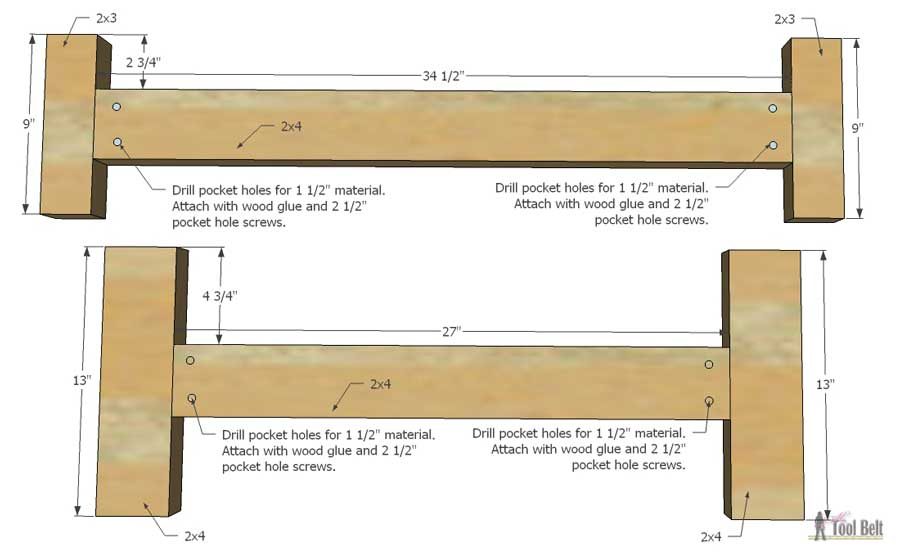
(If you don’t have a Kreg pocket hole jig, you can toenail the screws in.)
Step 2
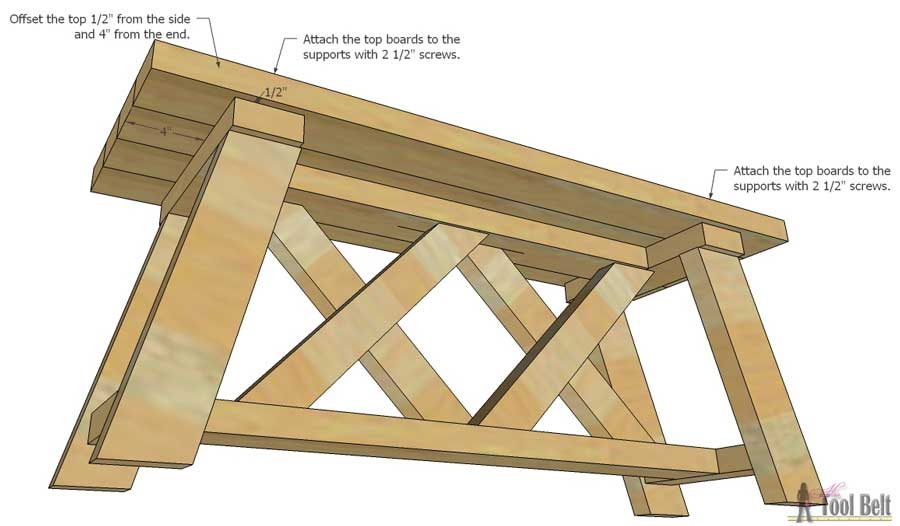
Measure and mark 1/2″ in from each 13″ piece end. The legs will inset 1/2″ in from each 13″ piece end.
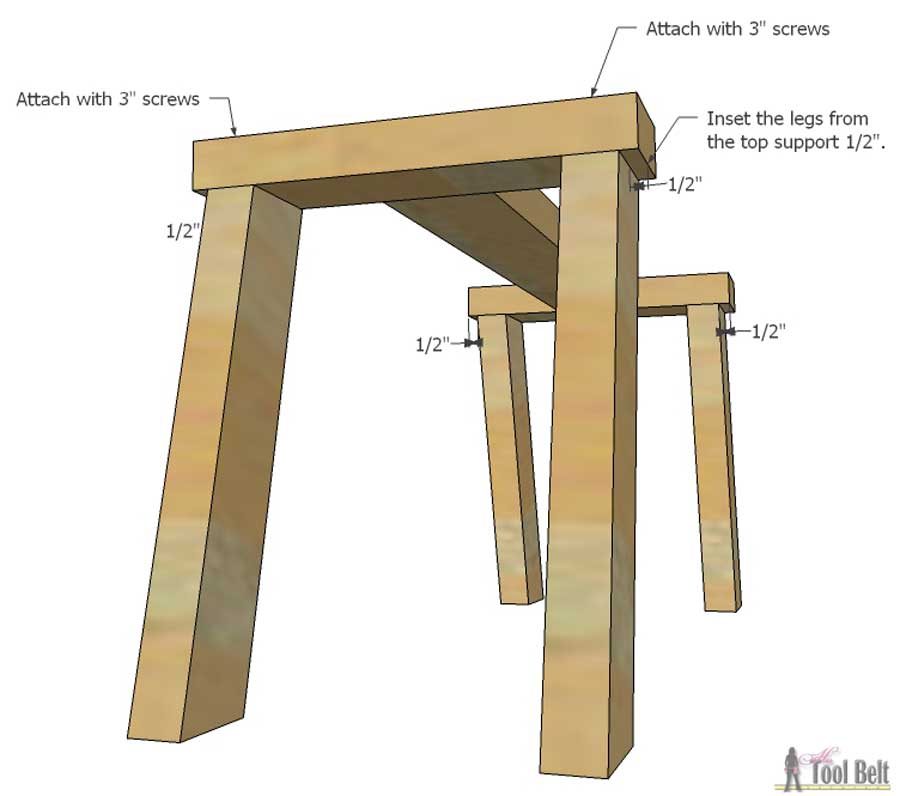
Use the countersink bit and pre-drill countersink holes for screws to attach the legs to the 13″ pieces. Use either 2 1/2″ or 3″ screws to attach the legs to the 13″ pieces. (Note: the legs won’t fit perfectly onto the 13″ pieces, overhang the same amount on each leg.)
Turn the leg assembly upside down and mark 2″ down on each leg end. Pre-drill countersink holes in the outsides of the legs (I drilled the holes about 3″ down from the leg ends). Attach the 9″ pieces between the legs using 2 1/2″ or 3″ screws.
Step 3
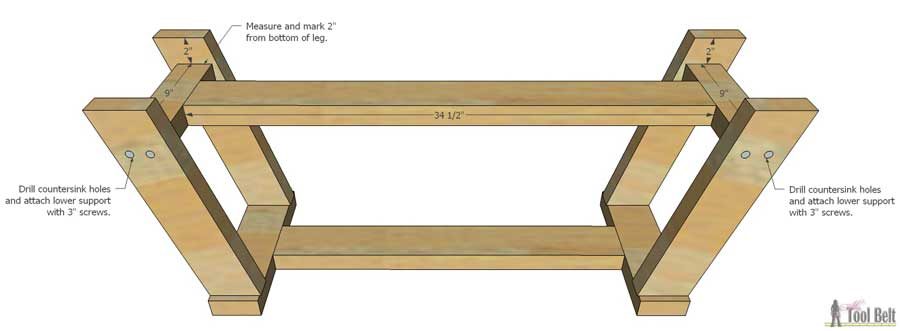
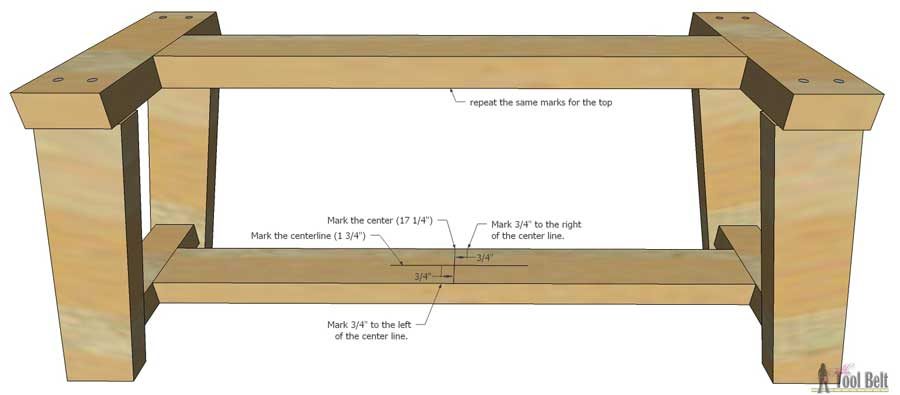
Measure and mark the center line for the length and width on the 34 1/2″ piece. Mark 3/4″ on both sides of the length center line mark. Repeat the same marks on the 27″ piece.
Slide 2 of the 16 1/4″ X pieces in between the top and bottom supports, trim the 16 1/4″ pieces if necessary. Line up the ends of the X pieces with the 3/4″ marks and the center line mark between them. Drill countersink holes in the 34 1/2″ and 27″ pieces, attach each X piece with a 2 1/2″ or 3″ screw.
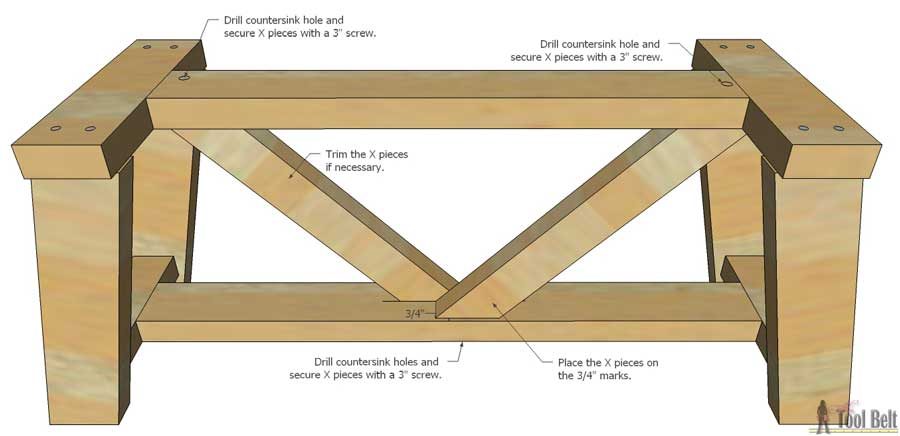
Flip the bench over, slide the other 2 – 16 1/4″ X pieces in between the top and bottom supports, trim the 16 1/4″ pieces if necessary. Line up the ends of the X pieces with the 3/4″ marks and the center line mark between them. Drill countersink holes in the 34 1/2″ and 27″ pieces, attach each X piece with a 2 1/2″ or 3″ screw.
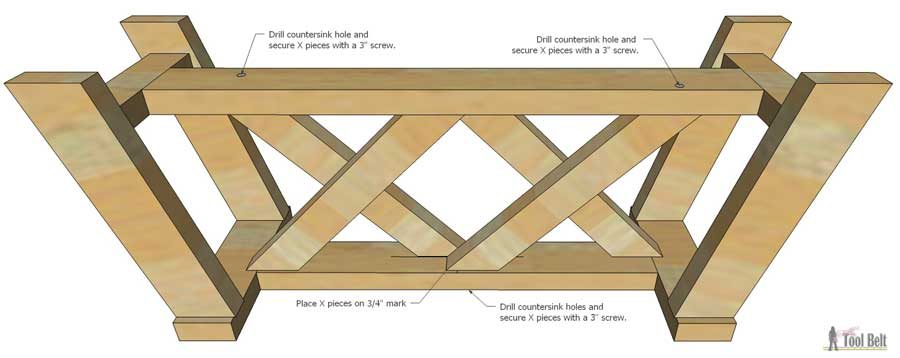
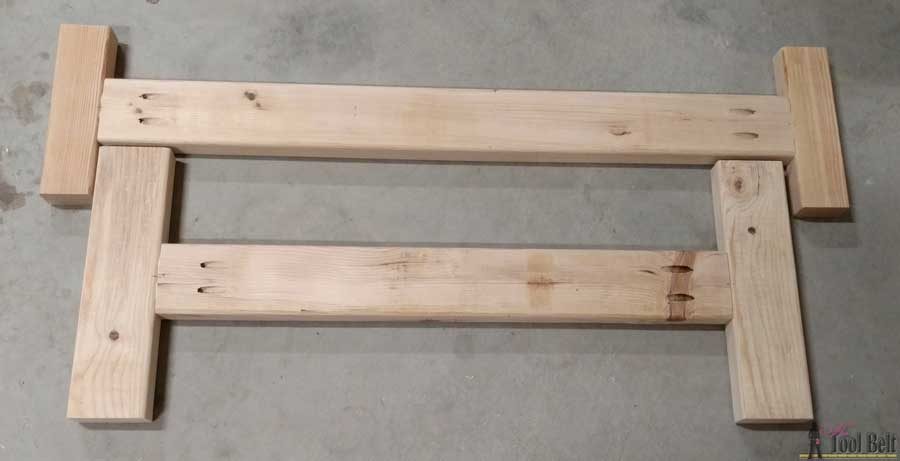
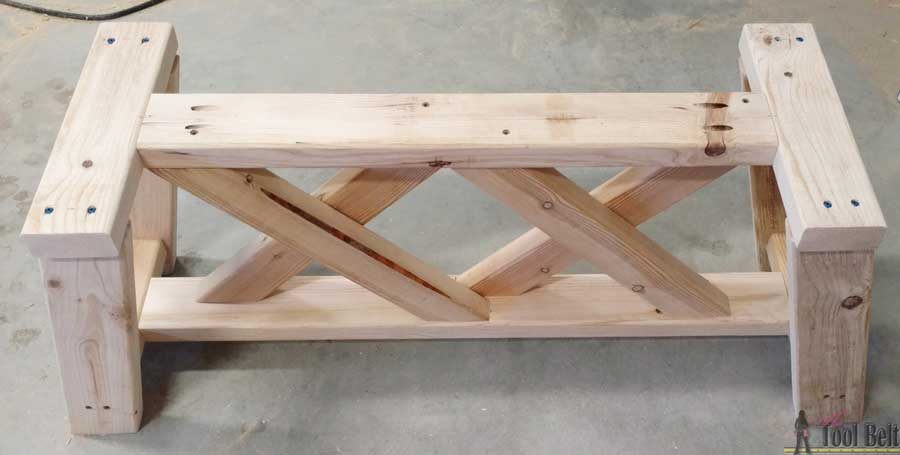
Yay, now the base is done.
Step 4
Measure over about 6″ from the 42″ board ends, pre-drill countersink holes to attach the top pieces to the base.
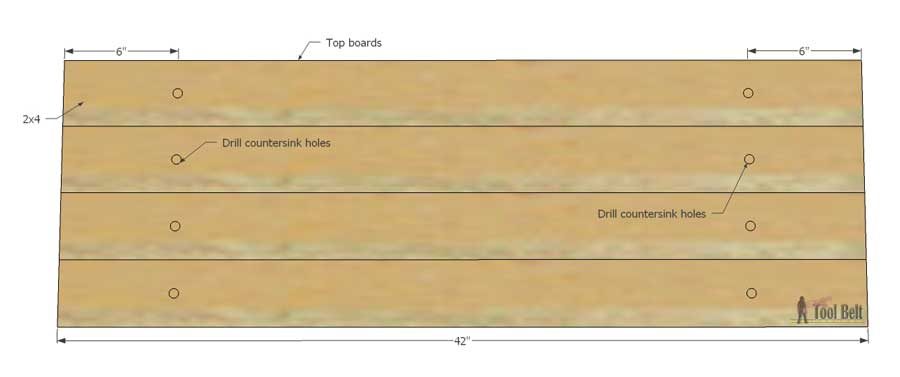
The top will overhang 1/2″ from the 13″ pieces on the side and about 4″ from the ends. Attach the top boards to the base with 2 1/2″ screws.
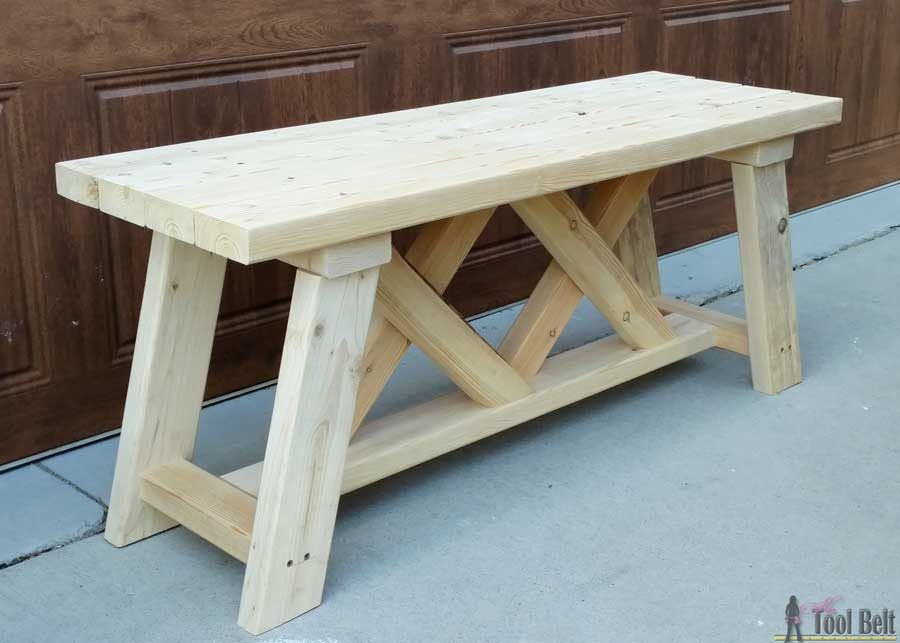
The double X bench assembled and ready for finish.
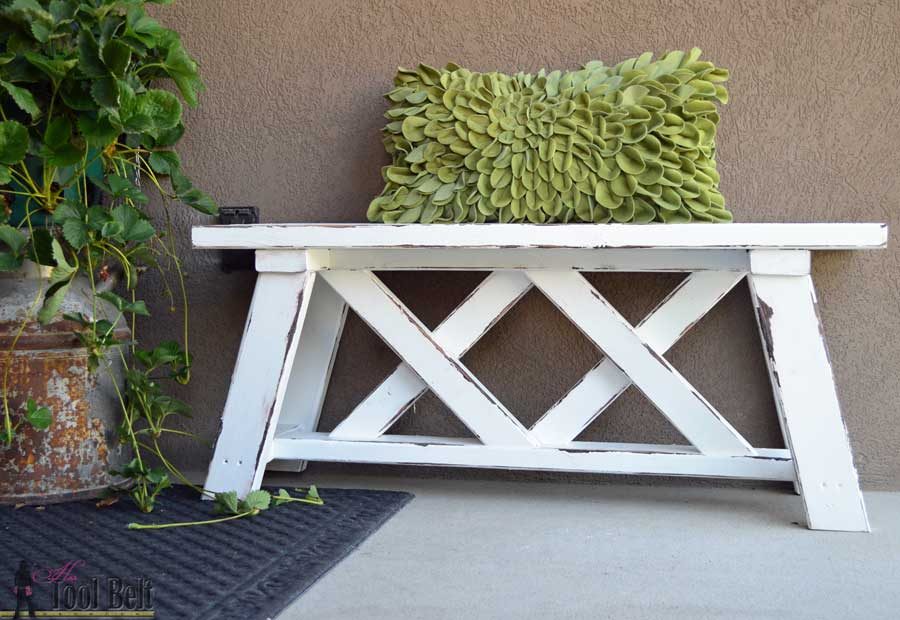
I decided to go for a highly distressed (chippy paint) look. First I stained the bench a dark brown color.
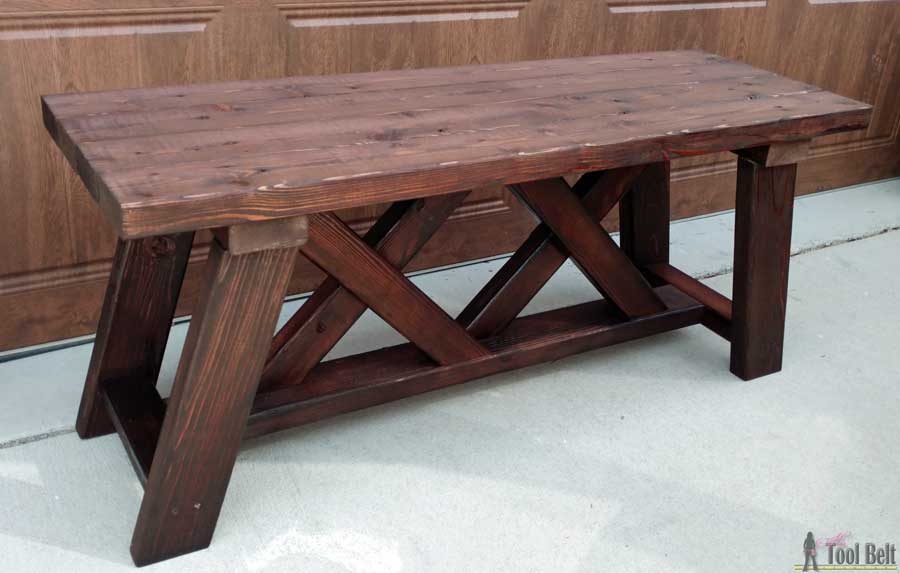
Once the stain dried fully, I used a little petroleum jelly (Vaseline) and applied a small amount on the corners and edges where I didn’t want the paint to stick.
I used a white latex paint and painted the whole bench white and let the paint dry.
Anywhere I put the Vaseline, the paint kind of cracked and didn’t stick. I used a corner cat sander to distress the paint and rough it up.
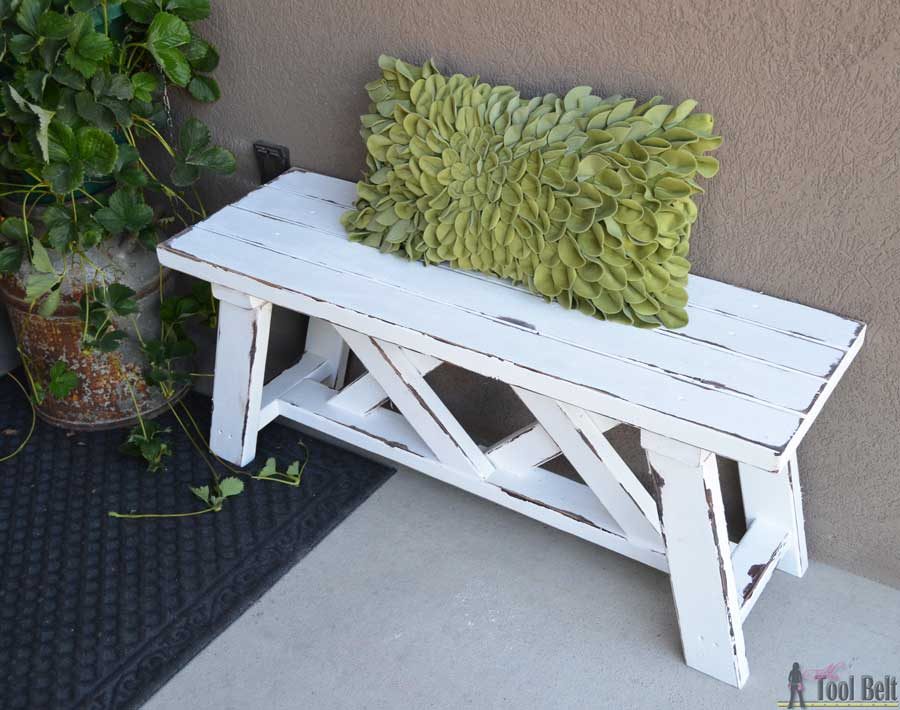
I’m excited how the bench turned out, it’s looking at home on my front porch!
Make sure to check out lots of other free woodworking plans.

JOIN OUR NEWSLETTER
Would you like more Recipes, DIY, Printables and Organization Ideas?
Subscribing to the newsletter will enable us to periodically send you creative content exclusively for Idea Room subscribers.
*View our Privacy Policy here.


Wow! Beautiful and such a great job!
Bev-Thank You!
Great job! The table is beautiful and the directions are awesome!!! Love the cut list and cutting diagram.
So glad you like it! Thanks!
Beautiful. Best directions and material list I have ever seen on a DIY site. This is my first time to your site and I was so impressed I joined right away
That is so great to hear! Can’t wait to see the finished Bench!
I love what you did! Thank you for the detailed instructions. I need all the help I can get for things like this. About how long did it take for you to make?
It will probably take a few hours to build. Painting and/or staining will probably take a day or two because you have to wait for dry times.
The design caught my attention right away but the details and cut list convinced me I could actually build this myself. Thank you!
You totally can make this! I would love to see picture once you are done!
I made this today, did not have the pocket hole jig, and my improvising didn’t work too well! I ended up having to anchor it with a 2×4 block on the bottom. Doesn’t look too bad, should be finished with the building tomorrow. I broke the electric drill, the battery operated needs to charge! I’m a beginner builder! Beautiful layout of instructions! Thank you!
Sorry about the drill but it sounds like it turned out!
Super cute! As soon as I saw it, I knew I wanted one….mid-assembly now!! The cut list with detailed diagram is awesome….one of the best I’ve used. Thanks for all the details. Can hardly wait to finish mine this week.
I would love to see pictures of the finished project!
Thank you so much for your directions and the pictures! I did run into an issue, though. I finished the second part of step 2, but upon trying to put in my X pieces, they’re about 1/4-1/2 inch too short. This is my very first build, so at this point I’m thinking the easiest thing to do is buy more wood and recut the X pieces. Is this what you would do? Thanks!
Hi Kelsey, You can do that. Another possible option is to remove the bottom support (2 – 9″ and 34 1/2″ pieces) and slide it up to fit your X pieces. I think you’ll have enough room that it will still look great.
I would like to print out this information but cannot. How do I find a printable version of these instructions?
Thank you
Jackie Soorsma
There isn’t a printable version but you could copy and paste it into a Word Document or something like that.
Can u convert this to a large table like 96 “
I am sure you can.
Any thoughts on how hard it would be to make this 48″ long instead of 42″? If i’m looking at the cut dims correctly there looks like enough room to make all of the long (6) boards longer? What do you think? Thanks for the inspiration. It’s because of this post i asked for a Kreg Jig for my bday (today) and i’m going to make this bench. I’ve been wanting to get that tool for a long time and now i had a reason to get it! thank you!
Not sure about adjusting the sizes. You may want to ask http://www.hertoolbelt.com/ . She is the one that made the bench. Thanks!
Well I finished the bench!! I made it 48″ and I absolutely love it. Now I’m going to make one more and then a matching 8′ farmhouse table to go with it. Thank you so much for the inspiration!
So happy that you love it!
What is the finished height? I was wondering if it would be suitable for benches to use at the kitchen table?
It is 18 inches tall. You could adjust the height though.
If I needed to make this bench 6 inches short in length (my space is small)…would these plans still work for me? Would I just make the top 6 inches shorter? 36inches instead of 42 inches?
I would love to have a table to match it!
That would be great!
This idea was brilliant! So wonderfull!
Thank You!
Just made one and absolutely love it! Wanted to post a pic, but not sure how.
Post it to my facebook page. Glad you enjoyed the project.
Did you put any kind of sealant on it after you painted it?
The bench is great, but WHERE did the awesome pillow come from??
My son made 3 of these, they are awesome
I’d also love to know where to get that pillow from or a DIY steps list… Thank you for the detailed project
Love this bench! Thanks for sharing the plans:)
Very nice
Thank You!
I love this bench! Can you tell me how you hold everything still while you screw the legs and the other angled pieces in place? I’m a real beginner.
Great question. I be Her Tool Belt will be able to answer that question better than me. Here is the link: http://www.hertoolbelt.com/ . Thanks!
How did u attach the legs on? I did this project alone and had difficulty attaching the legs on and more issues making it level.
You may need to email http://www.hertoolbelt.com/ and ask her about this question. I am unsure. Sorry. Thank you!
I’m gonna have my husband make this! I have been wanting a bench for a while! I do have one question, I have been wanting to try the Vaseline method, after you apply the Vaseline, do you wait for a certain period or just go ahead and start painting? Is it just a very thin application? Also, how does the Vaseline not get smeared as you paint and mixed in your brush and paint?
Sheila- You can paint right away. Yes, apply a very small amount and the vaseline will smear and mix a little, but it works out just fine. Great questions. Hope you enjoy this project.
The best instructions, diagrams and tips I’ve come across to make a totally darling bench!!! This is one I think I can make thanks to all of your detailed instructions and pictures!! Thank you so very much for sharing this!!! Can’t wait to get started!!! ❣️❣️❣️
Lorraine- Yay! So happy you found this helpful!
Sweet little bench. I work at a cabinet shop in the paint room and we always have scrap wood laying around so occasionally when the cabinet guys aren’t busy I get to make stuff for myself/ my sweetie lol. She saw this and said make this for me so I’m building it now. I have to say I’m really impressed with the detailed instructions, like a lot of others here have said you don’t see that on most sites. I feel sorry for those doing it all alone as it can be difficult to hold boards and screw at the same time. I would say if you can buy or borrow some clamps it helps a lot. If you can’t get clamps bribe/guilt a friend to help hold them for you😁😁😁
Ian- Great tips. So glad your wife and you made one. I would love to see pictures!
Hi! My wife loves the bench design. I have made two benches so far and my wife wants me to make another one with an extra x to fit in the space she wants it. My question is when you added the extra x how much longer was your bench. I am figuring it would be 21” longer. Would this be correct?
Tim- This is a guest post. So I haven’t actually made one myself. I am thinking you may be correct though. You could email https://www.hertoolbelt.com/ and ask them. So happy you have loved this design! I bet your wife is so happy!