
Have an outdated wood banister or handrail in your home that you want to update? Today I am sharing the best wood stain for handrail restoration and/or banister updates, and the step-by-step process for how to stain a handrail or banister. It is easier than you might think!
This project has been on our “to do” list for years…
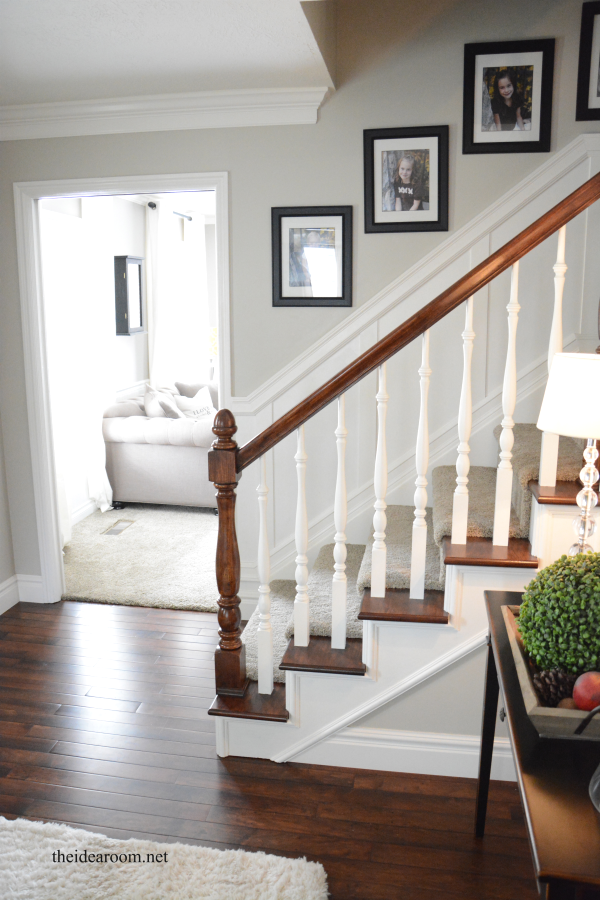
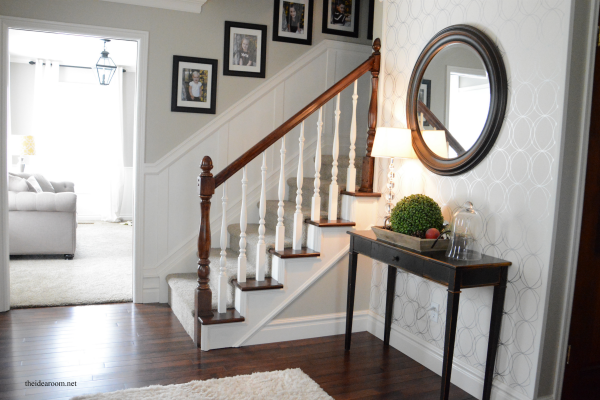
(after)
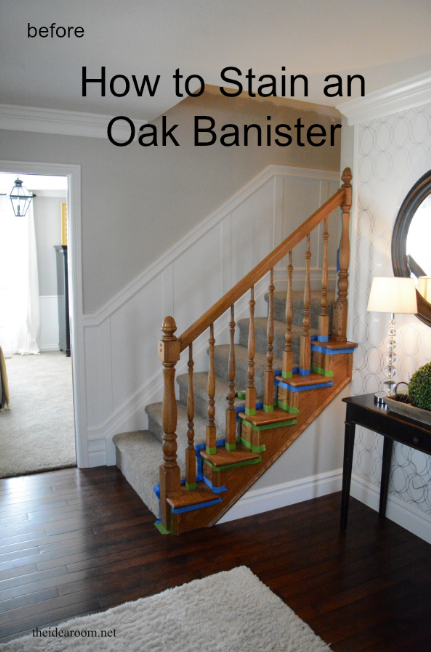
Ever since we moved into our home 12 years ago, I knew I wanted to get rid of our interior handrails and oak banisters. But of course, life, children and other more pressing and important problems and projects kept it at the bottom of the list.
I knew it would be tedious to stain an oak banister or wooden handrail, and we weren’t looking forward to the amount of time and work it would take. We even had some contractors come in a give us a few bids to see if it would be worth it to hire the job out. With the lowest bid coming in at $5k, we quickly dropped the project. That was simply too pricey for our budget.
BEST WOOD STAIN FOR HANDRAIL
About a year ago, I learned about an oil-based Gel Stain from General Finishes that we would be able to use without a lot of tedious prep work. I was so excited, because I knew that we might actually feel motivated to finally get this project off of our to do list. When I showed the stain to my husband, he was actually as excited as I was (and my husband isn’t always excited when I present him with new project ideas… :)!
*NOT ALL GEL STAINS ARE THE SAME! We had great success with this particular brand of gel stain which had the best finish overall compared to other brands we have used, so use other brands at your own risk. Not every type of stain are equal.
Because not all wood types accept stain as easily as others, your best course of action will be to test your stain on a small inconspicuous area of wood first to see how well your wood type is going to accept the new stain.
Staining Oak Banisters Dark still is a time consuming project because of all the balusters, but we were able to cut down A LOT of the tedious prep work. But I am so happy with how the wood finishes turned out, that I would totally do it again if I had too. If you are looking to update your Oak Banisters, I will attempt to share with you a tutorial so that you can do it too.
WATER-BASED STAINS VS OIL-BASED STAINS
Oil-based stains can be a little harder to work with than water-based stains. Oil-based stains are also harder to clean up than a water based stain, oil based stains are more durable and stand up against the elements better than a water-based stain.
If you have a project that needs to stand up to the test of time, an oil-based stain is usually the better option. Since we are working with a handrail that sees a lot of activity and use by a busy family, we knew that the oil-based stain would be our best option for having or work last for a long time and use.
BEST WOOD STAIN FOR HANDRAIL
About a year ago, I learned about an oil-based Gel Stain from General Finishes that we would be able to use without a lot of tedious prep work. I was so excited, because I knew that we might actually feel motivated to finally get this project off of our to do list. When I showed the stain to my husband, he was actually as excited as I was (and my husband isn’t always excited when I present him with new project ideas… :)!
*NOT ALL GEL STAINS ARE THE SAME! We had great success with this particular brand of gel stain which had the best finish overall compared to other brands we have used, so use other brands at your own risk. Not every type of stain are equal.
Because not all wood types accept stain as easily as others, your best course of action will be to test your stain on a small inconspicuous area of wood first to see how well your wood type is going to accept the new stain.
Staining Oak Banisters Dark still is a time consuming project because of all the balusters, but we were able to cut down A LOT of the tedious prep work. But I am so happy with how the wood finishes turned out, that I would totally do it again if I had too. If you are looking to update your Oak Banisters, I will attempt to share with you a tutorial so that you can do it too.
(before)
HOW TO STAIN WOODEN HANDRAIL
SUPPLIES NEEDED TO STAIN WOOD BANISTER
- staining pads or clean cloth
- latex gloves
- masking painters tape
- 220 grit sandpaper
- sanding blocks or hand sander
- General Finishes JP Gel Stain (we used Java color)
- wood wax, wood oil (like Danish oil, teak oil or tung oil) or wood varnish (we used General Finishes SH Topcoat in Satin finish)
- small paint brush
- larger paint brush
- sponges
- white interior paint (semi-gloss finish)
- Glidden’s Gripper Primer in white
- drop cloths
- dust mask
Please read through all directions a few times before you start!
PREPARE THE WOOD
- Lightly sand down all of your banister, including every surface you will be staining and/or painting with 220 grit sand paper. This doesn’t need to be perfect. You just need to rough up your surface area and old finish so the stain and paint can adhere to it. It is best if you don’t wear down your original stain color, because you will be able to notice the color variations when you put on the new stain.
- Wipe down every surface with a damp clean cloth to remove any lint or excess dust. This will help to prevent any imperfections in the final finish of your stained handrail.
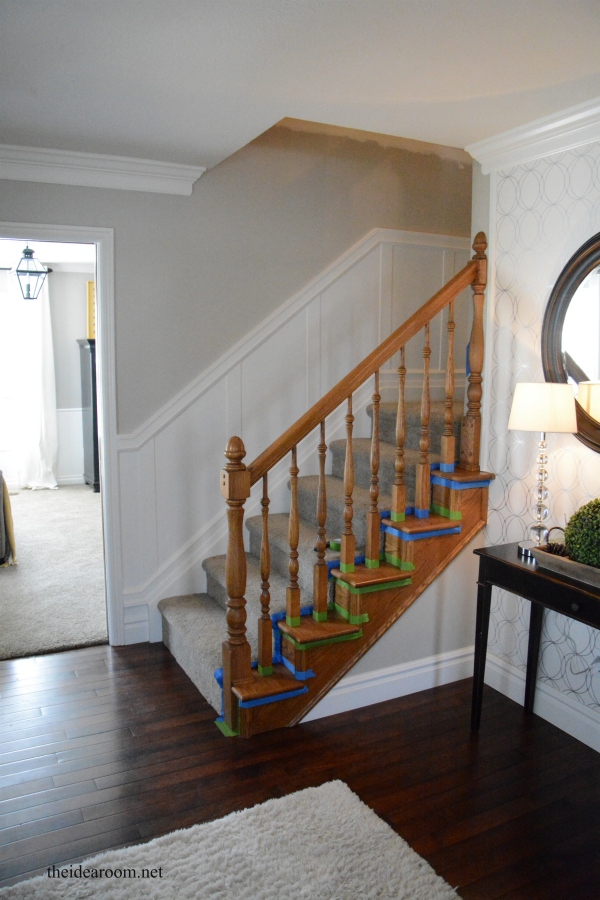
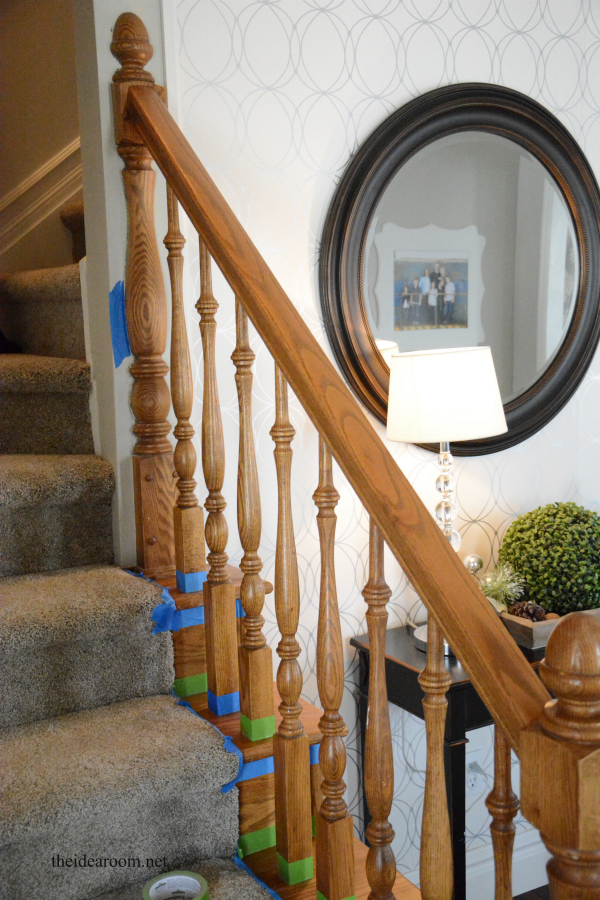
- Tape off the surfaces you will NOT be staining. We did a two-tone look with some of the wooden handrail with some of the items painted and some stained. So, you will need to be extra careful in masking and taping off the RIGHT areas to prevent stain from getting where you do not want it. Do your staining first and THEN your painting. (You will need to tape off again after you stain for the areas you will be painting).
- If your stairs are carpeted like ours, you might even want to tape the actual carpet! You can see that we did this in the above photo.
STAIN YOUR WOOD
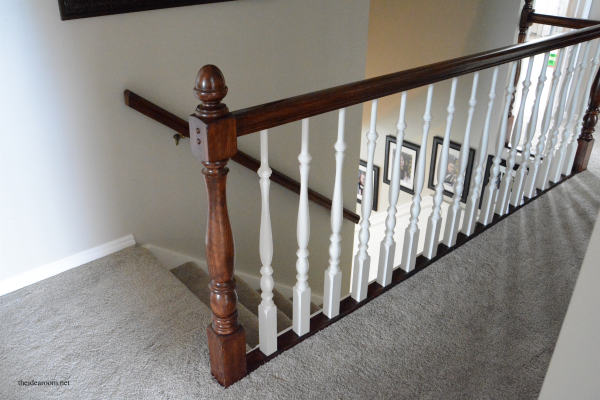
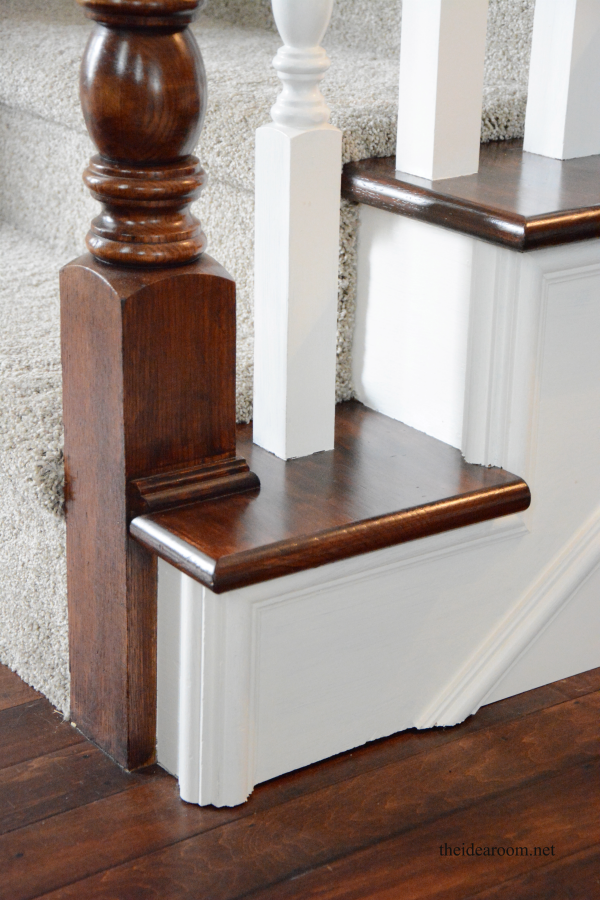
We stained the following areas on our staircase:
- Newels
- Newel Caps
- Stair Treads
We painted the following areas on our staircase white:
- Stringer (or Carriage)
- Risers
- Balusters

- To stain the wood, simply dip your clean cloth or old sock into General Finishes JP Gel Stain in Java color that has been stirred well (according to your particular brands instructions).
- Rub over your wood in small working areas adding a light stain until your stain is even in color and thickness. You may not get the dark color the first or even second application, so don’t try to make it really thick or dark in one coat. Be careful to watch for drips at this stage and look over your newly stained area to catch any drips you might have missed.
- It took us two coats of stain to get the color we desired because our oak was a little bit darker to begin with.
- If you get too much stain on, simply wipe off the excess stain as quickly as possible and reapply.
- Complete this process until your first coat is finished.
- To get in small areas, we suggest using a small craft paint brush to apply stain in the hard to reach areas of your balusters and newels.
- Let your stain dry for at least 24 hours (according to the directions for your particular brand of stain). Add your second coat of stain and let dry completely.

PREP FOR PAINTING (IF APPLICABLE)
- When the stain has set for a few days, you can tape off the areas you have just stained that are next to the areas you are now going to be painting. Take your time and tape the edges as carefully as you can. The more time and effort you put into this, will greatly effect the outcome of your finished banister!

- Add a coat of primer paint to your prepared areas and surround wood you are going to paint. We LOVE using Glidden’s Gripper Primer in white. We have used it to paint all of our cabinets and the paint holds up SO well!
- After you allow the gripper primer to dry you can mow paint those same areas with your favorite indoor paint. We used our favorite white paint in a semi-gloss finish.
- Let your paint dry in between coats.
- Ours took 2 coats to cover completely.
- If you have any areas that need some touch up, you can do so at this time.
We stained the following areas on our staircase:
- Newels
- Newel Caps
- Treads
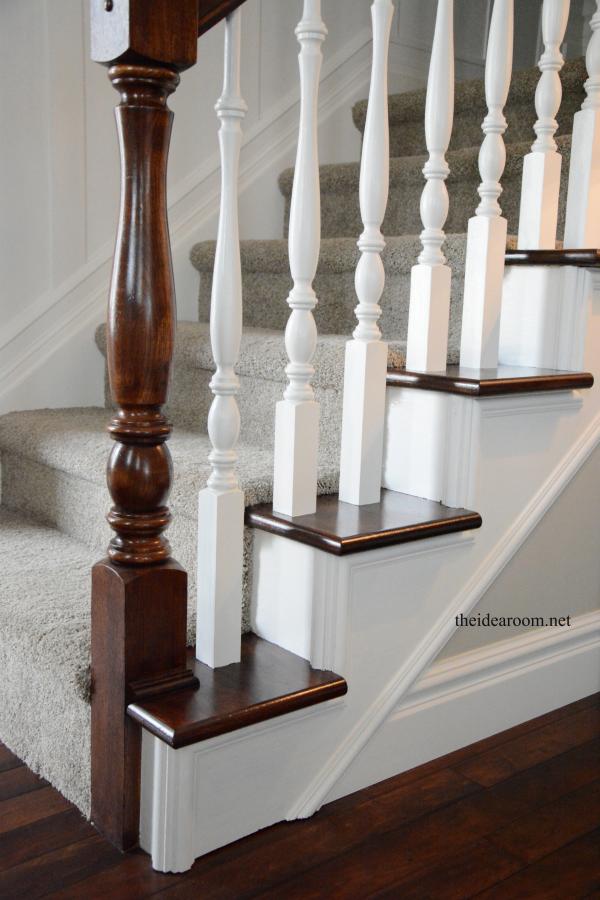
We painted the following areas on our staircase white:
- Stringer (or Carriage)
- Risers
- Balusters
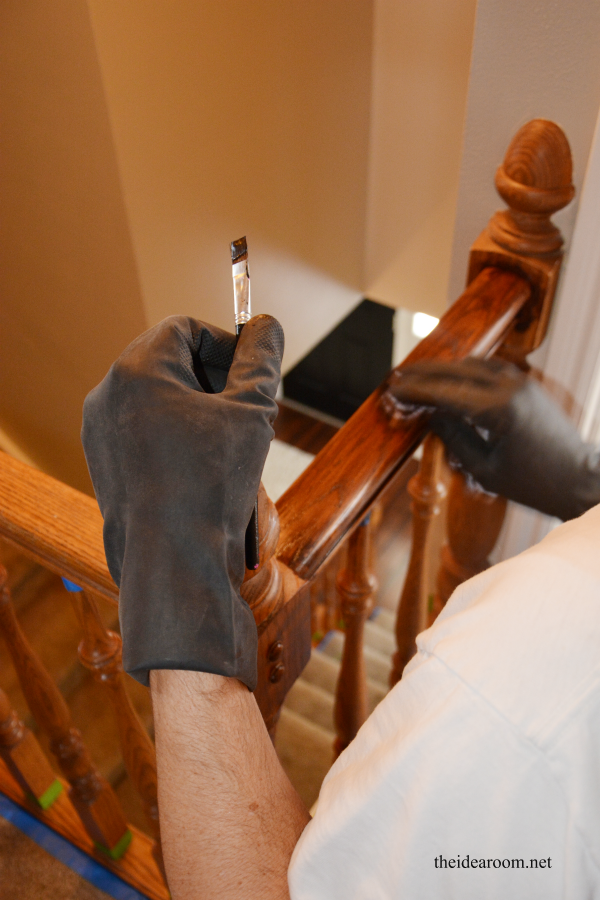
ADD COAT OF POLY OR WOOD WAX
- To finish your banisters so that the stain and paint holds up well over the years, you will want to cover them with a varnish or a first coat of poly. We LOVE General Finishes SH Gel Topcoat in Satin finish. You simply wipe this varnish on like you did the stain…with a clean rag or sock. We used three coats shellac (if you use wax you may also need to add additional coats of wax).
- Allow it to dry between each coat.
- Remove your painter’s tape and touch up any areas that may need it.
This project took a few weeks for us to complete…with a LOT of other family stuff going on in between staining and painting and drying times. We worked on it mostly at night when the kids were in bed.
I am in LOVE with the outcome. The finished stain color ties in so nicely with our dark wood flooring. Such a nice change from the oak color it was before! Now go and do yours!
JOIN OUR NEWSLETTER
Would you like more Recipes, DIY, Printables and Organization Ideas?
Subscribing to the newsletter will enable us to periodically send you creative content exclusively for Idea Room subscribers.
*View our Privacy Policy here.


That is beautiful! A great job well done & a complete tutorial! Thank you for sharing!
Your banister looks lovely! Did you put the varnish on both the stained and painted parts? Excited to do mine. Thank you for the tutorial.
Yes, we did.
Do you have a post about that wall paper wall. It is nice.
I don’t have a post on it specifically. But here is a link to the wallpaper I used! http://www.designyourwall.com/store/Darcy-Pearl-Circular-Geometric-modern-wallcovering-GB57218d-pr-3175.html
Well worth your time and effort. Stunning results.
Thank you so much Bonnie!
Would you share what your paint color is on the walls up the stairs? Thanks
Yes! The paint in the entry way is Revere Pewter by Benjamin Moore. This paint is my very favorite gray!!
That looks amazing! I wonder if I could use that gel stain on our front door and shutters outside. Hmm….off to investigate that. :)
I hope it will work for you! Good luck!
What color white paint did you use? There are so many shades of white out there :P
I love your wood floor !! I would love to know the brand and color of it!! Thanks!
I just found this article and have the same question. We need to refinish our floors and railings both. Thanks for the info, Amy!
@AMY & @theidearoomassistant,
I love your wood flooring as well, it seems to match the handrail and newel post. What stain is used on your flooring? Thanks for the staircase inspiration, Darlene
I will have to find what color of wood floors we installed. It has been awhile since they were installed. It is really close in color to the handrail though.
Thanks for the tutorial. I’ll be ding this soon. LOVE the kid pics on the wall!
Annie, Thank you so much!
Love the finished product! I want to do this to my banister-How much stain did it take to do the 2 coats to the banister? I see the stain comes in 1/2 pint and 1 pint cans and don’t want to buy too much. Thanks!
I used a pint can but, not sure how much you will need for your banisters. I like to have extra in case I need to touch up later on down the road.
This is lovely. I am curious, on the wall side (no railing) did you just put up moulding diagonally. and then add the batten above, or is there a specially cut stair stepped piece before the diagonal moulding?
Hi Amy,
We redid our first floor with dark floors and off-white trim. Upstairs is all oak. We want to paint/stain the staircase just like yours, but then it won’t match the upstairs trim. Did you have this problem?
Hi Amy! Looks lovely! Can you actually tell me the paint color you used on the walls? Thanks!
Do you think this staining would work for oak kitchen cabinets and baseboards?
Holly, I would think so, but you may want to try a small section before you commit. Thanks.
Hi, I love your banister! I just want to verify that you used Java? The color of your project turned out so lovely and such as nice shade of brown. All of the other posts that I have seen who have used Java look so black. Thanks!
Yes! It was Java. I was nervous it would be so dark too. But we did have a very lighter yellow oak to begin with. Test it on a hidden area first if you are really unsure. Good Luck!
Beautiful job! Thank you for the tutorial. How did you avoid getting the stain on the carpet?
You can tape down plastic or craft paper to avoid spilling on the carpet.
When you painted the white are you able to see the oak drain through the paint or did the primer take care of that? Looks great!
Kristi- The primer seemed to take care of that. Great question.
Well done! I too had this job priced out and decided to attempt this project by myself. My question is – did you work up or work down?
Susie- We worked down the railing. I don’t think it would matter which direction that you go though. Good luck on your project. I would love to see pictures when you are done.
My stairs are all painted white and the balusters. How well the Java gel do on the handrails? Will the wood grain show through?Am I going to have to sand down to bare wood? Thanks for your tips! It looks great!
Not sure how well it would stick to white paint. I have only used it on stained wood. I think you may have to sand it down.
Can you give me more details on how you applied the topcoat? You said you applied it with a sock… Do you just rub it on in a very thin layer on the banister and all the balusters? Did you use a brush at all? Do you have to go back over with another cloth and wipe the excess off? Also, the Instructions on the can say to sand between each coat… Did you do that? I would be afraid of taking off my stain and paint.
Heather- Yes rub a thin layer on with sock. I only used a brush in areas that were too tight to reach with the sock. You don’t need to rub excess of with this stain. I did not sand in between coats. Hope this helps.
I love your oak banisters!! We are in the process of re-doing our oak banister with gel stain but I am concerned it will ‘yellow’ over time. Did you have that problem? Should I use a water based top coat to minimize tannin bleed?
Thank you for the tutorial and inspiration!
I have not found that they have turned yellow. Hopefully they wont. I think because the stain is much darker than the oak stain, it should be ok.
I am getting ready to do this same project, someone suggested a product called TSP. Have you ever used this, or heard if its better then sanding.
Thanks!
I try and stay away from harsh cleaners, but I have used TSP before. I did not use it on my banister. I just sanded it. If you are planning on using TSP, it must be handled carefully. I would wear rubber gloves and a mask, and in a well-ventilated area. I would give ample drying time before painting. It can be a replacement for sandpaper as well since TSP cleaner will remove paint.
Very professional looking job, beautifully done, thanks for sharing.
Thank you.
You make this sound doable! I’m getting a bid on totally replacing ours but if that proves cost-prohibitive (which it probably will), this might just be a summer project! Thanks!
Kristin- I hope you end up doing this. It was totally worth it!
I just started my own stairs today using your tutorial for inspiration. With one coat down, it seems to be getting darker as it dries. I can also see every scratch in the wood – I’m wondering if I wiped off too much? Will that all even out with more coats?
Julie- I found that mine did even out with more coats. I would love to see pictures of the finished banister!
I really appreciate hearing a positive review of gel stain!
Amy- Thank you. We loved the gel stain!
Im following this article and starting the project this weekend, I’ve already lightly sanded everything! I know you say use a semi gloss for the white paint bannisters but should it be latex based, Acrylic, water based?
I used latex based paint. Hope this helps. You will have to send me pictures of the finish project.
I would lie to refinish my stairs however I’m afraid they will be very slippery. Whatsyyour thoughs about it.
Doris- I don’t think they will be more slippery if you refinish them. I don’t know for sure though. I love the look of wood on the stairs.
Your stairs are beautiful and the décor. Which color stain did you use on the stairs I love that color.
Lashawn- Thank You! We used this one: https://www.amazon.com/gp/product/B0035YI8SY/ref=as_li_qf_sp_asin_il_tl?ie=UTF8&camp=1789&creative=9325&creativeASIN=B0035YI8SY&linkCode=as2&tag=thidro-20&linkId=QAGMZJCP5D43PTTS
Can you paint the balusters first? What are the negatives besides messier? And how much messier lol? I’m thinking paint them white this winter and stain next winter after my new kitchen is done to coordinate the stain color.
TC- I think it would be fine if you painted them first. Just make sure to tape off really well.
Amy. I’m starting a similar project and have been researching Gel Stains. I also noticed your stained interior door. Any tips of keeping those looking nice. Our stained pine doors are showing some wear and tear.
Sara- I would apply a sealer on the pine door to keep it looking nice. You can also apply an oil for doors. You can find them at your local hardware store. Hope this helps. Thanks for following along.
Hi! I’m excited to try this! Yours looks beautiful! My question is if the General Finishes SH Gel Topcoat Satin finish is oil based or water based?
Thank you!
Lorraine
Lorraine- It is an oil based gel.