I LOVE all the tips shared last week in the comments of my post on getting kids to smile! If you missed the comments, click here to read the post with comments below.
I have had a handful of people ask about my processing of images. I haven’t quite known how to share this because I feel like my style changes all the time. Plus, I didn’t come up with the formula’s for all of my actions, some were given and some were purchased and I can’t always remember where they came from! But I have thought of a few tips I can offer based on various actions.
I think I explained what an action is in a previous post. I found this definition online: actions allow designers and photographers to automate common sequences for increased efficiency. I like to call it a recipe. Originally, actions were only available with photoshop 7 and higher, but I know there are now actions out there for Elements, too. They are different files, so you have to download according to what version you are working with. So many places offer them for free, some charge. Today, I am going to use actions free from The Pioneer Woman. There are MILLIONS of options out there, you have to find a style that you identify with and play with it. I rarely use actions “as is” I often tweak them to my liking (I will also explain that).
I must stress that actions look best on a properly exposed image, they don’t necessarily *fix* a messed up image, but make a good image great.
STEP 1
Find an image you want to play with. I am selecting an image from a session yesterday. I LOVED the light there, but it was a bit harsch at times…I want to soften it up just a smidge.
STEP 2
Decide which action to use. I love the samples PW shows in this grid. Often times next to an action you will see a before and after to let you know what it will look like. I will select………..to play with.
STEP 3
Download your actions into a specific folder.Within your *pictures* folder on your computer, make a folder that says *actions*When you find one you like, click download and save that ATN file into the actions folder.
STEP 4
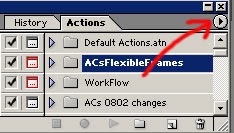
Load your actions into your action palette (if there are a bundle, you will need to unzip the file). Click on the arrow in the top right corner of your actions panel and you will see “Load Action” in the drop down list (if you don’t see it, will need to unzip or “extract all files”).
STEP 5
Run the action on your images by pressing PLAY (triangle at the bottom of action palette). I chose the vintage action in the set. This is how it looks at 100% (I like it!). *If you apply an action you don’t like, go to your HISTORY palette and click on the small image at the top and it will take you to your original image.
STEP 6
I often decide I want to lower the opacity, so I play around a bit with the slider…You can change the look of an image by messing with the opacity slider or combining diferent actions for a whole new look. Possibilities are endless!
STEP 7
Flatten your layers (some actions have layers that can also be adjusted) and save, or add another action. It’s fun to combine different actions for different looks, too. Please let me know if you have any questions!
I just found this cool set of 45 FREE Use at your own risk:)
Besides photoshop, I know there are also very basic editing options. Early on, I used picasa, and I hear lots of non-pro’s talk about picnik for editing (pro’s may use it, too, I’ve just never heard of it). Check them out!
To see more of this photo shoot, CLICK HERE.
JOIN OUR NEWSLETTER
Would you like more Recipes, DIY, Printables and Organization Ideas?
Subscribing to the newsletter will enable us to periodically send you creative content exclusively for Idea Room subscribers.
*View our Privacy Policy here.


Thanks for sharing, I finally got my dslr so I now I can really use your tips!
LOVE it at 80%! very cool… and a great explanation. Thanks!!!
What photoshop edition do you have?
Thank you! This is very helpful and I too love it at the 80% opacity.
I use CS2:)