

*This is a sponsored post on behalf of Lowe’s.
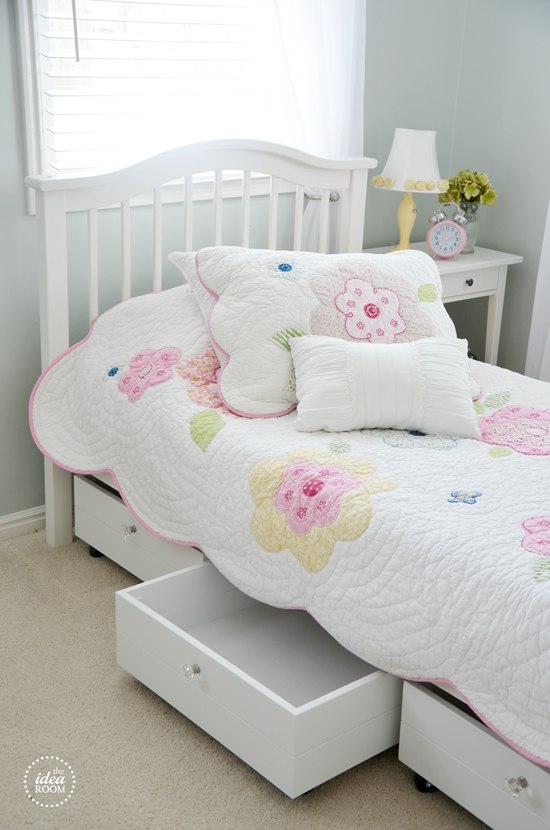
This month, as a Lowe’s Creator Blogger, one of our challenge choices was to come up with a creative storage idea. With 5 kids, there is no such thing as too much storage. I needed some more storage in the girl’s rooms but don’t love when you can see the storage containers sticking out from under the bed.

So I wanted to make some storage spaces that were not only functional but pretty. Truly a perfectionist’s dream come true! We made these super easy Rolling Storage Drawers which fit perfectly under my daughter’s bed. And…I absolutely LOVE them!!

We just made one set, but plan on making more for the other girls rooms. And we have yet to determine exactly what to store in them…but the options are endless. We are thinking anything from pajamas, jeans, books, her toys, etc. And the wheels…I LOVE the wheels!!
You could also make these to go under a book shelf or a T.V. stand…or in a kid’s playroom. They could really be used anywhere that has a space that you can slide it under.
Want to make some for your house?
I will share with you how we made ours including our specific dimensions. You can go of of our main design and make any necessary changes in size dimensions so that you can modify them to fit your space.
You will need the following materials for ONE drawer:
-
3/4 inch piece of plywood or mdf board for the base (ours measured 22 x 22 inches) *Use wood instead of mdf if you are planning on staining them.
-
two 8 foot lengths of 3.5 inch mdf (we got the primed)
-
4 wheels (we bought wheels that were 2.5 inches in height & swiveled)
-
16 screws for the wheels (we used 3/4 inch #10 wood screws)
-
a drawer handle or knob (we used the larger crystal knob from Lowe’s)
-
gorilla wood glue
-
staples or small nails
-
eight 1/4 strips of wood to use as corner braces (ours were 5 inches long…two for each corner)
-
sandpaper or sander
-
paint or stain
-
drill
- 1. Determine the length of your space available for your storage drawers. Then figure out how many drawers you want. This will help you figure out to big to make each drawer. You will also need to measure the height you have and figure out the spacing. Remember to figure in the total height of your wheels too.
- For example our free space under the bed measured 76 inches. We wanted 3 drawers. So we made each drawer 23.25 inches square (outside) (rectangle is fine too) which gave us about 6 inches for spacing between the drawers and the ends.


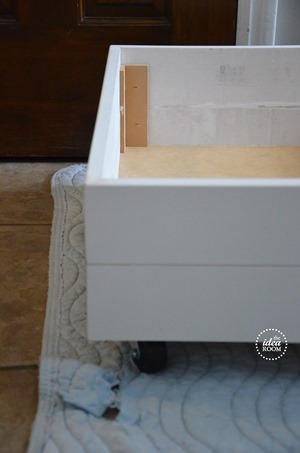
2. Cut your base out of the mdf or plywood. We cut our to measure 22 inches square.
3. Cut your side boards to fit your base. Our exterior cut was 23.25 inches angled down to 22 inches (remember you need to cut these at a 45 degree angle so they sit at a 90 degree angle on the corners. We used a miter box saw to cut the angles. We built it two panels high.
4. Glue and nail the bottom panels together around the base. We placed the bottom side panels so that the base was up a 1/4 inch from the bottom of the panels (a 1/4 inch overhang to help lower the height and allow it to fit under the bed). Let dry.
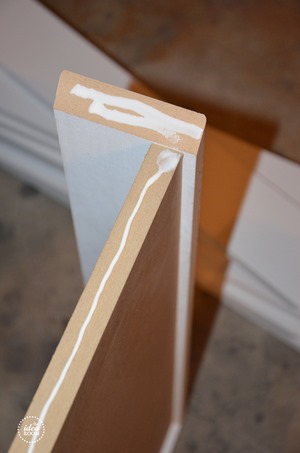
5. Cut the corner braces (ours were 1/4 thick x 5 inches long and either 1.5 or 1.25 inches to allow them to match up in size since one butts up to the other. Does that make sense?
6. Glue and staple them in the corners to give your drawer support. Depending on how big your drawer is, you may need other braces in the middle.
7. Attach the upper side panels with glue on the bottom and ends and staple the corners.
8. Caulk all cracks and spaces. Put putty in nail/staple holes and let dry.
9. Sand all rough edges and putty spots. Wipe off excess dust.
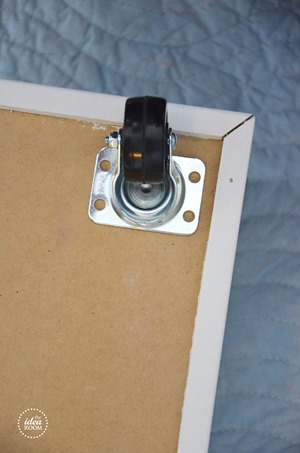

10. Attach your wheels to the base of the drawers with your screws.
11. Paint or stain your drawers.
12. Drill a hole (or two depending on your handle) where you want your drawer handle to be and attach the knob.

Repeat process for as many drawers as you need. The whole project (three drawers) took about 6 hours total from beginning to end spread over two days to allow the glue and the paint to dry. The wheels and the knobs are the most expensive part of this project.

I am not completely finished with the project as I want to put some fun colored paper in the bottom of the drawers if I can find it in a pattern and color I want.

As always, I would love to see if any of you end up making some! I love it when you guys email me or leave me a note of FB and share your projects with me! It makes all my efforts here worth it and I LOVE to get to know who all of you are out there!

Sign up for Lowe’s Creative Ideas Magazine, it’s FREE and offers a bunch of DIY inspiration. Go ahead and connect with Lowes Creative Ideas to find a lot more fun and creative ideas.

*Disclosure: This is a sponsored post. Lowe’s provided me with a gift card to showcase a project this month as part of their Lowe’s Creative Ideas Bloggers team. However all opinions and statements are mine.
![]()
JOIN OUR NEWSLETTER
Would you like more Recipes, DIY, Printables and Organization Ideas?
Subscribing to the newsletter will enable us to periodically send you creative content exclusively for Idea Room subscribers.
*View our Privacy Policy here.


Giiiirl- you make it look so easy. Like- “oh i just whipped these things up.”LOVE LOVE LOVE them. I want to make a set for every bed in my house! But I’d rather just have you make them. Mmmkay?
haha! For sure! I have a list going for the next time we see each other…which is super soon!! :)
My husband was just suggesting this type of idea to me yesterday. However, I didn’t receive to it very well because I didn’t know if it would work or look very good. So neat that I saw your project on Pinterest today. To see the idea in reality makes all the difference! Your rolling drawers are so cute & I sure will work well! Time to head to Lowes and buy some supplies!
Great minds! Glad you were able to find it at just the right time! Good luck on yours! I am sure they will be fantastic and that you will love them as much as we are!
I love your drawer ideas and the look of the entire room. Would you mind sharing your wall paint color? Thanks.
I know this was a long time ago…but somehow I am just seeing this! So sorry about that! The paint color is Benjamin Moore’s Quiet Moments! I LOVE it!
These are adorable Amy! I love them. My daughter has those same knobs on her dresser! I love those too!
Thanks so much Andrea! I LOVE those knobs!
These are super cute! My one suggestion would be to somehow include a cover. Maybe fabric? It gets dusty down there =)
A cover is a fun idea. You could really get creative with it too!!
I bet this would also work if you found an old beat up dresser or chest and used the drawers by adding wheels and knob.
Yes! They would work perfectly!!
Those are adorable, Amy! Such a great use of space!
Why could you not put tops with hinges on for opening and closing to keep the dust out ?
My creative magazine does not come half the time .
You certainly could add tops. We didn’t feel the need to since my girls would be getting in and out of them so often.
I saw your post on fb on Lowe’s site :) I was so excited when I saw you even had a tutorial to go with it. I measured the space under my daughters bed and headed out to Lowes to get the needed items.
Thanks for your creativity!
~Marion
I am so glad you are going to make some! Would love to see them when finished if you get a chance! Hope you love them!
Hi want to know where can I find the comforter it’s so pretty. …thank you
The bedding is from Pottery Barn about three years ago.
Head over to Habitat for Humanities RESTORE. They have lots of used kitchen and bath cabinets. You could just take the drawers out, paint, wheels and VIOLA!
I know I am a little late to the party, but I only have one question. What is the approximate cost? I know it depends on the materials, so I can figure that out by switching out what you did, if I even wanted to stray from your plan (which I don’t think I will).
Lauri
The cost really depends on the hardware you chose and the wheels. Everything else can be really inexpensive, especially if you use scrap wood. I think we spent about $25 on hardware.
These are great! Since mine will be for long-term storage (off season clothes and bedding), I’m thinking of putting a washable cover on them: just a simple square of fabric, a bit larger than the boxes, hemmed on all sides, with velcro tabs (soft loop side) sewn in a few places along one edge. Then apply glue-on velcro tabs (hook side) in matching locations along the farthest edge of the drawer. That will keep the cover anchored and dust out, but easy to remove for washing.
GREAT idea Carol! Under the bed can get pretty dusty so this is a perfect solution!! And…it would be cute too! Win Win!
Thank you for sharing this! I have been wanting to do this for a while now. I almost just bought an old chest just for the drawers. Lol. They were never the right size though. I want to do this!!! Thanks again! :-)
Hello friend! I NEED some of these for under my girl’s bunk bed. Want to make me some?! :)
I converted sturdy wooden drawers found at our local Habit for Humanity Restore for $5 each. They were painted, rollers added, and rope used for pulls.
Thank you for the great idea! We used your plans, but modified a bit since the drawers we were making were going under bunk beds. So ours were 2 ft. X 4 ft. I also added carpet to the bottoms. We are using the drawers to store Lego pieces and creations. I love that my boys can just pull out the drawer and see all the Lego pieces without having to dump them everywhere! Plus it makes clean-up a breeze!
That is so great! I would love to see pictures!!!
Can these have lids made for them? Dust gathers under beds.
They look great.
Jessica- I don’t have lids for them but I am sure you could make some. Great idea!