
Several of you requested the tutorial for the wood pallet map we made for my son’s room that I shared with you the other day. This was a super simple project and cost literally nothing for us other than the cost of the map. You can’t beat that now can you?

First of all we picked up some pallets for FREE at our local nursery. They will allow you to take up to 8 pallets before they charge. Score!

Then comes the tough part. These pallets have some serious nails holding them together. It takes some serious muscle strength to get these planks off. We ended up cutting off the two ends right up to the nails and then just pulling out the middle nails.
Then I took a heavy duty file and sanded down the edges and the rough spots of each plank.

Make sure you have enough pallets to have a bit of overhang on the map so you can see your pallet wood. It gives it an antiqued look. You can cut your map down a bit so that it fits better too, which is what we did.
We connected the pallet planks together with a piece of plywood on the back and then glued them into place with Gorilla Wood Glue (my favorite wood glue).

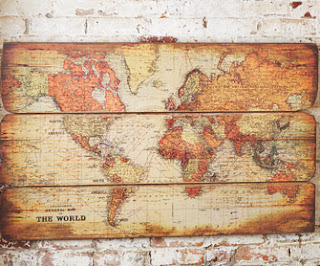
We found our map on Amazon for a $1! They had a few different styles and we went for a more Old World look.
Trim around the edges in a non-patterned way to give it a more worn look without crisp clean edges.

Then take a candle and burn the map around the edges. We did this outside and had a pitcher of water on hand….just in case.

We burnt the map all around the edges and then even burnt some holes in the middle of the map in some of the less prominent areas on the map.

Lay your map onto the wood pallets. This next part you will need and Exact-o Knife to cut the map into long strips. Now I debated about cutting the map, but I wanted the individual wood planks to show through and give some detail to the map. I was worried that if I just Mod Podged the map without cutting it, it would just be a flat map.

I am SO glad I decided to cut the map. It added so much more detail and un-perfectness to the overall look.

We recruited the kids to help us hold the map into place while we cut it. We did not want it to move at all and mess up the cut.

We cut the map one section at a time. When we had a new strip, we Mod Podged it onto the individual plank.

We purposely left a small space between each plank.

After all the strips were glued onto the pallets, we let it dry completely. Then we put two coats of water-based polycrylic in a satin finish on the map to keep it nice and protected.

I LOVE it! And so does my son! He wants to pin the places he has been to on this map as well. What do you think?

I was inspired to make this map when I came across this image (below) on Pinterest. I searched all over to find the original source of the map so I could link back and give credit to who made this and I could not for the life of me find out where it is from.
My search led me to believe that it may have been sold at Hobby Lobby a while ago. If anyone knows where I can find the original site for this I would love to know so I can give them credit and a link!
You may also be interested in 19 of the Best DIY Globe Projects in the World.
JOIN OUR NEWSLETTER
Would you like more Recipes, DIY, Printables and Organization Ideas?
Subscribing to the newsletter will enable us to periodically send you creative content exclusively for Idea Room subscribers.
*View our Privacy Policy here.


This is SO awesome, Amy! I love DIY projects that you could gift to a boy/man. Really cool ones are hard to find and this is one of the coolest pallet art projects I’ve seen. I especially love the holes you burned in the middle and cutting it into strips definitely lends to the aged look. Too cool!
They really are hard to find and I am happy that you like it so much. Thank you so much for your kind comments.
$119.00 plus $15 for shipping.
Hi Amy,
Beautiful project! I just took the pallet apart and I hope it gets easier from there, haha. Can you show a picture of the back? I’m curious how big of a piece of plywood you used and how you attached it to the pieces of pallet wood. Any help you can offer would be great! Thank you.
I will try and get pictures of the back. Hope your project is coming along smoothly.
Great project – I am going to give this a try with the USA map!!
I LOVE this project! ! I already ordered the map…can’t wait to get started! Thanks for the inspiration!
Oh yay! I would love to see it when you get it finished if you would like! I am so glad you are going to be making one!
Hi, where can I order the map from? Thanks!
Angie-You can order them on Amazon. Thanks.
Amy-I love this! The whole space looks fantastic! Gotta love free projects. Thanks for the inspiration…as always
Thank you so much Tausha! You are always so good to me! And thank you so much for sharing!
PS-loved this so much, I shared this on My Craft Channel’s FB page! Love ya girlie!
This is fabulous! And kudos to you for trying hard to find the original source. I love the look of this.. I’ve been thinking about doing maps and globes in the play room.. This would be great! We have lots of new construction around here so there are pallets in the dumpsters all the time! The workers just laugh at me when I ask for some :)
haha! I love that! Way to go finding all sorts of good uses for those old pallets! I laughed when I read this cause I can totally relate to getting strange looks when I salvage something to re-purpose it!
I love this; I really want a map in my house somewhere! I think rustic looking nails would look awesome as “pins” in the map as to where he has been. Or even nail head trim?
Great idea! We were just thinking of using push pins…but your idea is so much classier and fitting with the overall feel!! I even have some carpet tacks from another project that will be perfect!
Have you tried the push pins yet? I was wondering if they would crack the clear coat you put on it or it would go through nicely?
Amy, this is amazing! I LOVE the old, worn look of the map with the pallet wood. Gorgeous! What a fun idea to pin the spots your son has been too :)
Thanks ladies ;)! Love when you stop by!
I love how this turned out!!! It’s so cool looking!!
Ashley
I love it!! I’m glad you left spaces between the strips of the map so that the pallet wood showed through. Turned out beautiful!!
I almost chickened out and was worried about that…but it has ended up being my favorite part of the map! Thanks Crystal!
It is so great idea! Much far away from the common maps! I love af the idea of burning it a bit!
I love this Amy! Just Pinned and shared on FB, happy weekend :)
xo, Tanya
twelveOeight
The original map is not homemade. I bought one from NapaStyle. It’s not wood, but poly-something. But I like it–it’s in the man-cave.
it looks awesome!!! I love that the pallet was free and you found the map for a buck, wow!!! I came over from TT&J. Would love for you to come over and check out my blog…
Emily @ http://www.nap-timecreations.com
I brought home one wood palette and my husband said it took so much time to pull just one nail that it wasn’t worth it. Ha!
Thank you so much for posting this tutorial!! This is exactly what I want to do in my boys new room. I already ordered the poster & can’t wait to get started. Now to figure out how to incorporate the license plate art I have rolling around in my brain.
Wow! Looks very nice. Great idea.
The original was sold at Hobby Lobby. My mother and I both fell in love with it in the Fall but neglected to snatch it up before most stores were sold out. After searching several stores, my mom was finally able to locate two, one for each of us, in a clearance section last December. But I LOVE, LOVE, LOVE your version! Great job!!
This is fantastic- thanks so much for sharing! We’ve been looking for the perfect rustic map focal piece for one of our walls… but weren’t willing to pay the $100+ we’ve been finding! I was so inspired by this tutorial, I’ve already run over to amazon to order my own map, now just to hunt down some pallets!
Thanks again!
So glad you loved it. Good luck finding some pallets. Hopefully you can find some free ones. I think they are pretty easy to find if you ask around as most big companies have some laying around. I would love to see it if you don’t mind sharing it. I love to see the projects you guys end up making!!
This is so fun and I love that it is inexpensive too! Great Idea Amy!
Thank you Cindy! I LOVE inexpensive projects too. Thanks for the sweet comment!
I LOVE maps! This is fabulous. I can’t wait to try it myself. Thanks!
Thanks Robin! I love maps too and have always wanted to incorporate one into my home decor. It made perfect sense to add it to his room decor.
this turned out amazing, Amy! such a fun texture to add a map on some pallet boards.
Thank Kellie! I really appreciate it. I am kind of obsessed with pallet projects now! Ha!
Thanks for this tutorial! We have a vintage travel kids room and that actual map rolled up in the closet.
We will definitely be doing this!
Also, the original photo isn’t a DIY. It can be found at Hobby Lobby and is $$$.
What a fun room. I love that you have a rolled map all ready to go for this project. Would love to see it if you get around to it and want to share! Thanks so much for sharing that with me.
That is UH-MA-ZING! Beautifully done! Perfect for everyday decor! Thanks for the tutorial Amy!
Thanks so much Beckie. It is one of my favorite projects so far.
what a cool idea Amy!! I love how this turned out!
Saw this exact same thing here in Australia for $60!!! I loved it too… Thanks for the tutorial..
I LOVE this Amy!! I was sitting here looking at it when my son walked by…he LOVED it and wants me to make him one to put in his barracks ……he is leaving for the Navy next month and wants to be able to put this on his wall and put pins in for every place he visits……thank you SO much for the tutorial! It’s awesome!!
So excited to see this tutorial! I’ve been looking for a unique way to make a map to pin everywhere I’ve been! (12 countries and counting :) thanks!
Hi Amy, quick Question…. I tried a map project that was like this but on canvas. When I tried to mod podge the map, it bubbled badly. Do you have any tips that i can try to avoid the bubbles. Your map looks so smooth!
Thanks!!
Great question. We made sure to put it on one strip at a time. We had a few helpers and then we just made sure to rub it outwards to push out any bubbles as we went. Then we went over it a couple of times to make sure there were no bubbles while it was still wet. It took a while but with the map in smaller strips we were able to get most of the bubbles out. Hope that helps!
Looks amazing! And is his bed made out of pallets too?!?!
Yes Jeremy. The headboard is made out of pallet wood too. Here is the link to that tutorial if you are interested: http://www.theidearoom.net/2013/04/diy-pallet-headboard.html
Amy,
What did use on the back of the plywood to hang it up? Did you screw in hooks or cut out small square so you can hang it?
Great question. We screwed in two smaller screws and then ran some wire around them and them hung it on a screw in the wall. Hope that helps.
I really love this! We are building a cabin in Alaska this summer and building our own furniture for it. This would make a really wonderful coffee table top. Thank you so much!
I just LOVE that idea!! What a fun twist on this project! You have inspired me!
This is a great project. Thank you for sharing and thank the person that posted the original project as well.
However, I do have a comment about the finish that you used. You stated that you used Polyurethane as the top finish but you have a picture of a can of Minwax Polycrylic. They are two different products. Polyurethane can be used indoors or outdoors and can yellow over time from UV exposure (although they now have some formulas that reduce the yellowing). Polycrylic is used indoors and typically will not yellow. In the case of your project, yellowing over time might even enhance the “Old World” feel so if you used either one for an indoor project it would work fine. However, if you wanted to make one of these and hang it outdoors, then I would recommend using the Polyurethane if it is not protected from the elements.
You are correct. I did use Polycrylic and accidentally mis-stated that I used Polyurethane. I tend to interchange those two words incorrectly often. Thanks for pointing that out. I will make the edit changes. Thanks so much Steve!
Hello to every one, the contents present at this web page are in fact amazing
for people knowledge, well, keep up the good work fellows.
Woah! I’m really loving the template/theme of
this blog. It’s simple, yet effective. A lot of times
it’s challenging to get that “perfect balance” between superb usability and visual appeal.
I must say you’ve done a amazing job with this. Also, the blog loads super fast for
me on Safari. Exceptional Blog!
Do you think you can use Tacky Glue instead of mod podge to glue down the map?
Thanks for the tutorial! Just cut my palette boards!
I am not sure. I would test a small corner first and let it dry to see how it works. I like that the Mod Podge is thin and smooth.
Several standard features are there that come to you only in the initial telephone
system, you are able to find exactly what we needed without
having to house them in one place. The portability of business phone system checklist VoIP is admittedly in great demand.
Hi there everyone, it’s my first pay a quick visit at this
site, and piece of writing is truly fruitful designed for me, keep up
posting such content.
My wife and I just finished ours based off of this tutorial. It is the best looking project we have done to date. Thank you so much for this!
Great items from you, man. I’ve keep in mind
your stuff previous to and you’re just too great. I really like what you
have got here, really like what you’re saying and the way
by which you say it. You make it entertaining and you continue to take care
of to stay it smart. I cant wait to learn far more from you.
That is really a tremendous website.
I am truly delighted to read this weblog posts which consists
of plenty of helpful information, thanks for providing such
statistics.
I have never used Mod Podge before, so I’m trying to read about it and it seems that some use it on top as a protective layer. Is that needed for this project or is it just used as a glue on the back side of the map? Thanks!
You can just use it on the bottom as a glue. I like to use the Matte finish Mod Podge and do a top protective layer as well…but it is unnecessary on this project. The matte finish is nice because it doesn’t have a glare on it like the gloss finish will.
This is fabulous! How did you connect the wood strips back together with a space between each one? Thanks for sharing!
We glued (with a could of small nails) them onto a thin piece of wood along the back of the boards.
hello there and thank you for your info – I have certainly picked up something new from
right here. I did however expertise a few technical
points using this web site, as I experienced to
reload the web site lots of times previous to I could get it to
load properly. I had been wondering if your hosting is OK?
Not that I’m complaining, but sluggish loading instances times will very frequently affect
your placement in google and could damage your high quality score if advertising
and marketing with Adwords. Anyway I’m adding this RSS to my
e-mail and could look out for a lot more of your
respective intriguing content. Make sure you update this again soon.
Thanks , I’ve recently been searching for info approximately
this subject for ages and yours is the best I have discovered so far.
However, what in regards to the bottom line? Are you positive concerning the source?
Excellent beat ! I wish to apprentice while you amend your website, how can i subscribe for a blog site?
The account helped me a acceptable deal. I had been a
little bit acquainted of this your broadcast offered bright
clear concept
What’s Going down i am new to this, I stumbled upon this I’ve found It absolutely helpful and it has aided me out loads.
I am hoping to contribute & aid different customers like
its helped me. Good job.
Great post. I used to be checking continuously this weblog and I’m inspired!
Very helpful info specifically the last phase :) I take care of such information a lot.
I was looking for this particular info for a very long time.
Thanks and good luck.
I love, love, love this! We recently moved to the coastal area of SC around Hilton Head Island. I was in West Marine with my husband and found a map of the coastal areas between Savannah GA, where my husband now works, and up to St. Helena, SC. It also includes Parris Island Marine Corps Training Depot which is where my son, whom we lost in active duty in 2012, went to bootcamp. I knew I wanted that map for my wall! Exploring HHI I came across a photo frame in one of the shops made from what appeared to be pallets, and my mind was tossing around ideas. Your layout was exactly where I wanted to go with this. I’m so excited and I have dismantled my free pallets and tea stained and burned my map. I just need to put it all together. Thank you so much for showing me the way! I’d just hug your neck if I could, this is a personal quest <3
I love this! We recently moved to the coastal area of SC around Hilton Head Island and I was in West Marinewith my husband and found a map of the coastal areas between Savannah GA, where my husband now works, and up to St. Helena, SC. It also includes Parris Island Marine Corps Training Depot which is where my son, whom we lost in active duty in 2012, went to bootcamp
We stumbled over here different web address and thought I may as well check things out.
I like what I see so now i’m following you. Look forward
to finding out about your web page again.
We stumbled over here by a different page and thought I should check
things out. I like what I see so i am just following you.
Look forward to checking out your web page again.
In fact no matter if someone doesn’t know after that its up
to other visitors that they will help, so here it happens.
certainly like your web-site however you need to check the spelling on quite a few of your posts.
Many of them are rife with spelling problems and I find it very bothersome to inform the truth then again I will definitely come back again.
May I simply just say what a relief to discover
someone that actually knows what they’re talking about on the web.
You definitely know how to bring a problem to light and make it important.
More people ought to look at this and understand this side of your story.
It’s surprising you’re not more popular given that you most certainly possess the gift.
Hey there! Do you know if they make any plugins to protect against hackers?
I’m kinda paranoid about losing everything I’ve worked hard on. Any suggestions?
Oohh wooow!!! This is amazing!!!Grat Idea!! I love it so much!!I can’t find the map of this color but only politics map ..so sad!
:) :)
This is awesome!! I saw that wood plank world map in a model home we looked at and I have been looking for it since! I have a small obsession with maps and globes. I found it on rodworks.com but it’s out of stock of course. Then I came across your page and I think yours looks way better!! I can’t wait to make my own :) thank you for the tutorial.
Great idea. I am going to try one of Scotland. I think it is from Iron Trade Imports, btw.
:)
Hi, Im wondering what the measurements of your pallets were as well as your map. I’m going to try and find similar palates. Looks great!
Good word of mouth is the best lead generation method. You
may have been enticed into the business by a slick solo ad
or article that said you could start seeing five figure incomes per month within your first 30
days. By focusing online marketing efforts to a specific demographic, a company may be
able to increase its chances of connecting to their site’s visitors.
This is such a great idea; have you also considered painting the doors on your wall the wall color; they will blend in and not be so distracting to your decor
ha! Yes…but everything takes time…wish I had more of it!
Amy,
Do I need to use mod podge? If I glued the back of the strips as I put them on the pallet planks, then sealed it with the poly would that work? Or would it cause crinkles in the maps finish?
No…poly should work the same…probably better!!
Found it :http://rodworks.com/product/world-map-on-wood-planks/
Wow!! Yay! Thank you so much! That was driving me nuts when I couldn’t find it!
I can not find the $1 map? Can I get a link?
I would love to have the link or what you searched for where you found you’re map. I’m not finding anything on Amazon for $1
I love the idea. I looked in Amazon and can’t find it. Can you help me out. Thank you
Great idea! Just finished recreating this for myself.
Hey, I’m attempting to make this myself! Did you brush the mod podge over both sides of the map? Thanks!
This is my first DIY project. What are the measurements for the map, plywood and pallet boards? Thanks for your help.
Love this!! Can you tell me what size the map was that you got? Or do you happen to know the link to the map you got on amazon? Thank you!
I LOVE LOVE LOVE this idea and it is exactly what I have been looking for! This will be an upcoming project to compliment our new living room decor. I think I am going to use nails to mark the places we’ve been (rather then push pins).
p.s. they sell something less rustic online matted and framed for greater then $100.
GREAT project! Thanks for sharing!
Yay! I am so glad you love it and want to make one! Would love to see a pic :)
Finished! Thanks for the inspiration. I love my new map though now my friends like it so much I’m going to have to make more!
Yay! I am so glad you were able to make one!
Thanks for the idea, we have a large family reunion coming up and as the family historian, I used this idea to track our grandparents from central mexico (1913) to cleveland ohio (1926), I used push pins with little flags to show the places they lived during their journey……this is going to go over big.
Thank you so much for sharing your fun use of this project! I just love it!!
What’s up to every body, it’s my first pay a quick visit of thhis blog;
this webpage carries awesome annd truly good data in favor of visitors.
I love this tutorial, can’t wait to do this!
Thanks, Eleanor xx
http://lovelaceandlilies.blogspot.co.uk/
So glad you love it! You will have to send pictures of the finished project.
complimenti…bel lavoro…e bellissima idea ci provo anch’ io….. grazie :)
By chance do you remember what size map you used? We are trying to decide the best size to get and your room pic looks like the ideal size. :)
Hi Amy, I was wondering, how much did this project cost you all together?
Just stumbled upon your site with this project and have to say I LOVE it! I’ve been looking for an old skool project as a main-piece for my office. I’ll try it out this coming weekend and let you know how it comes out! :D
What size is the map?
Thank you! I made my own map with your tutorial. https://sztukadomowa.com/2016/04/27/zabawa-w-deche-cz-2-fotorelacja/
Turned out beautiful! Thanks for sharing!
Valuable info. Lucky me I found your site by accident, and I’m shocked why this accident didn’t happened earlier! I bookmarked it.
Nice DIY pallet projects. I have different project idea. I will use it as frame to my indoor koi pond project
Gian- What a great idea! I would love to see pictures of the finished project!
That is an absolutely crazy idea! My son lives pirates and he will be so into this! We may even have to make him a flag of the jolly roger in a similar style, maybe someone here could advise me on how to make a convincing flag using plywood and pallet wood?
Anyway thanks for the amazing idea!
I hope you make one! My son has loved it!