
Ever dig into the depths of your purse trying to find your car keys, while simultaneously juggling groceries and a wiggly toddler? Well I have. One too many times. Today I would love to share with you how to make these fabric keychains that can be worn around your wrist for easy access. Let’s get started.
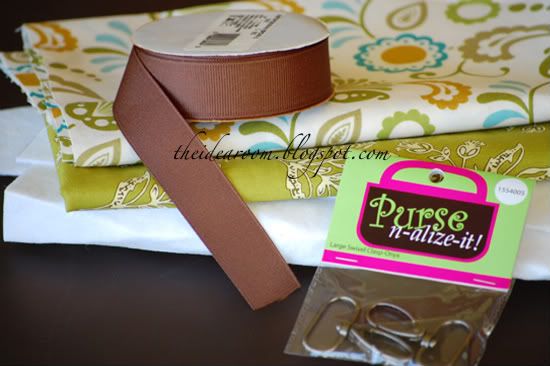
For this project you will need:
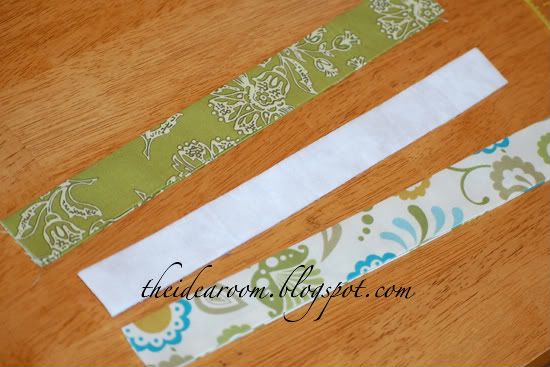
- 2 coordinating fabrics
- 1 strip of fusible interfacing (I used Pellon 809 DecorBond)
- 1 purse strap clip (I found mine at JoAnn’s Crafts)
- 4 inches ribbon (mine was 7/8 inch width)
- matching thread
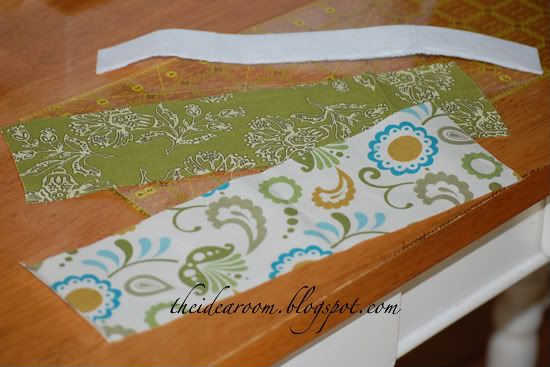
First, cut your fabric so that you have a strip of each material that measures 2.75 (2 and 3/4) inches by 13 inches. Cut 1 strip of your fusible interfacing to measure .75 inches by 12 inches.
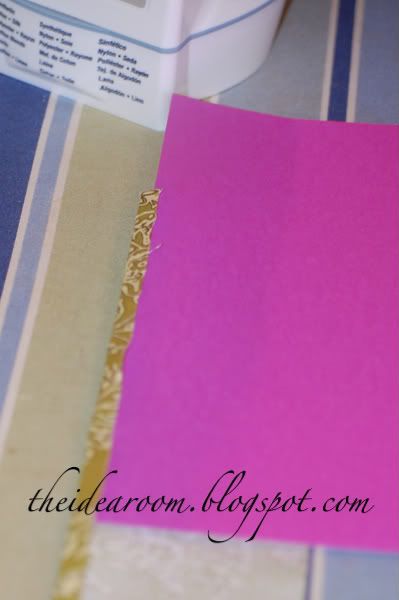
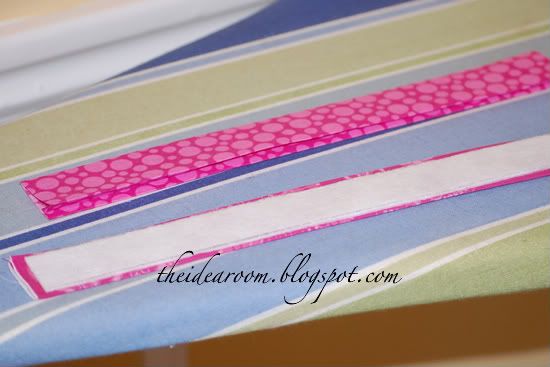
Iron both strips of coordinating fabrics a 1/4 of an inch down both sides with the right-side of the fabric face down on your ironing board.

I use a piece of card stock paper to fold the material over to give me a nice even hem line.
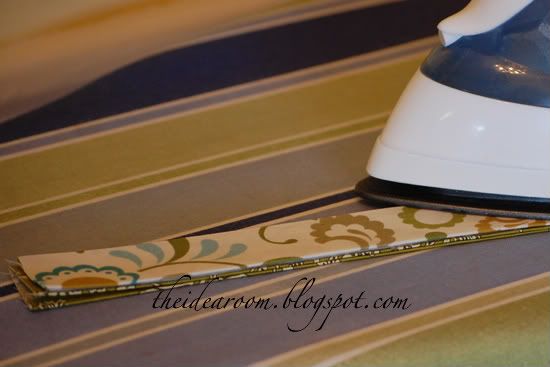
When both fabrics have been ironed, fold the material in half length-wise and iron. Be careful to match the edges up nicely.
Take your strip of fusible interfacing and place it evenly between your two coordinating fabrics. I make sure the folds of each ironed fabric are on opposite sides.
Iron these together. This will temporarily fuse the top and bottom materials together so they are easier to sew, and will make your key chain a little sturdier.
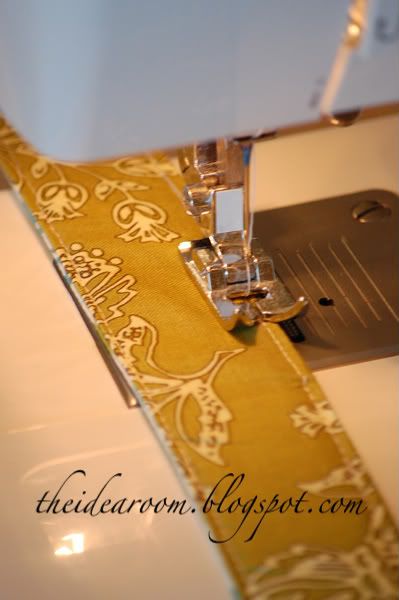
Now sew along both edges of the key chain. I sewed mine fairly close to the edge which was about an 1/8 inch seam.
Now, take your purse clip and slide it onto the key chain. Be sure that the clip is on top of the material you want to be on the outside of your key chain. Place the two raw edges so that one is overlapping the other one about 1/4 of an inch (or to the fusible interfacing).
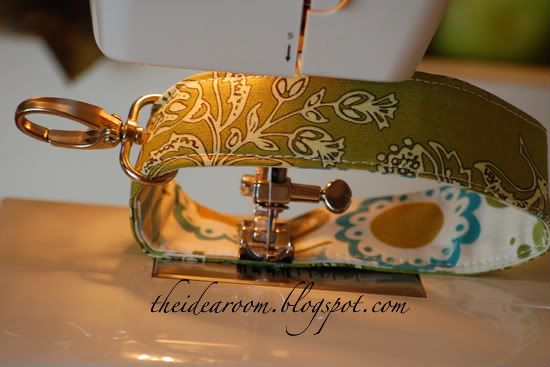
Sew these together using a zig-zag stitch several times back and forth so that it does not come apart.
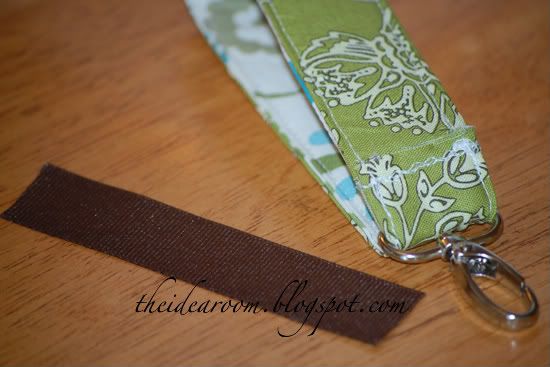
Take your strip of 4 inch ribbon and burn the edges with a lighter or a match to seal it so they do not unravel. Do this very carefully! Move the purse clip around the key chain until the seam is about 1/4 to 1/2 an inch above the clip. Take the ribbon and wrap it around the area where the two ends have been sewn together. Tuck both ends of the ribbon to the inside of the key chain.
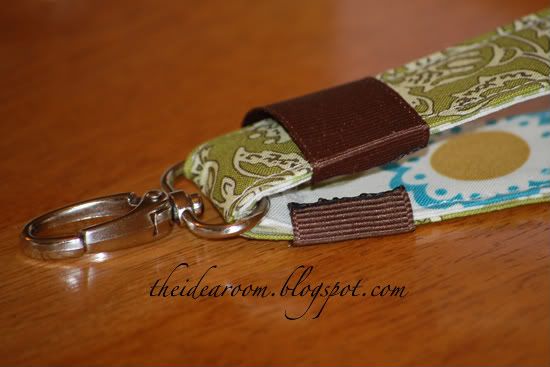
Pin in place and sew the top and bottom of the ribbon. I changed my thread color so it matched the ribbon and was less noticeable. Remember to reinforce your seam. I went over it twice so it will hold up.
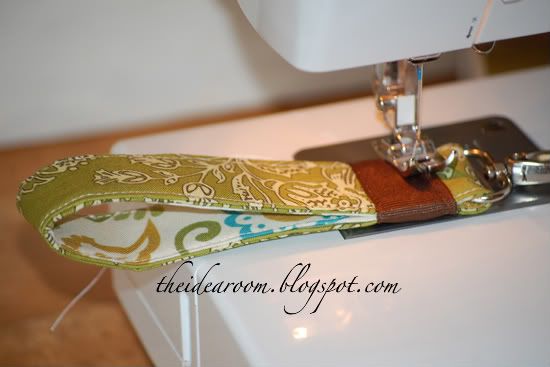
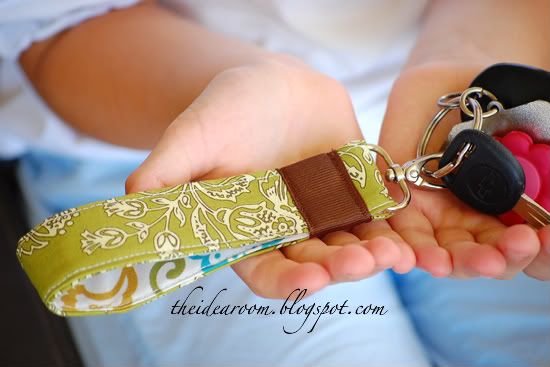
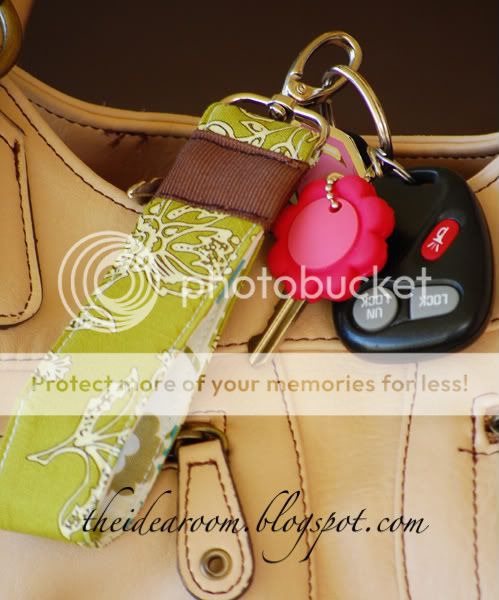
And there you have it…a cute and functional key chain.
JOIN OUR NEWSLETTER
Would you like more Recipes, DIY, Printables and Organization Ideas?
Subscribing to the newsletter will enable us to periodically send you creative content exclusively for Idea Room subscribers.
*View our Privacy Policy here.


These are sooo cute! I am going to make one this weekend.
I bought one of these (similar) on Etsy, but my kids managed to break it. Yours looks lots sturdier. I'll have to give it a go. Thanks!!
I loved!!! Congrats for ideia!
Your creativity is amazing…these are wonderful and I can't wait to make my own!
Love the fabrics and ribbon you chose…Perfect!
I enjoy your blog so much…my FIVE are all grown up..sigh..but I shared your blog with my creative daughter who has Four!
Thanks again..
HOPE~
this is a "must make"!! i know these will be included in gift bags i make for my mom & sis. for xmas…thanks for the great tutorial! xo
Oooh – I LOVE this. definitely going to make it.
i am so excited that you posted this. I carry this type of keychain everyday that I bought commercially made, and it really is handy! I am so glad to have your step by step tips with photos (awesome!) to make more!!
LOOOOVE this!
Such a fun idea…I just started sewing and am anxious to give this a try! Maybe I can handle it :) Thank you for the easy follow steps!
We have linked you up on our new blog as well because we love your creative and fun ideas!
Happy crafting!
I love all of your ideas and I have a question. Where do you like to get fabric from? You always use such cute stuff I just wondered if there is a great place you use
darling!
I love it! I have to get reacquainted with my sewing machine.
Can't remember how I found your blog but I am loving it and all of your great ideas. Thanks so much for this tutorial.. it's just what I need!
Thanks for the instructions! I just bought material the other day to make a camera strap cover – maybe I will have to make a matching keyring.
I love this! My key chain is pathetic- something I don't really think about until I see something cute like this!
I loved this project. I posted a picture on my blog (www.rockiescrafts.blogspot.com) of the one I made for my sister in law.
Thanks for the super easy instructions!
love this idea, i'm going to have to try it out with some cute Hawaiian fabric…watch for the post on http://www.cuddlewithaloha.blogspot.com
thanks again
i just got this as a gift and LOVE IT! my life is so much happier. I was excited to find the tutorial here and will have to share. thanks!
This is wonderful. I just saw it on giverslog and I'm in love. Big problem though – I don't have a sewing machine! :( What to do??
Please help. I bought the same name brand or thats what handcocks said it was fusiable interfacing. Mine will only stick to one of the pieces of material.it wont keep material together any suggestions.
What a fun tutorial! I am totally going to make some of these from my zillions of fabric scraps for Christmas Gifts for my girlfriends!
Beckie from Infarrantly Creative sent me over. What a fun blog you have!
Thanks for the awesome tutorial! I just made myself one, check it out on the ol' blog.
http://laurenspired.blogspot.com/2009/11/cool-keychain-for-me.html
(the pics don't do it justive, it looks ten times better in person) thanks again!
Hi!
Today I posted an entry on my blog with a link to this tutorial.
I'd appreciate your letting me know if that's OK.
Thanks,
Nancy Ward
http://paperfriendly.blogspot.com
I made 6 of these last night, and plan on doing some tonight after the kids are in bed. I just love them! Thanks for the great gift idea and awesome tutorials! I just discovered your blog recently, and it became an instant favorite!
This is adorable! I put a link on my blog: http://ificould-ificould.blogspot.com/2010/04/fabric-key-chain.html
If you want, grab a button saying you were featured: http://ificould-ificould.blogspot.com/p/featured-sites.html
Thanks for the great tute!
Missy
I did not think I could do nice things from my house! I love getting information like this! continue writing and sharing much more!
This is awesome. Thank you! Oh, and P.S. We have the same ironing board cover. Target? :)
What a great idea! I'm definitely making one! Thanks for the tutorial and for the great tip on using card stock! This is a great gift idea!
Thanks. I made one now I have to make one for my three daughters. I love it!
Thanks so much! I've been thinking about making one for my daughter who will be getting her driver's licence in a few weeks :D
I love this idea. I am definitely going to have to try it. Thanks for sharing!!!!
I don't have the means to make these but I really want to buy a few for Christmas gifts. When will there be more in stock? I love them!
love this key fobs … i have a question, though: i need to purchase some of the hardware, but can only do it online, what is the width of the connector, the thing that the fabric goes through!!! ….
thanks ….. darlene
I made a few of these and posted a link to your tutorial on my blog. http://culdesacmom.blogspot.com/2010/12/top-10-projects-from-online-tutorials.html
Thanks for the great tutorial!
I made myself and my MIL one and personalized them! It took a little extra time (to center the embroidery), but I put "Lisa's Keys" on the outside fabric and my cell phone number on the inside ~ just in case I happen to lose my keys they can contact me, but with my cell, they won't know where I live.
I absolutely love this idea. I am dying to learn to use a sewing machine and now I want to more than ever. It's the little things!!! What an adorable idea.
So cute! I need to make some of these. BTW this post came up on Stumble Upon. :) I’m going to re-stumble it.
I absolutely love these Amy!
so adorable! I *might* break out the sewing machine! ;)
Hello! I just “attempted” to make this today! I just had to use what was around my house, but when I visit the craft store again, I will get ALL of the supplies! For now, it was a great start to getting back into sewing! Here’s the link for my blog post sharing what I did :) Thanks for the inspiration!
http://chrissyandnathan.blogspot.com/2011/04/sewing-keychains-pinterest-oh-my.html
I can’t tell you how many of these I’ve made for friends, family, and teachers’ gifts. They always love them, and I love how quick and easy they come together! Thank you for the great tutorial!
I think I can make these! I featured this on my Inspiration Friday post…
http://www.laniejandco.com/2011/06/inspiration-friday-6311.html
I LOVE THIS! I’m so glad I found this tutorial. I need to make a bunch of these as gifts for my clients. Thanks for this easy tutorial!
I liked to your post after making my own. Here’s the linko:
http://thehenryhomestead.blogspot.com/2011/06/key-fob.html
Thanks for such a wonderful project!
Hi Amy,
I love your key chains and your tutorial was simple to follow. There is a group of folks that are trying to start up a park in Wisconsin for special needs children and I had made a few of your key chains and was hoping to donate them to sell and all proceeds would go for this project? Is that something I can do or would they have to ask for a donation and not sell them. Thanks for your reply,
Kathy
Wonderful tutorial! I shared on my blog: http://littleredhousedesigns.blogspot.com/2011/07/key-fobs.html
Love, love, love this and so going to do it. Thanks so much!
Just made 2 of your keychains and blogged about it. Great tutorial and great blog. Hope to make some more great crafty items from your site.
Great tutorial! You’ve been featured on the Quality Sewing Tutorials blog.
We hand select only the best free tutorials and patterns for home sewers.
Thank so much Jen! That made my day. I really appreciate it!
First of all, I am NOT a sewer! But, I decided to give these a try,and they turned out really cute!! You can see mine here:
http://www.stampwithtammy.com/2012/01/another-leadership-gift.html
Thank you so much for taking the time to post this tutorial! I just can’t wait to make one of my own! I did a search on the internet and your key chain holder was by far the cutest one on here! Great job!
Amy this is so cute & a fabulous idea. I’m gonna try doing it.
Thank you for sharing your idea with us.
This looks like one of those fun instant gratification sewing projects! I’m eager to make this for myself & for gifts. Thanks for the concise, chatter-free, photo-heavy tutorial. I pinned this to Pinterest crediting you by name & linking to this entry.
I love the fabric key chain, but I really like the flower key cover. Can you tell me where you got it. Thanks,
Liz
Oh, me too! Me too! I love the fabric key chain, but I really like the flower key cover. Where or where did you find that darling gem? Please do tell!
I just made one of these and instead of fusing them together, I sewed the edges just like you did and threaded a wide piece of elastic through it. I sewed it down at the beginning and after threading and stretching, sewed down the other end in place. The rest is all the same. Thanks for the tutorial and I’m gonna get a head start on this years Christmas gifts.
Thanks for the tutorial! I’m a newbie to sewing and made one without too much trouble. I’ll be making more as soon as I get the clips!
So glad you were able to make one without too much trouble. I am not a great seamstress and I need simple and easy too!
Where dod u find the purse strap clips?
Made these as a Christmas gift for friends and some family members, they turned out great! This was the very first time that I sewed anything, so don’t let a lack of sewing expertise scare you! I did make a few modifications though— I decided to widen the fabric by 1/4 inch, this made it easier to iron the crisp edge in the next step. I also cut the ribbon a tiny bit smaller (about 3 1/2 inches), this seemed to help it not bunch up as much while sewing. Thanks so much for the post! I’m hoping everyone loves these cute key chains as much as I do! I was making a bunch of these and decided to cut out templates to make the prep process quicker, it helped a ton!
Great tutorial. I made some for my daughters for Christmas. Thanks for the ideas.
Thank you for this tutorial brilliant and easy to follow. Just made my sister a lovely key fob for Christmas.
Thanks for the great tutorial.
I have had all the supplies for this keychain and I have finally made it. Great directions. thanks
Thanks for the instructions. I just scored a purse at a thrift shop for $2, and it had 4 of the purse strap clips, 2 sturdy rings and a magnestic snap closure I can reuse. I’ve already got everything else as I’m an avid sewer, quilter, and re-user. Happy crafting!
Oh, I hope someone will see my comment if it’s the blog owner or other commenters… I’m having a heckuva time finding the purse strap clips! Hobby Lobby doesn’t carry… Joann’s doesn’t carry… doesn’t anyone MAKE their own purses anymore? I hate to have to buy them online because I need to “see” what I’m buying first and photos don’t do justice. BUT if anyone has found these online, I’d love to know where? I need to try Pat Catan’s and Michael’s locally to see if they carry, but in the meantime I’m frustrated. Want to make a bunch of these for Christmas gifts!
Or if nothing else, I’d like to know the measurements of the “ring” that the strap goes through! :) That’d make it a LOT easier to buy online.
Sorry you are having trouble finding the clips! They used to be so easy to find. I found the link for them online at JoAnn’s but they are currently out. http://www.joann.com/everything-mary-black-175in-swivel-clasp-2pk/10088276.html At any rate…the opening is 1.75 inch. Hope that helps!
Thanks a lot for sharing this!
I just made one, your explanation is very clear!
I made my own version of your design as a gift and linked back here today! Thank you so much for sharing. Excellent tutorial!
http://www.feltwithlovedesigns.com/2014/05/29/pinterest-projects-fabric-keychain/
I noticed a question about the interfacing above, and I too am struggling with it! My interfacing is only fusing to one piece of the fabric, and after reading some tutorials online it seems like that is normal…how did everyone get it to fuse to both sides?! So confused! Please help!
It will only fuse with one side. This is fine. Just sew it up and it will work just fine. It just holds it in place so you can sew it.
How much did it cost to create such cuteness?
My only cost was the purse clips since I had everything on hand. If you bought the materials to make it for a few friends, it woulc end up being 2-3 dollars for each one depending on how much and where you purchase them.
GREAT TIP on here on how to get a nice clean STRAIGHT hem on fabric by using a piece of card stock! GENIUS!!!! Love it!