
I am so excited to finally have this customized towel rack finished! This towel rack has been brewing in my head for several months…long before we had repainted and done some updates to our Master Bathroom.

The previous owners of our home had updated this Master Bedroom from its original 1980’s state. They covered almost every wall space in this space with white tile (that has a slight gray undertone to it). It is not my first choice but hey…at least it wasn’t pink or some other outdated color right?!
We do not have the time, funds or desire to pull all that tile down and fix it up so we are trying to do our best to work with what we have. And…in all honesty…there really is nothing wrong with it…and with my new towel rack, I actually don’t mind all the white tile.

The towel rack was drilled right through the tile and was an ugly combo of gold and silver…which I was not a huge fan of. I wanted to be able to add some color to the walls too. So we drew up a design and planned out something that would fit perfectly in our space.

I was asked to participate in Lowe’s Creative Ideas challenge for the month of February and the challenge was bathrooms. I was excited to be able to finally be able to get this project started…AND FINISHED!! And since I practically do most of my home improvement shopping at Lowe’s anyways…it was perfect.

We spent some time browsing the aisles of molding at Lowes and decided to go with a more simple design to fit the overall look of our existing bathroom vanity. I happened to already have an old cabinet door that I had picked up from Habitat Restore back in the summer with two of my friends Becca and Char. I used this for the main cabinet in the base of the rack.

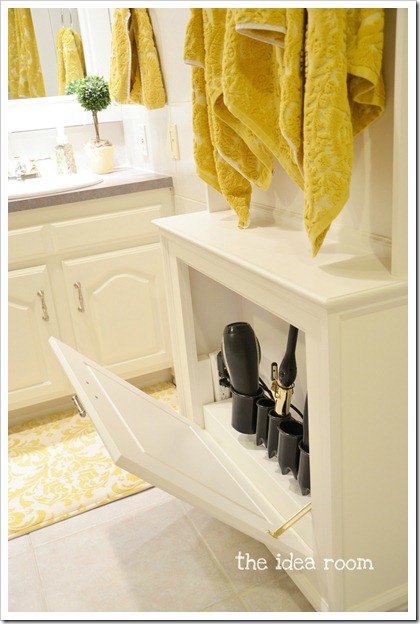
We also made it so that the cabinet door actually swings open. And I have a fun little surprise inside that I can’t wait to share with you in a later post.

I am thinking of adding a little bit of a subtle gray pattern to the inside of of the towel rack (the flat area where the towels hang) to give it a little more personality and color but still have not quite decided about that. For now I will leave it white while I think about that.

We did not have a lot of room in that spot since the vanity was there and we still needed to be able to allow for two people to stand there and get ready in the mornings. So we made the towel rack tall and skinny to fit our available space and to still be able to provide some functionality.

I will be sharing with you soon a tutorial so that if you are interested in building something similar in your home you will be able too. I am really happy with how it turned out…
Thanks to Lowe’s for helping us get motivated to get this project done! You can find Lowe’s Creative Ideas on FB for more great ideas. They also have a Lowe’s Creative Ideas blog…and you might recognize one or more faces there now…![]()

Be sure to come back and I will share with you exactly what was used and how we built it. Want to know how we updated other areas of this bathroom?
Framed in Builder’s Grade Mirror
*Disclosure—Lowes provided me with a gift card to purchase supplies for this towel rack.
However all opinions are mine.
Linking up here:


)
Oh my gosh, I LOVE it! It is so fabulous! And I think the white tile goes well with the white cabinet. It makes those splashes of color even “splashier”!
Thanks Emily. Glad you like the white tile and cabinet together. We had to figure out some way to get some color in there.
I think it looks great! For the gray, maybe stencil on that part with a flat pale gray in the same or a complimentary stencil as your rug?
That is what I was thinking too. A nice soft gray that doesn’t compete but just adds a little interest to the piece.
Love it! Very inspiring, however, I must ask where did you get those towels? I love those more than life itself!
ha! I LOVED them too and this was my splurge item. I bought them at Anthropologie…my first and only purchase from them. :) I think they still have them in stock!
This is brilliant! I hace a nice blank wall in my bathroom and it is inset out 10 inches and this would be perfect! Please do let us know how you built it! Thanks so much!
That sounds like it would be the perfect spot Wendy.
It looks great! I can’t wait to see what’s inside the bottom cabinet!!! Something like this would work great in my bathroom. I’ll be watching for the how-to!
Thanks Pamela. The good thing is you could adjust the size and measurements to fit your own space and make one totally perfect for you. Hoping to get the tutorial up later in the week.
Love this!! Love the colors too!
April
Wolfelicious
Thanks April. Yellow is pretty much making me really happy right now too.
Are you kidding me?! That is FANTASTIC!! Love it, love it, love it.
Probably gonna steal it. Hope you’re ok with that! ;-)
haha! Thanks so much for your fun comment.
that looks so cute! i’m going to guess you have a laundry chute hiding behind that door. i’ve always wanted one of those in my bathroom.
Thanks Megan. A laundry chute would be pretty awesome! ;)
Such a great idea! I have been wanting to do something unique in my master bath too! And I think you just gave me the idea! Excited to see what’s in the bottom, I would hide a garbage can in there (hate that’s out in the open where my baby thinks it’s free game) And I also love your towels! Do share where they were found! :0) Thanks for the inspiration.
Oh yay! I would LOVE to hide the garbage can. That is definitely one of my pet peeves too. Towels are from Anthropologie!
Ho. Lee. Crap…that is so freaking pretty. You are ROCKING these home improvements Amy! Those towels are super yummy too. Hope you’re planning on me moving in this summer. Just get ready.
Haha! Thanks so much Lara! I am getting your room ready as we speak :) I hope Patrick and the kids don’t mind…although would love to have them all. We could be one BIG happy family!
Love!!! Wish my bathroom was big enough for something like this! LOVE!!! ;)
Thanks so much Valerie. I really appreciate it.
This is so nice! I love the idea for towels! We have the most awkwardly designed bathroom with no good place for towels and this is perfect!
Thanks Lisa! It would be great if you were able to make something to fit your bathroom as well. I will be sharing it later in the week if I can get it written up.
Love the colour scheme. Got similar colour bath mats from West Elm but in Zig Zag, would love to get my hands on those towels. Love it!
Thanks Grace! That would be so fun to add the towels with your West Elm mats! The towels are from Anthropologie!
WOW! That is so beautiful. I have never seen anything like that before. What a great idea.
Megan
I love this! We bought an 80 year old lake cottage that has been through decades of bad decorating decisions, and, the bathroom has to be gutted and redone. I still wanted the bathroom to look like it was built when the house was, though. I think this suits the period of the house as well as our desperate need for storage, and I ALSO have some cabinet doors that I picked up for FREE from a scratch and dent furniture store that went out of business. ;-) I’ll watch for the plans!
I love it! Beautiful! Where is the rug from?
LOVE!!! I love the color combos! I was going to ask where you got the towels but just read they were from Anthropology! (Love them too!) :) I’m always filled with inspiration when I leave your blog. Thanks for sharing! xo, Reannah
Ugh! I can’t stand it!! what’s behind that door??
oooo lovely! can’t wait to see behind Door #1. Me thinks it’s either a laundry chute, appliance storage, or a secret entrance to the magical land of Narnia. Love this idea….just might have to steal it in some way for my own bath. Thanks for the great concepts!
I can’t wait to see the tutorial! This would be perfect in my bathroom. My bathroom is large, which is a plus, but there’s this odd dead space between the toilet and my huge sink/mirror/counter.
Beautiful & so clever Amy! You and your husband are really handy with wood and DIY projects. I just love them and how you provide directions detailed with photos. Can’t wait to see how you utilized that cabinet space you created. I too am guessing a laundry chute! Please post part 2 soon!
I love this!! Pinning it now!!! :-)
gatheredinthekitchen.com
What a fab idea, and if there’s a laundry chute behind that door, even cooler!
I love it!! What a great idea!! Your bathroom project turned out amazing! Well done! :)
This is so cute! I love the yellow and white too! I would love for you to link this up at our Naturally-Nifty Linky Party!
http://natural-nester.blogspot.com/2012/02/naturally-nifty-linky-party-4.html
Love it! Where did you get the rug? Also, what paint color did you use? Great job!!
I love this!! I feel so stuck lately. Stuck in infertility and stuck in my home. This has just inspired me. Thanks!
Cool Amy! That would be a great space to store curling irons and a hairdryer-that would be my guess!
What a great project! Looks like it gives your bathroom a fun punch of personality, beautifully done!
(visiting from WhipperBerry)
Seems like the tile would be perfect for a boys bathroom. Tempting! Great use of space.
I love the towel rack and so does my wife. Your creativity is awesome! It looks very classy and a great use of space. My wife wants to know if I can rent your husband for a weekend to get all my projects done….right.
Haha! You are too funny! Thanks for the kind words. Yes…you can borrow him…just feed him every two hours and he should be good. I will need him back though as I keep adding to his “honey do” list! And…I am being serious. He would love to help!
Awesome that sounds great. I like the hair tools storage from your more recent post. I will have tosend you pictures of the room along with some chocolate cake to get the creative ideas flowing and then rent your husband for the weekend to get the projects done.
Wow I can’t wait to see the tutorial! I need one or two of these!
Maybe you could get a grayish slap of marble cut to fit the top and just lay it there….in case you change your mind later