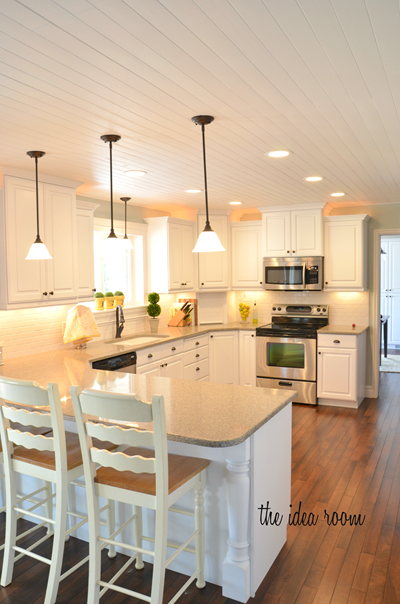
As one of Lowe’s Creative Bloggers on the Lowe’s Creative Ideas site, I was given the challenge to update my kitchen. The challenge was issued back at the beginning of the year. It just so happened that we were smack dab in the middle of a kitchen re-do. Perfect timing right? So I decided to fulfill my dream of having a wood plank ceiling. In this post I will share with you How to DIY a Wood Plank Ceiling.
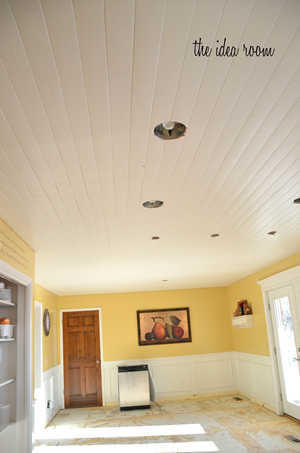
{After}
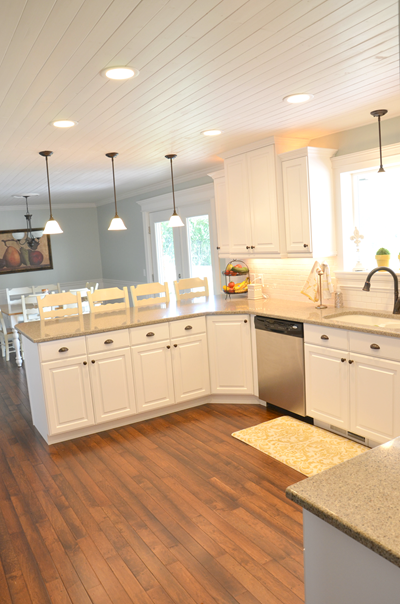
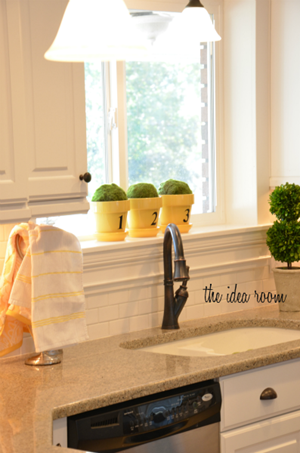
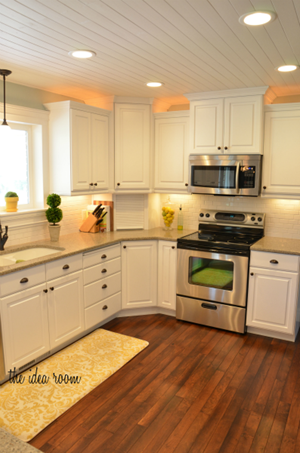
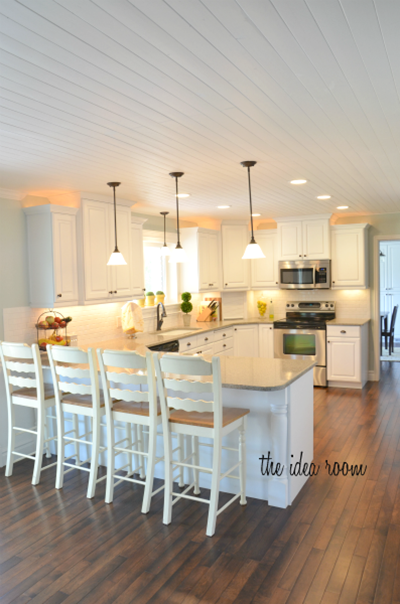
I shared with my readers a few sneak peak photos as we moved along in the extremely SLOW process of DIY home remodeling. And I am so excited to be able to share with you how our kitchen FINALLY turned out. We are not completely finished. We still have a few finishing touches, along with the wall décor to complete, but I am really happy with what we have done so far.
{After}
When school ended in June we stopped working on the house remodel completely so that we could have a “normal” summer when the kids were home and underfoot. And now that start of school is less than a week away, we plan to FINALLY finish up all the loose ends.
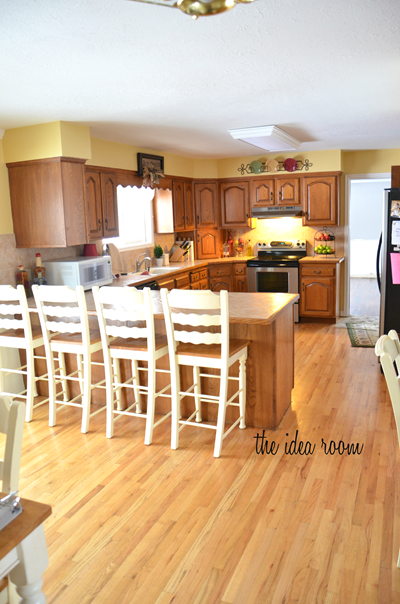
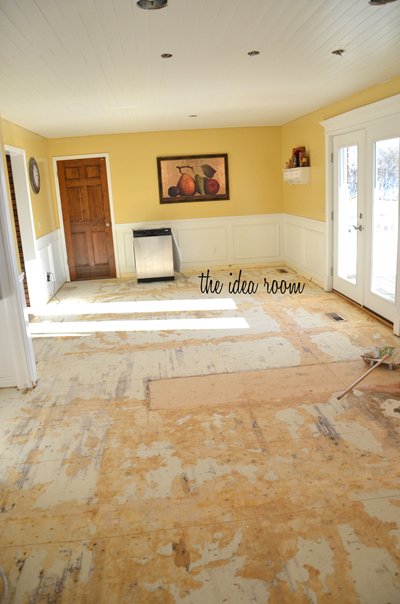
{Before}
(I can’t believe how YELLOW my kitchen was…I am so happy with the new look! Funny to think that I LOVED that color not too long ago! But then again I am a person who likes to change things up…if you haven’t noticed :).
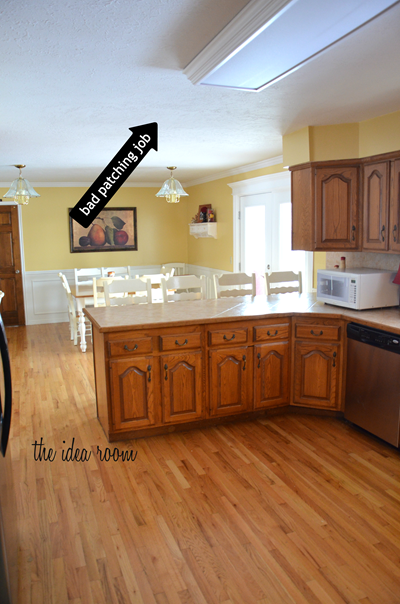
{Before}
So for the #LowesCreator Kitchen Project, we decided to install a Wood Plank Ceiling. I have always loved the look of them but wanted to make it a bit “fancier” and paint it white. Part of our motivation for the wood paneling was to cover up a horribly ugly patch job on the ceiling to cover where some wrap around cabinets had been removed by the previous owners. It was pretty bad. We also combined the two lights over the table and centered a new single light over our dining area. Then we had some canned lighting to the space. So needless to say we had a huge ceiling repair on our hands. Planking the ceiling was a great option and actually saved us a lot of repair work.
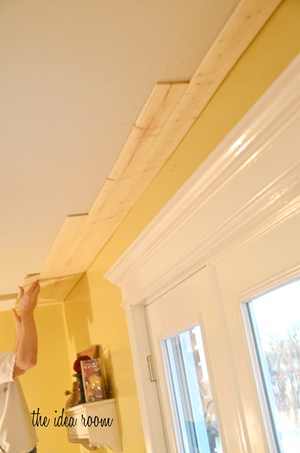
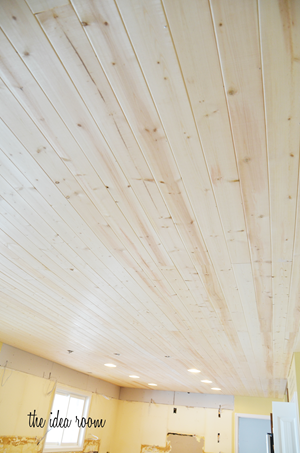
We ended up using these V groove, Pine Wood Planks from Lowe’s. They were pretty inexpensive for a pack of six, 8 foot long pine planks. We put them up in a staggered pattern so that all the ends would not be lined up for a smoother look and finish. We added a thin line of painters caulk to the back side of each plank and then stuck it onto the ceiling. Then added some nails every couple of feet to secure it to the ceiling.
While my husband and son put the planks on the ceiling, I followed behind them with the painter’s caulk and filled some of the bigger cracks and knot holes in the wood to give it a smoother, less rustic look. The process was pretty tedious but so worth it for the finished product!
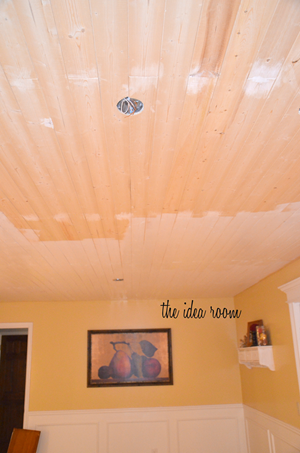
After allowing the caulk to fully cure, we primed and then painted the wood planks white. We some crown molding in the dining area to cover up the uneven edges where the ceiling meets the walls. Then in the main kitchen area, we added just a small flat trim molding to cover up the edges as the city scape cupboards had crown molding and it would have been difficult to match up the crown molding on the walls and cabinets.
I can’t believe we are so close to getting things completely finished up and will for sure share with you the final touches when we get them. We did the entire kitchen tear out by ourselves (with some help from our family and our kids). We were originally thinking of just painting our existing cabinets white like we have done with some bathroom cabinets, but considering our home is 30+ years old we decided to replace them. I am so glad we did because as we started to tear them out we could see just how water damaged and rotten several of them had become especially around the sink area. A couple of them just literally fell apart.
We had the cabinets built and installed along with the dark wood flooring. All the rest of the work was done by us. I am planning on sharing several tutorials in some future posts if you are interested in exactly what we did. I am not going to lie, it was really A LOT of work, but I am SO glad that we did it the way that we did! So now you know why I might have been a bit of a crazy person these past several months.
Did you know you can sign up to receive the Lowe’s Creative Ideas magazine on your i-pad or i-phone? There are a lot of great ideas being shared from month to month.
**Disclaimer: I was given a gift card from Lowe’s for this project.
However all opinions and text are mine.
JOIN OUR NEWSLETTER
Would you like more Recipes, DIY, Printables and Organization Ideas?
Subscribing to the newsletter will enable us to periodically send you creative content exclusively for Idea Room subscribers.
*View our Privacy Policy here.





What a difference!!! Very inspiring post. Love your new kitchen and ceiling. It’s my dream to have my wooden kitchen all white once…. and the ceiling with built in lights just like yours. This is truly and inspiring post and I’m looking forward to more. Thanks!
Bye,
Marian
Thanks so much Marian! Hoping you are able to get a new kitchen for yourself too! We have just loved the transformation.
HI Amy,
I just found your pics, and fell in love. What a great job, it looks wonderful.
I’m working in my downstairs bathroom, my whole home has those pop-corn
ceilings, so, I’m trying to get most of it down in the bathroom, not an easy job!!!
I am going to put the boards on the ceiling (hope it looks as good as your work). Now I’m
wondering how much of the pop-corn I need to remove, and if I use the glue on the back of the board I wonder if they will adhere to what is left of the pop-corn. Any ideas?
Margaret
Hey Margaret! We live in a manufactured home and have popcorn ceilings. YUCK! We have covered the bathroom and the laundry room with sheet rock as we were going to put sheet rock in those rooms and tear down the popcorn…but in a manufactured home, you can take all the insulation you can get so we just installed it over top.
Just last weekend, we began using the same paneling as in this post to cover our popcorn ceiling in the living room. We scraped the popcorn so it was just not bumpy any longer. The smaller side of the living room (divided by a center beam) was done with Loctite glue and a nail gun ( GET A NAIL GUN!!! BEST TOOL EVER! besides a Kreg Jig) and it is solid. Just make sure you get a stud finder and run along the ceiling using a marker to mark where the studs are. You want to be sure that you get some nails in some studs to be sure the whole thing stays up.
The second side of our living room we are going to try using flat strips about 1 1/2 inches wide run on all edges and in the center to fasten to the studs. This way, we’ll use less glue, but also be sure to be nailing every single piece into something that’s being supported by studs.
Good luck with your ceilings!
Hi Beth, thanks so much for your post, it’s great to have a place where we can find good techniques and help from real people.
Good luck to you too with the rest of your ceilings and I’ll look into getting a nail gun!!
Thanks again,
Margaret.
Good Evening Amy
Love the work you did. Is their anyway I can get more step by step instructions. Looking to do the same style on the main floor.
Thank you
Mario- This post was awhile back. Sorry I don’t have more clear instruction for you. If you have any specific questions, I may be able to help though. Thanks.
I am in love with your ceiling! I’m gathering ideas for my own kitchen remodel & this is my first decision made! Thanks for a great review.
Yay! You will be so glad you did! Good luck to you on your remodel! It is a lot of work but so worth it in the end.
Wow Amy if you hadn’t included all those step photos, I would have sworn that kitchen came from a magazine! Simply stunning, and I LOVE the planked ceiling! Gorgeous, just gorgeous :)
You are too sweet Amanda! Thanks so much for the kind words. Hope you are doing well. Loved spending time with you in Dallas!
I really LOVE your ceiling – amazing job on it!
Thanks Mandy! Fun to have both you and Amanda stop by right after each other. So good to meet you in Dallas! I really enjoyed getting to know you!
Beautiful! I LOVE the ceiling!! Your kitchen is so bright and airy now – good job! :)
Oh Amy!!! You whole kitchen is stunning! STUNNING! I know how much work it must have been so I hope you can sit back and enjoy it now that it is done. I am off to pin :)
Thanks so much Stacy! That means a lot coming from you as I feel like you are always inspiring me with your DIY projects!
LOVE it!! Could you tell me the dimensions of the room, I am in the planing stages of my own kitchen reno, and your kitchen is layed out very similarly to mine!
We have a long skinny kitchen. Our kitchen is about 15 feet across and 30 feet in length.
The kitchen is so beautiful, warm, inviting and light filled! It’s stunning. I hope you are thoroughly enjoying it. I love the ceiling treatment. My husband and I have this on our to-do list. We started talking about it about a year ago but we got sidetracked by a fireplace makeover. So glad you shared. I will be pinning so I can show him later.
Again… gorgeous! Gorgeous! Gorgeous :)
Thank you Shannon! We have a fireplace that needs some serious makeover. Do you have any photos? I would love to see what you did. Good luck on your kitchen!
this is incredible! omg, amy what a beautiful kitchen.
i KNOW how hard it is to work on ceilings. yes, the end result is always worth it, but those neck aches & arm pains make it so hard.
your kitchen is beautiful!
have a super day!
xo
kellie
haha! So true. I had such a kink in my neck and back after all that work up there. But it was worth it!
Amy this is GORGEOUS!!! I’m getting new appliances soon, and would love to do this to our kitchen!
So fun! I can’t wait to see if you end up doing it. Thanks Cheryl!
I love it! I am dying to do this to my house. Let me ask you can you see a crack at the ends of the boards? The picture looks seemless. Great job!!!
Yes. You can see the cracks. I did minimize them with the use of painter’s caulk, especially in some of the bigger cracks. But you can still see the faint lines. But it is not very noticeable unless you look up for them. Not sure there is a way to avoid them completely.
Can I get a little more info about your countertops? We are putting white cabinets in our new home and I love how well your countertops go with your white cabinets.
Thanks!
Oh and the ceiling looks incredible! Great job.
We went with a Quartz countertop. We went through a lot of options and decided Quartz was the best for us. I have been so happy with it. It has a lot of gray and some beige in it.
My kitchen is a bit smaller than yours but I have a similar dream. LOVE the ceiling! LOVE LOVE LOVE it. Pinned your pictures. :-) Yay!
Thanks so much Dixie! So happy to have you pin my images!
Love the kitchen….just one thought…IMO it would look a lot better if you changed the under and over cabinet lighting to lights that put off white light vs. the pinkie orangie yellowie color that your current ones do. That would help the light and white and airy feel of your kitchen be totally cohesive.
Your kitchen is absolutely GORGEOUS! Love the new cabinets and I’m in love with your ceiling. I may even marry it.
haha! Thanks Emily. You can come over anytime and spend time with it if you feel so inclined!
Thank u so much for sharing this with us! I’ve always wondered how people do this and these instructions/illustrations are awesome. Plank ceiling is a must for our future home!
Beautiful Kitchen! Where did you get your floor mat in front of the sink?
I love it! I’ve been going back and forth between wanting to do the ceilings with planks like this or the Armstrong ceiling tile/plank kits (which are expensive!) you said you put them up ‘staggered’ not worrying about lines matching up, is that right? And it looks like you ran the planks with the longest length of the room? Thank you for this post! I need to hide cottage cheese ceiling affordably :)
How did you make sure it kept square as you went?
Beautiful! I’m in love with your new upscale kitchen. It looks really high-end! Congrads on having a beautiful kitchen!!!! Love it!
Thank you so much Michelle! Good to see your name pop up on here!
Oh my goodness, Amy, what a transformation!!! This is absolutely gorgeous! Well-done!
thanks Sara!! Just stopped over to see what you guys did! Love that light fixture!!
Amy, beautiful job with the kitchen! I love all the changes, the new cabinet, and esp. that planked ceiling. Gorgeous! I know the pain of a kitchen remodel. I tore out my fixer upper kitchen & it’s just getting put back together with Ikea cabinets and granite. So exciting! And I loved seeing yours too.
Thank you so much Rhoda! That really means a lot to me coming from you! Love seeing the changes you are making in your home too! So very exciting for sure!
I think I have the same wood floor in my kitchen. Love them.
Yay! don’t you just love the floor. I LOVE the dark wood. It forces me to sweep my kitchen daily…which seems like a bad thing but it motivates me to keep a clean kitchen. I need all the help I can get some days!
Tell me about your floors? What brand/style/color. Love them!
Absolutely GORGEOUS! You are making me thinking about planking our ceiling (won’t the hubster be thrilled).
haha! My husband laughed out loud when he read your comment as did I. We should get these blogger husbands into a support group! Although my husband *usually* enjoys our projects!
I love your kitchen! The planked ceiling is such a beautiful and unexpected feature!
Thanks Kimberly! What a sweet comment. It is one of my FAVORITE parts of my kitchen! haha Who would have thought a ceiling could be a highlight?
Your ceiling and kitchen look absolutely beautiful Amy! I would love to add a planked ceiling to one of my rooms for a Scandinavian feel :)
Smiles, DianeM
Thank you Diane! I didn’t realize that was Scandinavian! My family is from Scandinavian lines so no wonder I am absolutely in love with this style! xoxo
Amy I love it, it’s so pretty! You guys did an amazing job!
Thanks Mindy! We need to get together when things resume back to “regular schedules” as if there were such a thing!
Yay, Amy, so excited that this post in live! I feel special that I got to walk through your lovely kitchen in July, and have been excited for you to share this with your readers!!! Looks so amazingly beautiful!!! Seriously, looking at that ceiling makes me drool, but I can’t imagine the patience it must have taken to hang it–way to get your son involved. Looks fab!
Thanks Kristen! So glad you were able to come and see it in person too! It was a lot of work but totally worth it! Hope to see you soon!
Love your kitchen sooooooo much!!!!! I will show it to my interior designer about this and hope she can visuallize what I want for my new home :) Thanks, Amy!
Thanks so much Joanne! Are you moving into a new home soon? How exciting!
Wow! What a lot of work, that is well worth the wait and time! I love your new paint color too. What kind of paint did you use and what color is it? Thank you!
Thanks so much Lisa! The paint color is Quiet Moments from Benjamin Moore. We love it!
I love your new kitchen! You did a fantastic job. What does the wall with the refrigerator look like? Have you taken any pictures of that wall? My kitchen layout is similar to yours, and I would love to see what you did with the wall opposite the sink. Thanks!
I too would like to see what you did with the wall not showing. We have a similar kitchen and I love what you have done with yours.
Hi Amy – we are in the process of gutting our kitchen. Would you mind sharing the details of having someone build your cabinets. We are in Michigan, so we would probably have to find someone locally…but did you find this a more cost effective method over say a home improvement store kitchen?
Gorgeous and loaded with charm and character! Job well done! Quite an impressive overhaul, and a far cry from where it all began! Love it!
OMG, it is beautiful!!!
How tall are your ceilings? I have a popcorn ceiling that is awful and this might be a good solution for it…but I barely have 8 ft ceilings….Thanks!
Love the ceilings!!!!! Your kitch is gorg but those ceilings especially- gah! LOVE the look! Pinning under my “we’re building a house board” which has turned into my “we’re renovating a 1930’s house board” and I can’t wait to do this to the kitchen ;)
Thanks bunches for the inspiration, Amy!
:)Kristi
Your kitchen is beautiful!!! Can you please tell me the brand name and color of your wood floors? We will be doing our remodeling project this fall and I love what you chose! Thanks for your help!
Love the planked ceilings. If you dont mind me asking..what is the height of your kitchen ceiling
The height of our kitchen ceilings are 8 feet.
I’ve been dreaming of this in my bathroom and to see it here makes me want to hurry up and do it! I’m featuring this so all my readers can see the beauty. Showing it today at somedaycrafts.blogspot.com
Thanks so much Michelle! I really appreciate you featuring it!
Your planked ceiling adds so much character to the space! And your kitchen remodel is amazing. I hope you don’t mind if I pin your photos as inspiration for when we do our kitchen over!
Thanks so much! You are really sweet. Good luck with your kitchen remodel!
I have always loved this look of a plank ceiling! I wonder if I can talk Hubby into doing that to our kitchen and living room area. I also want some wainscoting done in all of the rooms except maybe the bathrooms. Although I think they would look good with the wainscoting, too.
What a difference some paint and some boards make! Awesome! And we happen to have a Lowe’s real close to where we live. =)
Thanks so much Deborah! Hopefully you can sweet talk your hubby into it. Sometimes it takes a little coaxing at my house too. And I am a fan of wainscoting as well!
LOVE your kitchen remodel!!! What type of floors are those? And where were they purchased? They are gorg!! We currently have original hardwood from the 70’s in our ENTIRE house…I think they’ve seen their last days. We don’t want to spend our life savings replacing 1900 sq. ft worth of flooring so I’m looking for many ideas!
Wow…now if that doesn’t open up that room, I don’t know what would. It looks absolutely gorgious!!! Makes me wanna do mine. If you don’t mind me asking, was it really expensive to do? I love the look.
It’s beautiful. What color is your trim, ceiling and cabinets?
I love your kitchen! We are getting ready to put in new countertops and we’re going with quartz… do you know what “pattern” yours was? I love it!
Your kitchen looks fantastic! I just showed your ceiling pictures to my Hubby. We did beadboard in our dining room, and about it put it in the kitchen. It was NOT the wood I wanted to put in there, but it’s what Hubby bought. But I want to do single planks when we do the living room and thanks to you, I’m going to check out those planks at Lowes. Funny. We had the same light fixtures in our kitchen and put in spots also.
This is my DREAM to do in our house! So I’m wondering…about how much did this ceiling cost you? Your space looks similar in size to ours so I’m just wondering. :) It’s so beautiful. :)
This looks great. Hope I’m not stating the obvious, but especially for this project and also on any trim/molding installation it would be monumentally easier to paint all your boards before you put them up – and then touch up your nail holes.
haha! We actually had a big discussion about this very thing. Usually with our molding and trim we will do exactly that…but this was sooo many boards and painting every single one was a bit daunting. Since I was painting, I chose to do it all at once with a roller. It took only about an hour to do the whole ceiling and we got it all done at once rather than laying out one board at a time. Just too many boards and no where to lay them out to paint and let them all dry for our situation.
Hi, Great job on the ceiling. Just wondering, I can see that the wood was ‘sticked’ directly to the ceiling – how do you provide space to install the spotlights (or whatever it is called :P ) ?
Good Question. You have to have space between the ceiling and the roof or upper floor. We have a space between the ceiling and the upper floor. We also used canned lighting that was fully contained as one unit. The canned lighting needs to go into the ceiling BEFORE you put up your planked ceiling. We had those installed by a licensed electrician.
I love your ceiling! It’s the inspiration for our current living room makeover. I saw your post and knew exactly what I wanted to do in our space. Thanks for the easy tutorial!
This is wonderful!! We are actually in the middle of doing this to our own kitchen right now. I came online to find info about finishing (ie filling holes, the ends, knots. what to do about the sap, sanding, etc) and found you. I started using wood filler and I think its going to be too much work.
So, I’m not sure If you covered this or not, but did you fill in the nail holes or leave as is. Also you used painters caulk and not wood filler to fill in knots and where the ends butt? Is there a reason, is it easier?? any advice you could give would be much appreciated. Thank You!!!
I just found this post and love the ceiling. I am looking to do some ceiling treatment and love the idea of wood. You didn’t really say “how” you put the ceiling up. I have popcorn that I have taken off my ceilings and need to do something with them. How did you attach it to the existing ceiling?
love the color paint…what is the name of it?
what color are the walls?
The paint color in the kitchen is called Quiet Moments by Benjamin Moore.
thanks so much…I absolutely love your kitchen!
Hi there!! Your kitchen is incredible! Where did you get your bar stools from?!?!
We got them at a local furniture shop but I had seen them at RC Willey. They are about 15 years old though. We are actually planning on selling them and replacing them with ones that will fit our needs better.
Hey Amy,
I have been admiring your ceiling for a while now…we’re getting ready to plank our bedroom ceiling (been in the planning stage for months!) and I re-read your tutorial every once in a while just in case this is THE weekend we’re going to start (I want to be ready!)
One question, I noticed that you didn’t prime the wood before applying it to the ceiling… when you were painting did you wish you had put a coat on the planks first? I ask because when we did our board and batten walls we primed the boards (or the battens? not sure which is which) first and then painted when they were up and it seemed easier that way. I am not a hige fan of painting ceilings so I want to make sure I make it as easy as possible :)
Leen
PS love, love, love the entire kitchen! It’s gorgeous :)
Ha! I totally hear you on painting the ceiling. You can do it either way. I thought it would be too tedious to paint every single board so I opted for painting them with a roller while they were on the ceiling. Yes…it was a pain in the neck and some of the grooves were had to get and I had to use a paint brush in a couple of depressions in the ceiling. But…overall I was glad I did it on the ceiling. But my neck was not enjoying it. Either way would work :) Just depends on what tedious you want to deal with the least!
I love this!!!! What are the dimensions of your kitchen?
Hi Amy,
How did you decide the width of board to use and the direction to hang it? I am looking for suggestion to make my room look larger.
We just used the width that was available in the packaged wood. I liked the size of it. We decided to run it the length of our kitchen and the same direction as our wood flooring. I feel like the other way would have made the room look weird. I think you just have to go with the feel of your room.
You’ve made some really good points there. I checked on
the web to learn more about the issue and found most individuals will
go along with your views on this website.
Love the your ceiling. I have been planning to do this with my kitchen ceiling. Thankfully it is a small kitchen. I have a question. Could you put the planks directly over the popcorn rather than scraping? I saw another post on another website where they just put the planks directly onto the popcorn without scraping it off first. Trying to save myself a lot of mess, but if it will adhere better to a smooth surface then I guess I have no choice.
Thanks,
Same dilema with the popcorn. Can you place directly over? Assuming you use nailgun as well?? Please respond..
Yes…You can put it right over the popcorn ceiling. Yes I used a nail gun!
This looks so great!! One question – do you cut the holes for the pot lights before or after installing the wood planks?
Thanks,
Christina
Great question! We laid the board up on the ceiling and then saw where it hit the hole for the light. Then we made a mark with pencil where to cut the board. Made a straight cut and then attached the board. We laid the other half of the board on the other end if the light and continued along the ceiling. We then went back and shaped each light hole into a circle at the very end by rounding the cut corners with a handheld jigsaw. Does that make sense?
Beautiful kitchen. Would you mind sharing what you used for flooring? Love it. Thanks.
Beautiful! Enjoy!
I want to do this on a vaulted ceiling. Do you think it will work?
At what lengths did you stagger the boards?
I really love your ceiling. Amazing…
Amy, any issue with sagging of the plank wood ceiling? My husband and I were thinking of doing the same thing but he believes a framework is needed before the planks can be nailed in if they aren’t hitting a stud. Studs usually being 16 inches apart, do the planks need to be nailed installed closer than 16 inches? Did lowes provide any input on this issue? Please let me know. Thanks.
What a difference you have inspired me to tackle this in my home.
Have fun! You will love the results!
Beautiful! So how do you do the lighting do you precut the boards or do it once they are up? I am clueless to this stuff! But totally want to try and do it in my kitchen.
Hi Amy I Love ,Love,Love your ceiling !!!! My question is what sheen of paint did you use on your ceiling ? Flat? semi gloss? eggshell ? LOVE YOUR BEAUTIFUL KITCHEN!!!!!
We paint all our ceilings in a flat finish. :) Thank you so much!
Hi! I’m new to your blog and I know this is a three year old post, but just wondering what type of recessed lights are these? We want to replace our lights and these look a billion times better.
Prime and maybe paint a first coat before installing. Did this with my last several projects (all would have been difficult to paint after) and really helped!
Great tip! Thanks for sharing!
I love it! I will try this into my house. Looks seemless. Great job!!!
Thank You!
We have almost this same kitchen and are in the process of remodeling now. We chose ivory cabinets for the uppers and gray for the bases. We will have a darker, leather finished granite and are doing the lighting almost the same except we have to do a sconce over the sink. The drop ceiling had florescent lights around the perimeter so we have to alter all that. I was grateful to find your post so we could see a similar before/after! My husband is going to plank the ceiling so this is helpful!
I would love to see pictures! Sounds beautiful! Glad this post has been helpful!
Love the plank ceiling in white, but local paint store has told me that the knots in the wood will eventually “bleed through” the primer and not look very good. Have you had any experience with this?
Mine has not done that. So not sure about that.
How could I become a Lowe’s blogger? I have spent a fortune with them creating my tiny house and still have lots to do.
Any advice is appreciated!
What type of ceiling did you have before you put up the planks?
When putting the pieces together how did the crease look. I’ve got some I want to try with but the edges seem to be a bit too rounded and makes a big crease when put together. Maybe I’m just overthinking it?
Michelle-I like to use a Satin finish. Thanks.
Can you please share what brand, color of white and sheen was used for the plank ceiling? Thank you!
I know it was Benjamin Moore in a satin finish but not sure on the exact color. Sorry.
Thank you so much for this tutorial! We wanted to find an affordable way to cover the bad mudding job on our kitchen ceiling and I found it here!! LOVE IT!
Emily- Thank you, glad you found this post helpful!
If you still check these comments… looks amazing!! Was wondering if you feel like you could have stained the wood planks instead of the white paint. We have a large room and want to plank the ceiling, but wanted a darker ceiling. I love the white if it’s the only option, but my husband wants to look for darker options!!
Laura- Thank you. You could definitely stain the wood. That would look nice.
Looks great. Did you run into any issues with unevenness on the ceiling?
Charles- It didn’t seem to be a problem. Thank you.
Hi. This looks wonderful and I would love to do it in my kitchen. I had questions about the crown and trim you used. We are having new cabinets installed and they will have a crown similar to yours all the way to the ceiling. I would like to use a different crown in the rest of the kitchen. Could I see a picture where your dining room crown meets the cabinet crown? Thanks you
Tara- You may be able to see better what it looks like in these pictures: https://www.theidearoom.net/kitchen-tour-updated/
So you have any photos of the wall that has the refrigerator? I love how the ceiling turned out!
You can find pictures of the back wall here: https://www.theidearoom.net/pantry-and-charging-station-tutorial/
We have a 1970 split level home. SERIOUSLY thinking about putting up wood paneling in the small master bedroom. The ceilings are 8 feet tall–will the wood paneling on the ceiling make the bedroom look smaller?
Kathleen- I think if you stained it, it could make the room look smaller. If you paint it white, I think it could make the room look larger.
Wow! Fantastic job! I love the hanging pendant lights. May I ask where you sourced them?
Sam- Thank you! I got those at Lowes awhile back. Not sure if they would still be available to buy.
our ceiling and kitchen look absolutely beautiful Amy! I would love to add a planked ceiling to one of my rooms for a Scandinavian feel.
You should. We love ours! Thank you for your kind words!
I just found your DIY ceiling on Pinterest. I di the same thing in our home. Question I have for you… have you had any expanding and contracting leaving small “crack” like areas between the boards? If so, how have you dealt? These cracks have gotten quite significant over time.
If you could email me that would be great!
Long ceilings require expansion joints. Without gaps between the walls and ceiling, the planks could buckle on hot humid days. This gap allows the ceiling to expand and contract with changes in temperature and humidity. After installation, these expansion joints can easily be hidden with trim. Not sure if this was done with your ceiling planks. This could be part of the problem. Hope this information helps.
I’ve had your ceiling pinned since we bought our house and am finally getting our planked ceiling installed!! Now I don’t know what sheen to paint it. What sheen pint did you guys use? It’s perfect.
Mica- I am so excited for you! I like a Satin Sheen. It seems to go on smoothly. I would love to see pictures.