• Store
  • Advertise
  • Press
  • Contact
  • Disclosure

The Idea Room

Inspiring Mothers, Women and Families

  • Home
  • About Me
    • FAQ’s
    • Terms
    • My Buttons
    • My Inspiration
  • Projects
    • Crafts
    • Food Crafts
    • Holiday Projects
    • Home Remodeling
    • Sewing
    • Summer
  • Recipes
  • Tips & Tricks
    • Organization Tips
    • Parenting Tips with Heather Johnson
    • Photography Tips
  • Essential Oils
  • Giveaways
You are here: Home / Halloween / DIY Halloween Direction Sign

DIY Halloween Direction Sign

10/11/2016

idea-room-holiday-series-banner

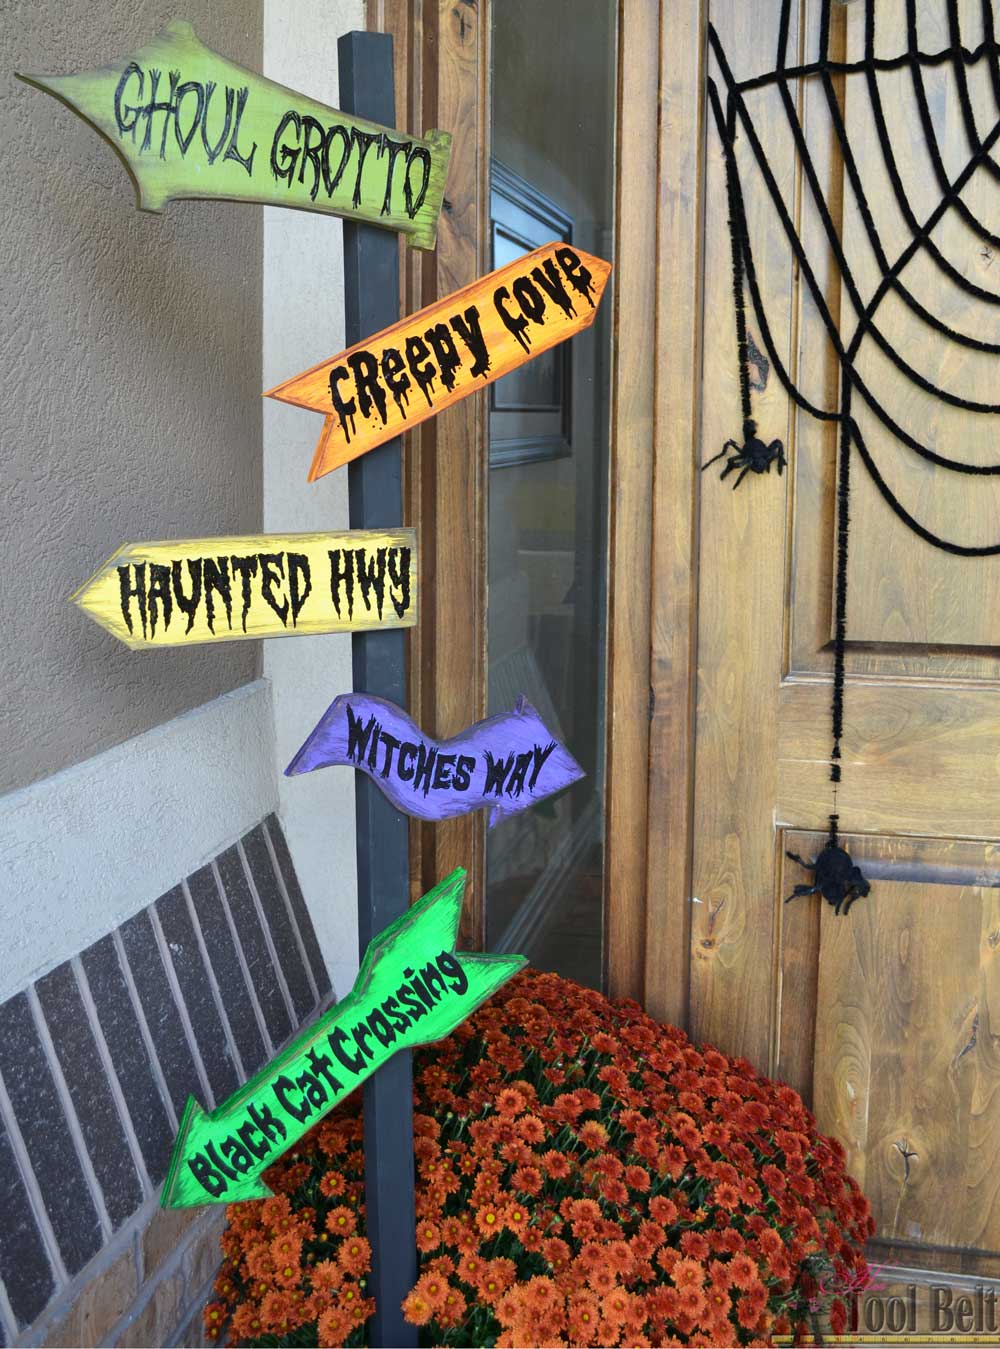
Hi, I’m Amy and I love to build things and share plans at Hertoolbelt! I am excited to be here for the Holiday Series and share how to build a scary Halloween Direction Sign. This Halloween sign is pretty easy to make and easily customized to the look you’re going for.

halloween-creepy-sign

OUR LATEST VIDEOS

Materials

  • 1 – 2″ x 2″ x 8′ board – post
  • 1 – 1″ x 2″ x 8′ board – legs
  • scrap wood or 1 – 5/8″ x 5 1/2″ x 6′ cedar fence picket – arrows
  • 8 – 1 1/4″ screws
  • 10 or more 1 1/4″ brad nails or screws
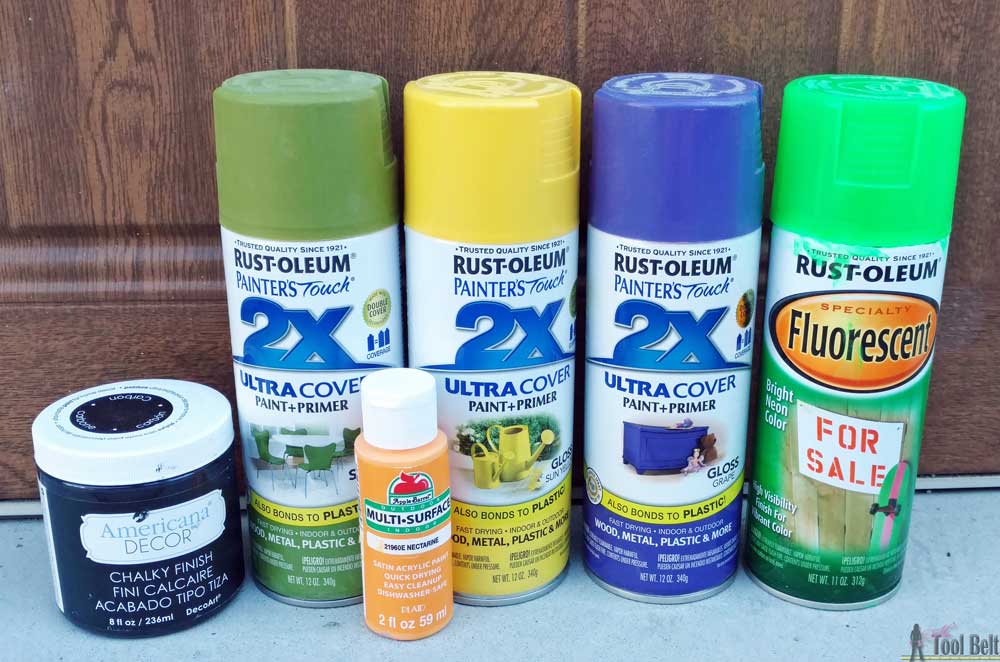
  • paint
  • stain – optional
  • sandpaper – optional
  • paper – optional
  • chalk – optional

Step 1

Cut the 2″ x 2″ board to 60″ long or to the post height that you want. Cut the 1″ x 2″ board into 4 legs that are 9″ long. (You can make the legs longer if you need more stability – extra windy area.)

Attach the legs to the post

  • Pre-drill countersink holes about 3/4″ from an end of a leg.
  • Place a leg flush with the bottom of the post and flush to one side.
  • Use 1 1/4″ screws to attach the leg to the post
  • Repeat for each leg.

sign-post-assembly

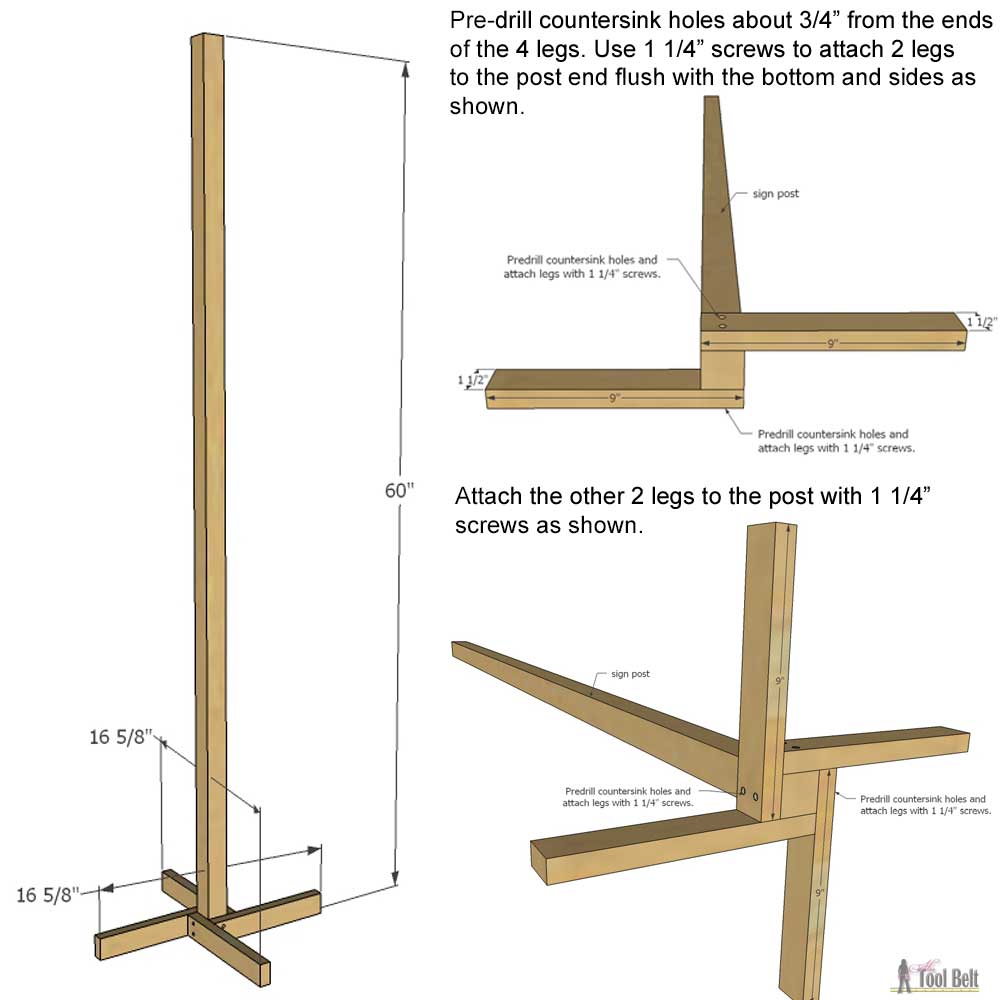
Paint or stain the post as desired, I used Deco Art Chalky Finish in Carbon.

Step 2

Make the sign arrows. These arrows are a great way to use up scrap wood, if you have any. You can draw out any arrow shapes that you like. I made a template for the arrows. that you can download and print.

5-halloween-sign-templates

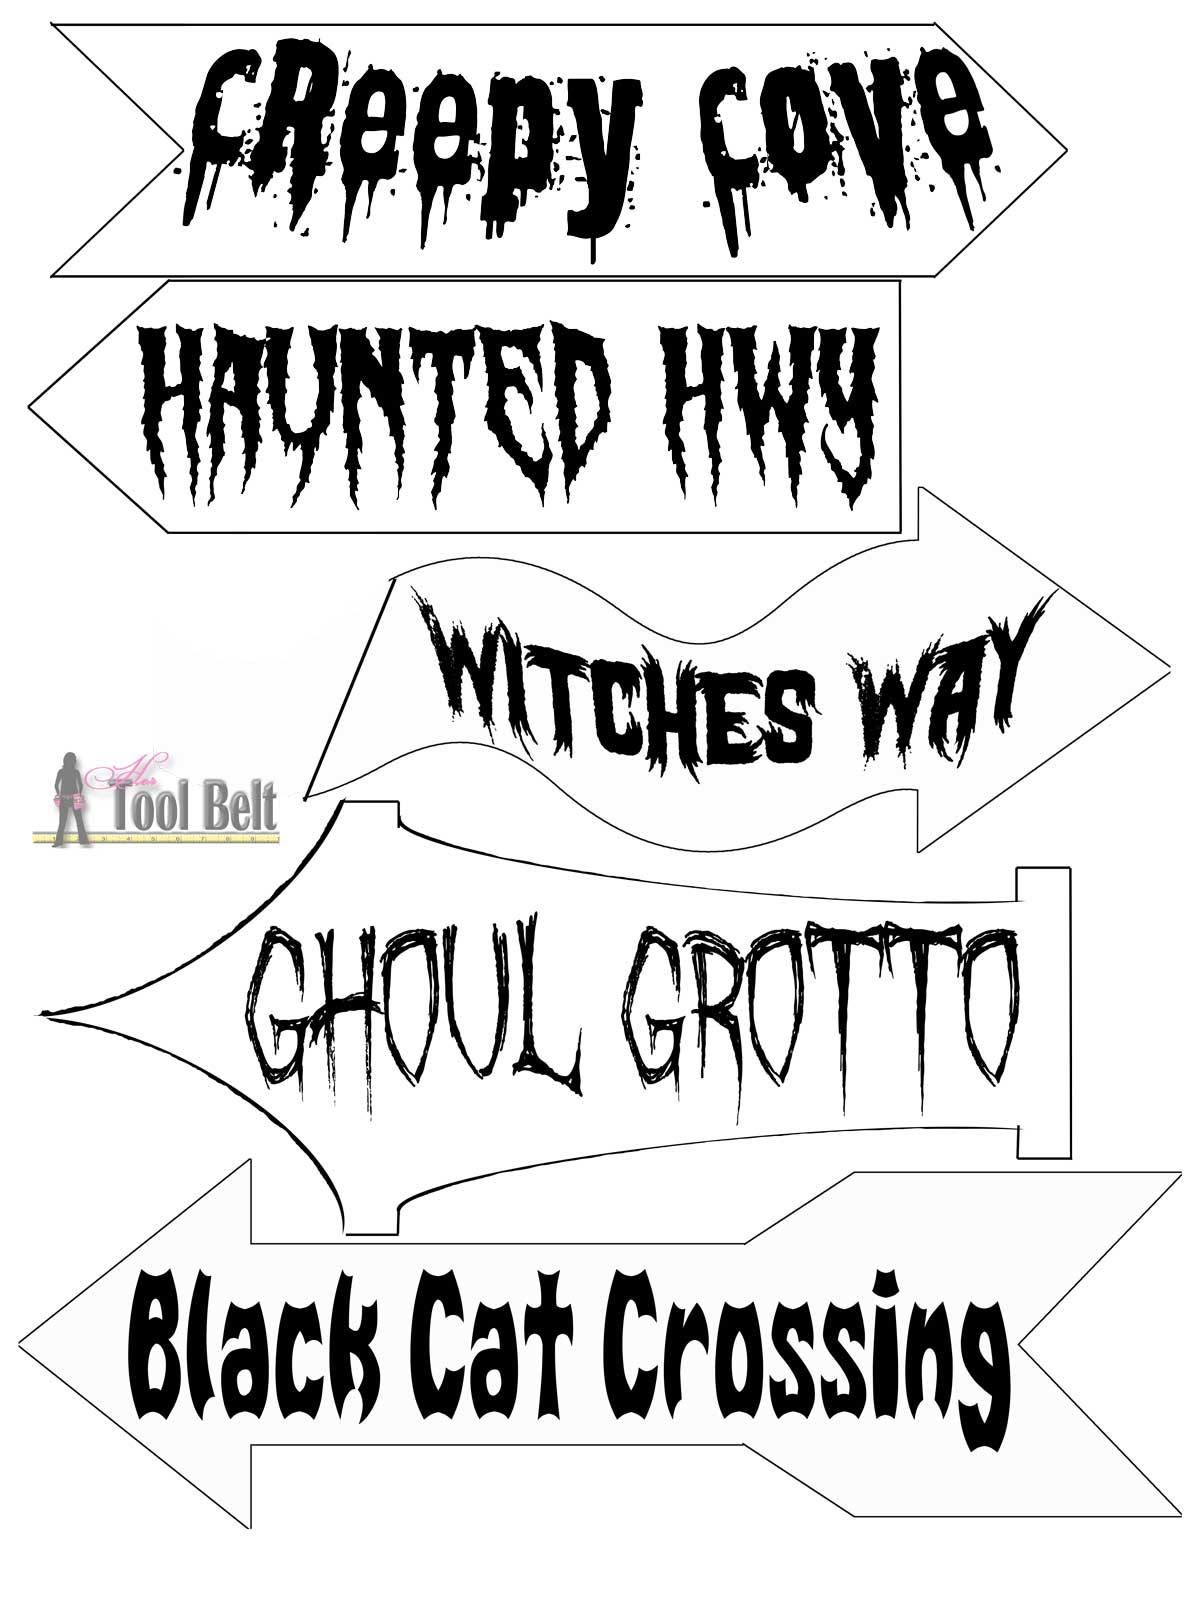
(Fonts for the lettering: Creepy Cove – Lavender Witness, Haunted Hwy – Swamp Witch, Witches Way – Mostly Ghostly, Ghoul Grotto – October Crow, Black Cat Crossing – Bat Men__G)

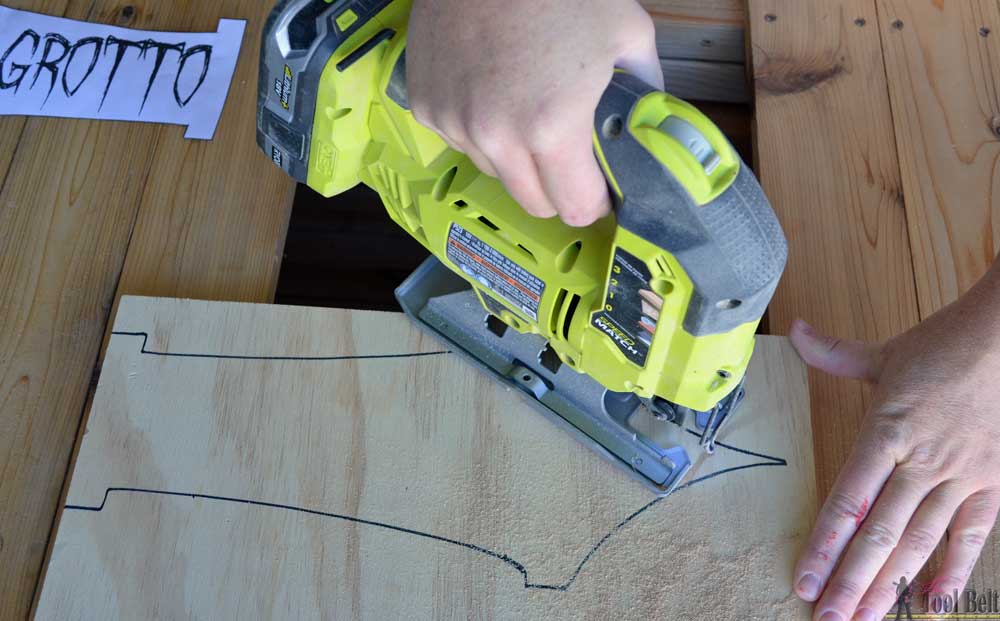
I printed out the templates and traced them onto my scrap wood pieces. Use a jig saw, scroll saw or band saw to cut out the letters. Sand the arrows as needed.

halloween-road-sign-cut-out-arrows

Paint the arrows whatever colors that you like. I used paint left over from other projects.

halloween-direction-sign-paint

Once the paint fully dried, I used a sander to rough up the edges and get the distressed look.

halloween-road-sign-sand-edges

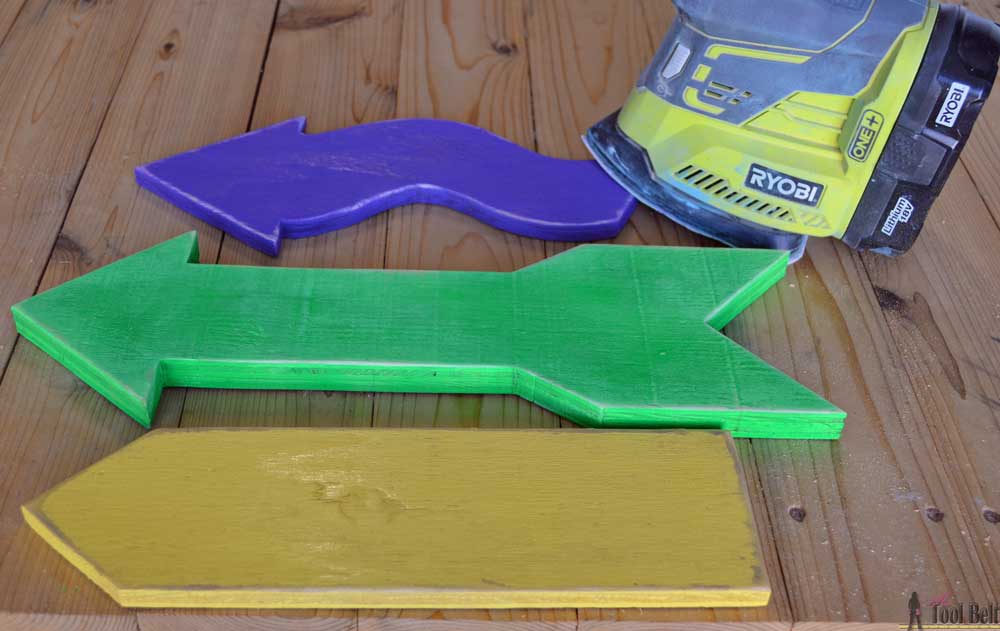
I used a really dark stain (Van Dyke Brown) to antique the edges with a paper towel, any dark stain or antiquing glaze will work. Antique as much or as little as you like.

halloween-road-sign-antique-arrow-edges

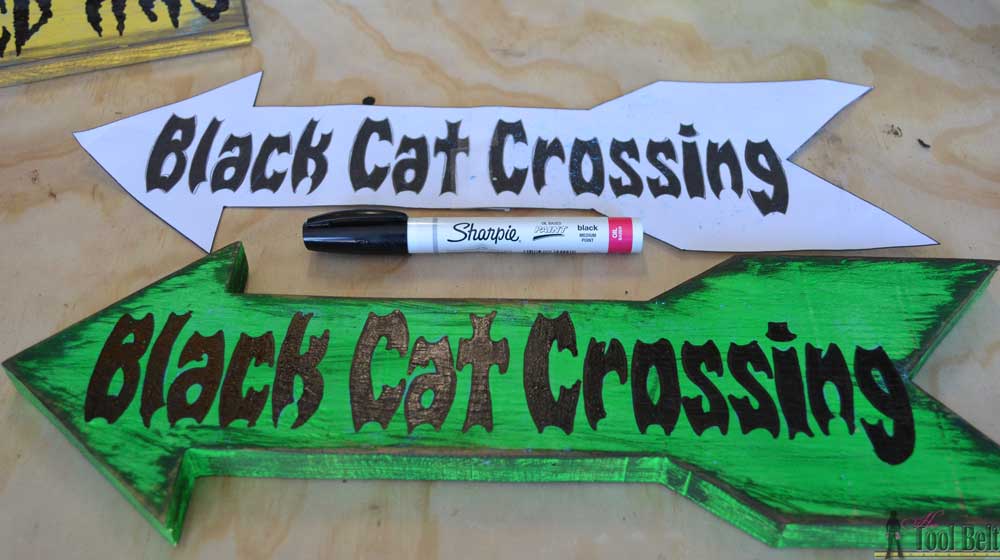
For the sign lettering, I have to use a template because my handwriting is horrible and I don’t have a vinyl lettering cutter. A really easy way to transfer the lettering to the sign is with chalk. Rub chalk on the back of your template, then trace the letters with a pen or pencil. This will leave a fine outline on the arrow.

halloween-road-sign-trace-words-with-chalk

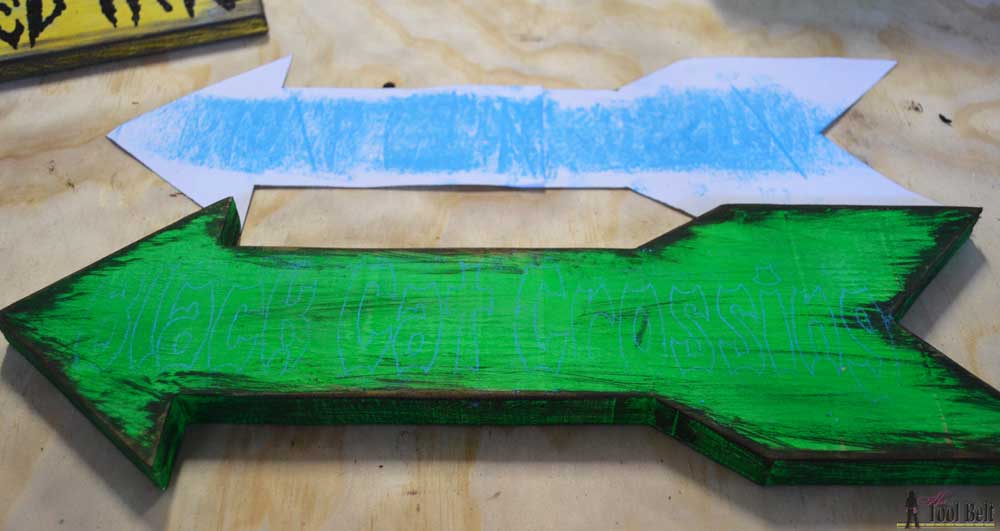
Use paint or a marker to fill in the tracing. A Sharpie paint marker works really slick.

halloween-road-sign-sharpie-paint-marker

Step 3

Space the arrow signs out along the post as you like, and attach the signs to the post with a brad nailer or screws.

halloween-road-sign-attach-arrows

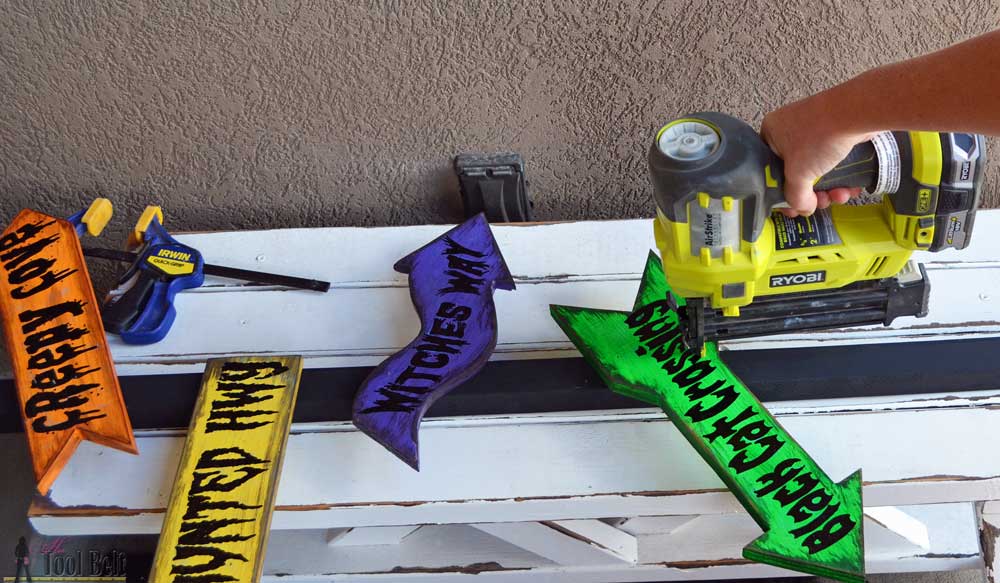
Now the Halloween Direction Sign is done!

halloween-road-sign

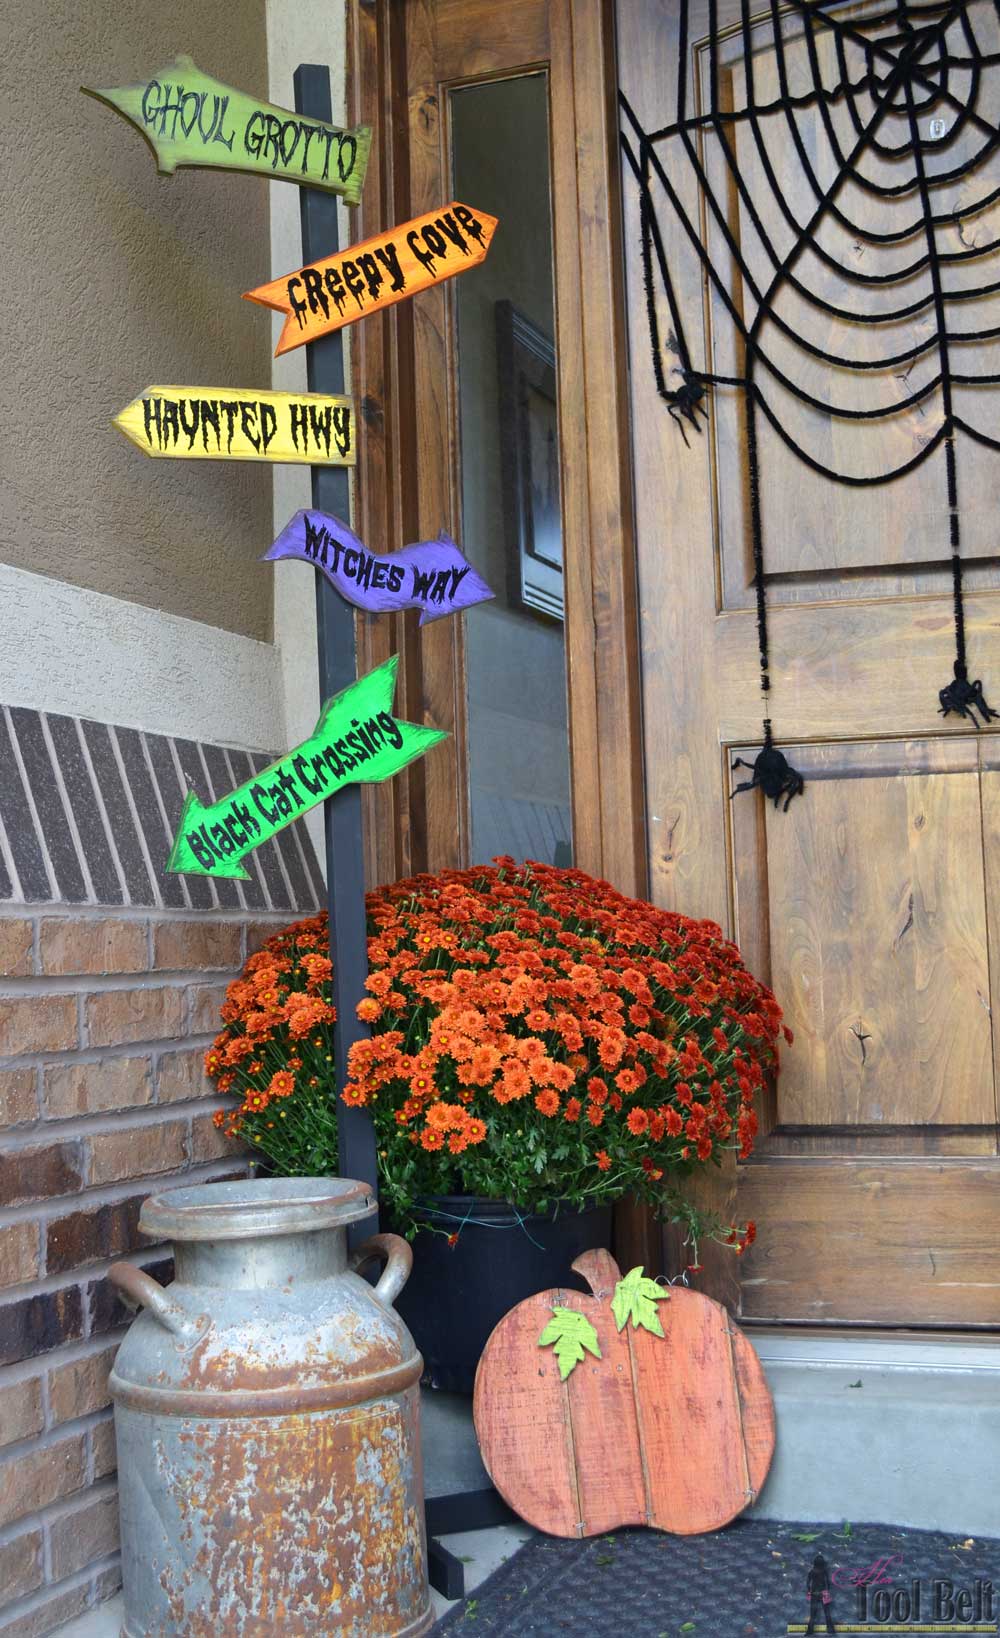
Make sure to check out lots of other free woodworking plans.

holiday-series-button

Stay Updated!

Would you like more recipes, printables, DIY/Decor, and organization ideas?


Sign up for updates and get a free copy or our Sugar Scrubs eBook!

Success! Now check your email to confirm your subscription. Once confirmed, the e-book link will be sent to you in a few minutes.

There was an error submitting your subscription. Please try again.

We never send spam, only creative ideas. Powered by ConvertKit
Share >>>
7 Comments / Leave a Comment
Share
Pin16
Tweet
Stumble
Shares 16

Filed Under: Halloween, Halloween Decor, Holiday Series Tagged With: creative halloween food, DIY Halloween, DIY halloween sign, free wood working plan, Halloween, halloween decorations, halloween sign, make your own halloween sign, wood working plans

About Amy

Amy Huntley is the owner/author of The Idea Room. A mother of five, who enjoys sharing her love of all things creative in hopes of inspiring other women and families. Never miss a creative idea that she shares by connecting with her here, or read more of her posts.

« Grove Collaborative | FREE Fall Seasonal Offer
DIY Halloween Pillow: Trick or Treat »

Comments

  1. Karyn says

    10/12/2016 at 6:57 am

    Love this sign!

    Reply
    • Amy says

      10/12/2016 at 8:09 am

      Amy (Her Tool Belt) always does such a great job! Hope you can make one!

      Reply
    • The Idea Room Assistant says

      10/14/2016 at 6:48 am

      THank you!

      Reply
  2. Brooke says

    10/12/2016 at 9:35 am

    hey There! Super cute sign! I was wondering if you could tell me how you make the spider web in the background, that is if you did make it?
    Thanks!

    Reply
    • Amy says

      10/12/2016 at 10:43 am

      I will ask Amy from Her Tool Belt and have her respond here :) It is so cute!

      Reply
    • Amy says

      10/12/2016 at 11:22 am

      I just asked her and she said she got the spider web from Tai Pan!

      Reply
      • The Idea Room Assistant says

        10/14/2016 at 6:42 am

        Great. Thanks for letting me know!

        Reply

Leave a Reply Cancel reply

Your email address will not be published. Required fields are marked *

WELCOME

Amy is the author of The Idea Room.
A mother of five, who enjoys sharing her love of all things creative in hopes of inspiring other women and families. [Read More …]

  • search
  • categories
  • archives
Categories
Archives


click on images to go to posts…


Photobucket


Photobucket


Photobucket


Photobucket

Disclosure of Material Connection: I received one or more of the products or services mentioned in some of my posts for free in the hope that I would mention it on my blog. Regardless, I only recommend products or services I use personally and believe my readers will enjoy. I am disclosing this in accordance with the Federal Trade Commission’s 16 CFR, Part 255: “Guides Concerning the Use of Endorsements and Testimonials in Advertising.”
Creative Commons License
This work is licensed under a Creative Commons Attribution-NonCommercial-NoDerivatives 4.0 International License. Copyright: The Idea Room by Amy Huntley © 2016; All rights reserved.

Copyright © 2018 · Design by Melissa Rose Design