
I feel a bit unqualified to cover photoshop, but I’m just going to speak in my own personal language and hopefully this will reach some of you.
In a minute, I will show you how I got this before and after. Sit tight.

First, let me say that I used photoshop elements 2 for a loooonng time. I currently use Photoshop CS2, at the shock and awe of fellow photographer friends that I haven’t upgraded to the current CS4—soon to be CS5. I’m good with my CS2. I have suggested to many friends to start with a basic version. I believe you can go to your local Sams Club and purchase photoshop 6 for about $80. However, some of the steps I will discuss here may not be in that version. Since I only had elements 2 and CS2, I don’t really know or remember what tools are in what versions. But some basics I can remember.
Photoshop language is a foreign language. A few years ago, I’d ask how to do something, and I’d hear “blah blah blah blah blah blah blah” as the response and I sat there with my jaw dropped staring at the person who just spoke to me. Ok, maybe I was staring at my computer screen as I read the words, but same thing, right? This, like switching to manual settings can be a frustrating process that will not come overnight. I’ve never liked when my husband says to me, “Don’t try to do it all at once.” And my reply would be…”but I want to, and I don’t know which to choose first!” This is true about the photography process, you really have to try to work on one thing at a time…but do what you will:)
I use actions to 1)Pop my color 2)my chosen black and white 3)watermark my images. I pop my color with a soft light layer. My favorite action that can be purchased, I got from Kylie Banks, over at Phaunt Actions in her color workflow set. She sells her set for $35, and my favorite action is the “snap it.” Sometimes I have to lower the opacity of the action. Opacity is the measure of how opaque or see-through you make a layer. If I play the snap it action at 100%, I get one look. If I lower the opacity to 50% I get half as much “boost” of that particular action.
Let me tell you a secret you may not want to hear. Just because you have the actions that another person uses and gets great results from does not mean you will get the same results. Many tweak their actions or take out some parts or combine them with others. A few years ago, there was a workshop called The Secret. A local friend of mine went (paid $1000) and with the workshop, you got THE action that was supposed to make your images look just like the instructors. She had some great stuff, I just wanted the action, not the workshop. My friend let me play with the secret action in photoshop and guess what? My images didn’t look like the instructors! So much for the secret…….
Are you still with me? Confused yet?
OK, here is MY workflow—or steps I take to get my images to my own personal perfected state. I have it combined in an action, but I am breaking it down here.
Let me just say that I shoot in RAW. This is opening a whole other can of worms, but I must mention it. I won’t go into detail what I do here, but shooting in RAW allows you to do minor tweaks to exposure and saturation on a file before converting it to JPG. If there is an interest, I could go into detail later, but I think most people are shooting in straight JPG’s. Shooting in RAW just makes processing 300 images per session MUCH faster. I love it.
When you look at this image below, it isn’t all that bad. A little dark, but decent, right? It isn’t until you see it as it could be that you realize it could be much better.

Let’s do that.
1. I open up my JPG file and see what needs to be done.
a. Is it too dark? To lighten, I open up levels—control “L” There is a slider (3 arrows under the histogram/mountain) and I can move the middle arrow right or left to lighten or darken. Play with the 3 arrows as you look at your image to determine a stopping point. Lightening a slightly dark image is easier than darkening a slightly light image. Blown images (too much light) are harder to save. After you like it, hit OK.

b. After I’ve played with levels, I go to the soft light layer. Not sure this is in all versions of photoshop, please let me know! I go to the top menu where is says: File Edit Image Layer and click on LAYER. From the drop down choices, I select DUPLICATE LAYER and hit ok (see sample below).

Duplicating my layer allows me to have two layers of my image on top of each other. Keeping my original on the bottom, that layer stays the same.

Once my duplicate layer is highlighted in blue (it says background copy here) I can add the soft light layer.

Tweak the opacity to your liking.
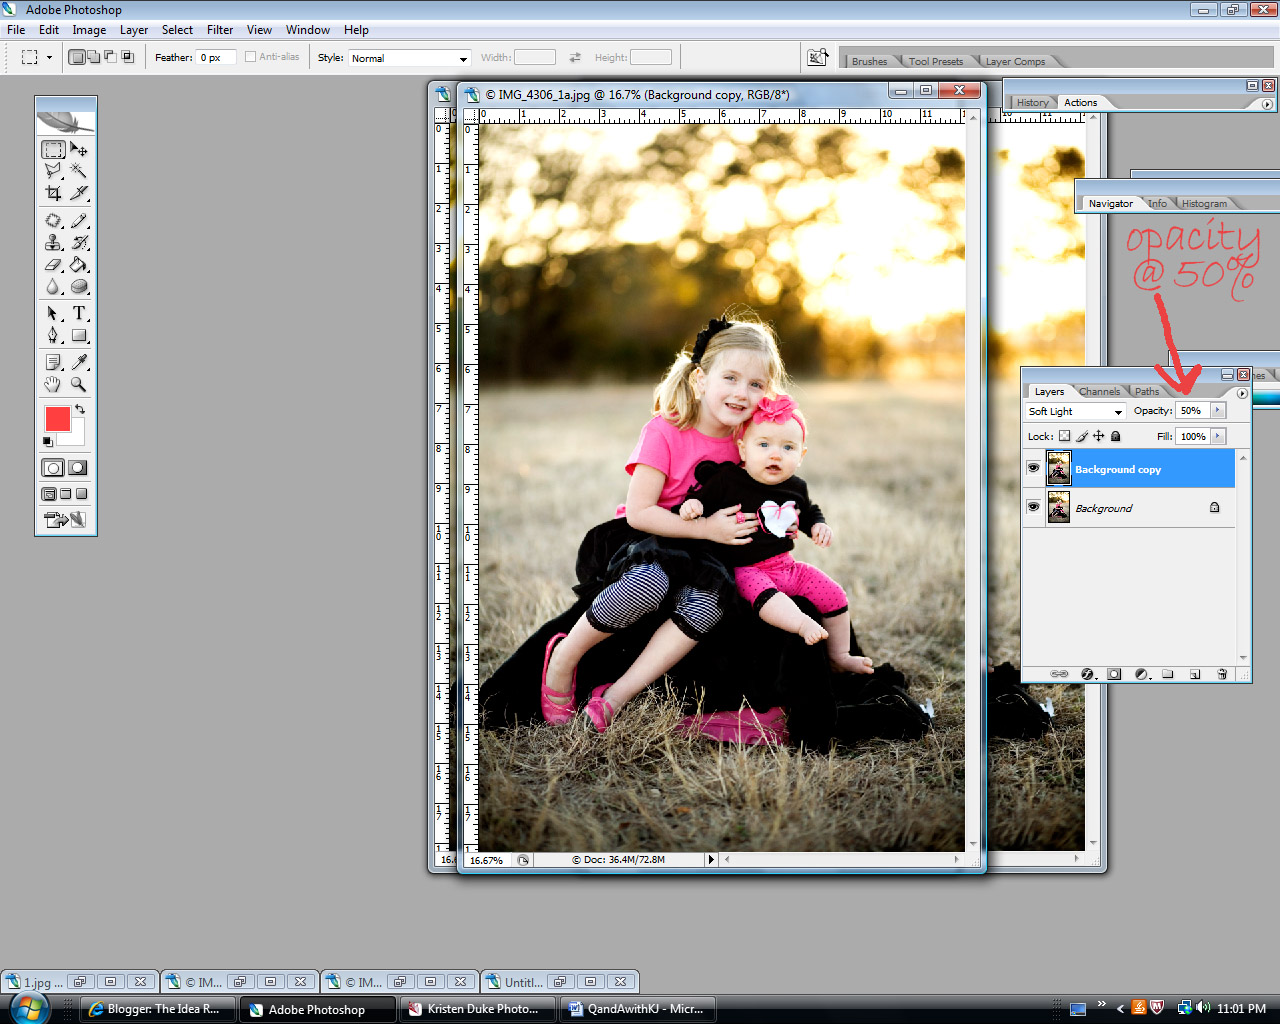 Depending on the image, I might want to keep the opacity at 100% or I might want to lower it to where I like the look.
I tweak the top layer to my liking and eventually merge the two layers (layer + flatten image) into one.


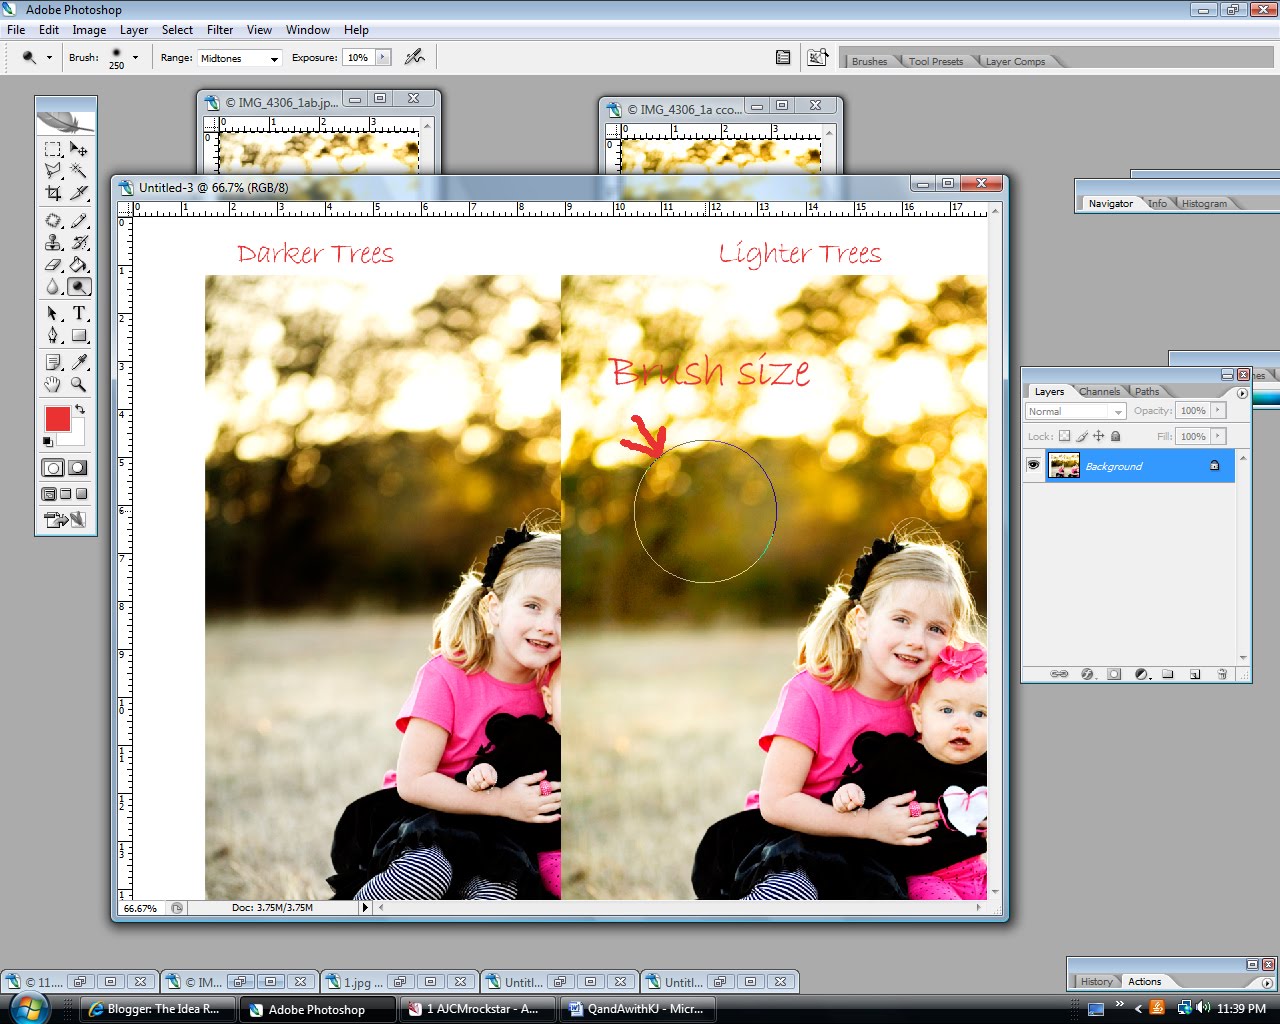

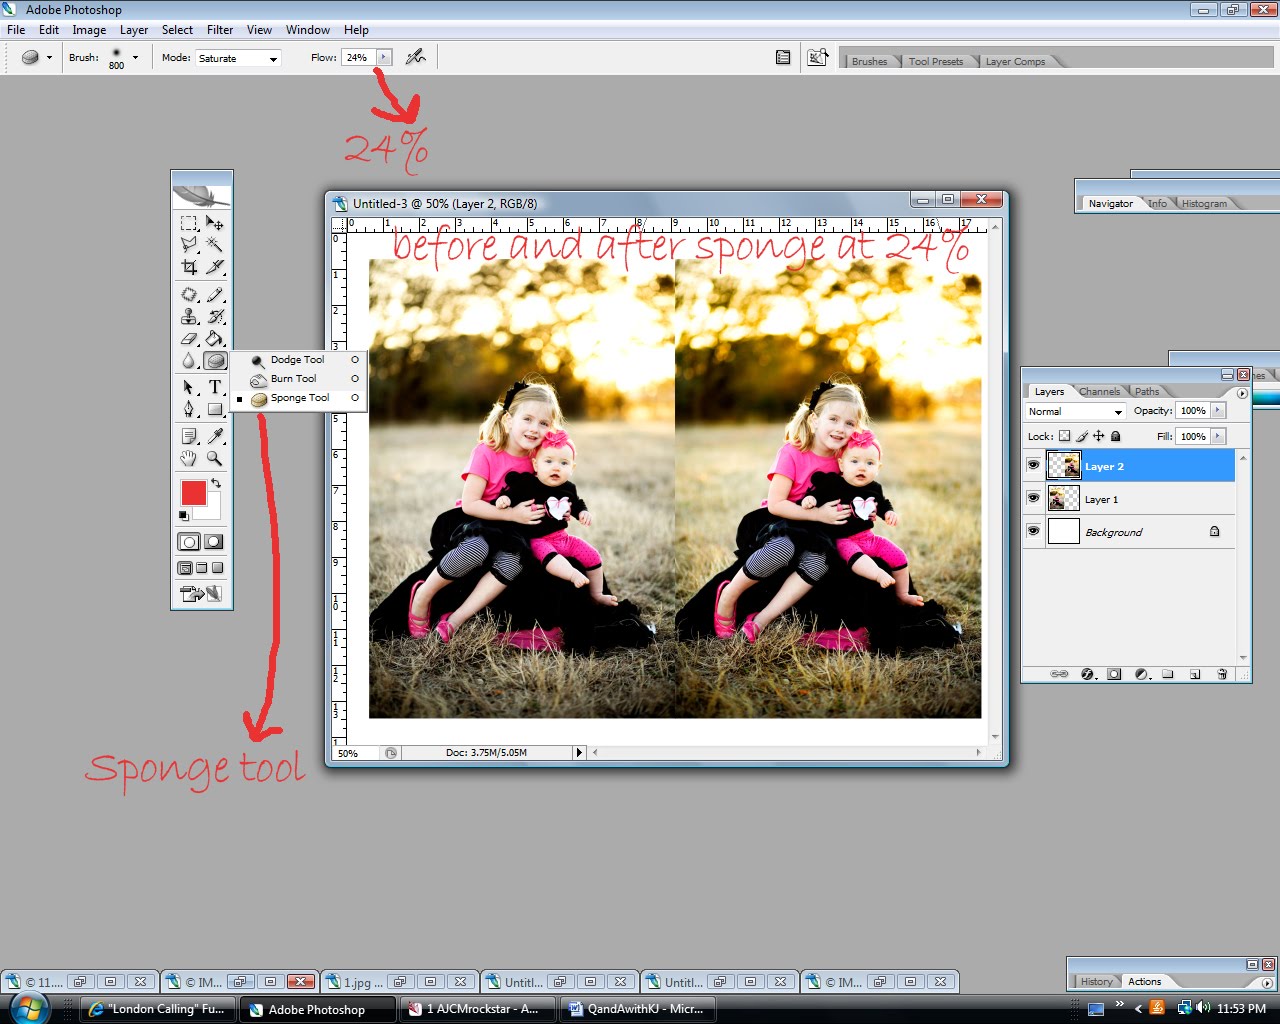
d. I always save as a duplicate file (file, save as, img_123a) and keep my original as is (img_123).
Let me know….
Kristen






Thank you thank you!! I use soft light ALL the time (often paired with "screen" to lighten it, but I might try lightening it first next time) but I never use dodge and burn there and I didn't even know what sponge did!! Thanks :) Oh, and I use PSE, pretty sure they all have soft light!
Nice tutorial, Kristen! Thanks for sharing your PS knowledge! I currently have PS7, but have the CS2 upgrade… just haven't done it yet. PS is a powerful program… way above my head. I completely understand the "blah, blah, blah" you're talking about. However, you explained it perfectly! i got it. Now, I will go play. My daughter is making her first communion May 1st. I would like to take her out to get some photos of her in her dress. So, I think some PS tweaking will be in my future. I'm nervous!!
amy
Thanks that was AWESOME. I never knew what the sponge tool did until now. (I've been trying to teach myself photoshop for awhile and it's HARD!) I would love to know how to swap heads in photos. That was a great tutorial.
I know nothing about photo shop I have borrowed it to see if I like it I spent all day on my behind playing with it it is fun never have done layers yet. If you pop over to my blog you can see the old truck I have been playing with.
Thank you! This is such a great tutorial! I'm so excited to try out some new things!! :)
AWESOME tutorial! Thank you very much!
Thank you so much for this tutorial! I have been wanting to learn how to turn the photos from my point-and-shoot into fabulous eye candy, and this helps a lot! If there is anything else you want to teach me, I'll be happy to learn :)
Thank you. I use PSE and I feel like I am ALWAYS learning new stuff, which I love!
Thanks for the tutorial. I have had Elements 6 for several years now and it fits my needs perfectly. And, just so everyone knows, actions work in PSE 6 just fine. In fact Pioneer Woman and several other places online have actions for Elements lower than PSE 7.
Never knew about the sponge, awesome! I would personally love to learn more about RAW. I have many photographer friends who shoot in it and they can't say enough good things about it. What makes it so different from shooting in jpegs? I'm too nervous to try it before knowing at least a little bit about it.
Kristen, thanks again for all the great info! Another post to be printed out as a reference. We will be getting Aperature with our new Mac; I'm going to play with it a bit first to see if I think i will still want Photoshop.
Could you point out the difference between the 3 pictures with difference opacities in the Soft Light Layer? I've been staring at them and I really don't see much of a difference between the 3 and I'd love to be educated as to what I should be looking for.
Thanks!
I am just starting to learn all of this and am LOVING your tutorials! Please keep them up!!
Thanks for your dodge tool tips! I'm excited to play with it now. I would love help on head swapping if you get a chance!
Thank you for the amazing, detailed tutorial. I would love to learn how to do "selective colorization" (I think that's what it's called). What I mean is, take a picture and have it all be black and white, except for maybe one item in it, like a flower or hat, that you leave in color. Hope that makes sense. Thanks!
I have been trying to figure out my new Photoshop program watching hours of tutorial and still not getting it. Thank you for making that simple. Can you please show head swap next??? Thanks
thanks for the great tutorial! i am like you with the whole wanting to do it all now thing:) i do quite a bit with editing and i am trying to decide if the next step for me is to shoot in RAW but i dont know if that will be opening too big of a can of worms for me. can you go into a little more detail on the benefits of RAW?
Wowzers! Great tutorial… Now a request: how did you become such a succesful blogger? I am sure it was thru these fabulous posts. I am your newest follower.
Fabulous!
I, too, would like to know more about RAW. I shoot between 200-300 images in a session, and now I am curious as to why you choose RAW over jpg. Any insight would be GREAT!
This tutorial was fantastic! The screen shots made the instruction so easy to understand. Thank you!
You know what I would love to learn? How to make a watermark for my photos. Something fairly simple and tasteful.
I use CS4 and I have never used the sponge. I think I need to try it now though. ;)
This is the first time I have used the dodge, burn, and sponge tool. Thanks for this great tutorial! I love reading your posts and look forward to future ones.
Thank you so much!! I currently use CS2 and pretty much play with layers and just feel around. Your tutorial was written perfectly for my skill or understanding level. ha!
Thanks again!
Great and useful post. I am a dabbler in photography and am still trying to figure out my camera–let alone photoshop. Appreciate it. Any other lessons you can offer would be read and appreciated.
Kristen,
Seriously! I can't thank you enough for posting this. I have been trying to do photography for a year now and am STRUGGLING with photoshop. I use elements 6 and they do have the dodge, burn and sponge tools, but I have only used the burn tool. I too shoot my stuff in RAW (love it).
I would love to learn head swap now – or anything else for that matter that you are willing to share. Any hints on how to get catchlight in someone's eyes every time?!?
You are a livesaver. Thanks again.
Thank you, all! So glad I could share the sponge tip with you.
I worried all my diagrams would be passed over (if it were me and I knew little about the program, I might have gotten overwhelmed).
Yes, Pioneer Woman has "actions" for elements. They are used differently, but nonetheless more options than there used to me. Just google actions for elements.
Cassi–RAW is a larger file, and you can tweak the RAW image and not lower the quality like you do when you tweak and save a jpg file. I can also pull up 10 shots that were taken in the same setting that need a little tweak and do that to all at once vs. one at a time with jpgs.
Joan–what I love about soft light is that it is a minor difference. Its true, the 3 do look similar, but look at the skin tones and see a bit smoother and softer. Also the trees have a bit more of a glow to them.
I think next week I will do a more mellow post for those wanting tips instead of the heavy reading.
Elizabeth–I don't really do selective color, and I'm not a big fan of it.
Tricia–watermarks are with a brush tool, I can do that later on for sure.
Adrian, thanks for the control J shortcut, didn't know that, and happy to not have to go ALL the way up to the bar to duplicate:)
Susan E–working on catchlights for my next post.
Lets see…Questions…
I love this! I've had several unsuccessful head swaps. Could you do that if you get a chance?
THank YOU for posting all those screen shots. That was SO helpful. I am a beginner at photoshop and this helped immensely. I have PSE 8 which you can get at Sam's for around $75. :) In case you wanted to know. I think I will eventually upgrade but I really am satisfied with what PSE 8 offers right now. I usually just mess with the levels and call it done most of the time. I really would like Lightroom…at least I know other photographers that swear by it. What do you think?
Thanks so much! I need to figure out Photoshop but don't have the time right now. Great tutorial!
XOXO
Jen
Oh…and please, please do watermarks. I will kiss your feet if you do…well you know what I mean. :)
This is going to help me so much! I do fairly well in Photoshop and can usually get what I want, but lately I've been wanting to learn those mystery tools…dodge/burn/sponge. Yeah!! Thanks a million!
Awesome, thanks! I just got a new camera and don't know what to do next. I've had elements 4.0 for a few years, and never really messed with anything on it at all. If you have time/inclination, you can check out what I did with this info, thanks again!
Go here if you feel like it :)
Excellent tutorial. I just wanted to let you know as a fellow actions lover that Barb Uil has some really awesome ones which I use all the time. (http://www.ittybittyactions.com/)
I've got the 52 action set and it is heaps of fun. There's also a LOT of free actions around. I've found some great free ones which make polaroids, black and white, mosaic type things, etc. You probably know this but thought I'd mention it anyways.
Cheers! :)
P.S. I think that's awful that someone is trying to dupe people into thinking one action could make any image look great. Post-processing can only do so much. If you don't have a good image to begin with (correct white balance, exposure, framing, blah blah) then no amount of post-processing is gonna save it. Sorry, just miffs me that someone would try to con people like that.
I love photography and thanks for the post!
Following you from MBC!
Hope you also visit and follow my blogs:
http://www.dangzter.com
http://www.jillandjolo.com
Keep blogging!
Show us how to TEXT on the image!!!!
I love these posts!! Thanks Kristen for sharing!! I want to know more about RAW!!! I can't thank you enough for sharing!!!
wow wow wow!
this was totally awesome!
i have been playing with layers and actions for awhile now, but never branched out beyond what i "know".
thank you for awakening me to the dodge tool! for some silly reason, i hadn't known what that tool does! yay!
thanks for sharing! Photoshop, here i come! =)
What a thoughtful tutorial. I love it when people are willing to share what they know, especially when it took a long time to figure it all out. I only have a point and shoot camera and picasa (none of the fancy gizmos) but I love learning and hope this will all make sense to me someday soon.
Thank you, thank you and thank you for posting that. I will be back tonight, when baby is sleeping to go step by step with my photos. Love it!!!
great tutorial, I have PSE8 and PS7, I would love to upgrade but it's in the near future. Whatever I can't do in PSE I just switch over to PS7 and right now it's working okay.
I would love to learn how to head swap. With photographing 4 children I am always in need of a good head swapping. I just have no clue how to do it.
Thank you! That was such a great tutorial. I am self taught and don't understand some of the things involved with PS and get very frustrated! Your tutorial cleared some things up! Thanks again!
Such great explanations! I would love to know how you edit more that one RAW photo at a time. Do you use Lightroom for that? I would love to know if you use any free actions and which are the best. How do you save all your pictures? My laptop is totally full, and I am not sure the best way to keep all my photo's in a way that is easy to keep adding to. (Right now all my pictures are in iPhoto Library.) Thanks for all the time you put into this post!
Thanks so much! I would like to know how to do text on an image, and also how to do a watermark. No idea how to do those. Thanks so much for sharing your wisdom!
Thank you so much for taking the time to post all of those laborious screen shots! It really helps me understand how to approach a photo.
thank you! thank you!
Autumn :)
http://www.tumtales.blogspot.com/
I'm totally new at editing in Elements. I've had it for ages, but never actually tried to edit anything. I've really been missing out! I'd love to see some hints on brightening people in pictures. We have some almost-really-good pictures of people where the background is the right colors, but the people are then very dark. I'm not coordinated enough to select the people out to brighten though…any other hints?
Thanks! Very helpful!
I want to learn everything you know in PS. I'm sure this post was awful for you, but the rest of us learned so much from it. Very useful
Thanks once again! I'm going to try it right now. I feel like I'm taking a college class. I always bring my notebook to take notes and then I go I 'do the assignment.' I had fun shooting in the manual setting the other day. :) Is there a way to do a blog on just your tutorials, I just feel like I have to search each time for your tutorials, just a thought. I love them!!
Thank you for this. I'm loving all your tutorials. I do shoot in RAW but I don't think I understand fully what I am doing… especially the part about batch processing a bunch of images. I'd love a tutorial on RAW images some time.
Hi!
I saw your pics at Pinterest and I ended up here.
I love your tutorial! Thanks! It´s so simple and clear!!!
Kisses and blessings.
Mirys
http://www.diariodos3mosqueteiros.blogspot.com
Just came across this tutorial and have to say it
Doing it this way your making your files huge with unnecessary information and doing it the “hard way”
DONT duplicate the layer ! its unnecessary
add an adjustment layer
in the layers palette click the half black half white circle at the bottom – in the pop up menu choose Levels
do your levels adjustment
change the blend mode to soft light or whatever you decide you need
if there are bits that need the levels removed or lowered ( like the trees) on the mask that comes attached to the levels layer ( the box to the right of the half circle layer in the palette) click there and then use a black brush ( at the opacity of your choice) to “remove” the adjustment
if you make an error it doesnt matter… paint it back in with a white brush
this is why you need to use masks
you never LOOSE the info/adjustment thats you’ve made
This is specifically for photoshop, I dont have elements so I dont know if they have adjustment levels and masks ( but some have told me they do)
ITA with Ebony, you absolutely need to learn how to use layer masks. If there is one concept that all people who use Photoshop should know it’s how to use layer masks. They are not difficult to understand and they will make your life SO much easier!
HI Kristen
I would like to know if you do any one-on- one session on photography.. especially on photoshop. I bought a PS 10 after a got my Rebel 2 a few months ago and I don’t know how to use it yet and with a little baby I have little time to play with it. Please let me know.
Thanks a lot.
Candy
Omigod, I’ve been using photoshop since it came out and never really understood dodge and burn. Thank you!!!
Thanks for this awesome tutorial. I did notice while using the sponge that you forgot to tell people to change it at the top of the tool bar next to opacity that it can be saturation or desaturation.
THANK YOU so much for this, I am sooo photoshop slow. This was perfect for me and so clear. I pinned this post thanks!
Found you from pinterest. Thank you for the great post! :) It was very helpful!
Hey! Thank you for your post. I am just learning about all of this and would love all the help I can get! I currently have a full-time job but was wanting to get into photography to see where it would take me!
I also have the CS2 and am just beginning to use it. I am a new photographer and am loving it. Thank you for this new tool I can use with my clients’ pictures. I would also like to know more about shooting in RAW. If you have a moment. Thank you again.
Happy Thanksgiving!
I just found this post from Pinterest. I still use CS2 as well. I really appreciate this tut! Dodge, burn and sponge are three tools I have never used before. I’m going to play with them now!
I love playing around with photoshop and seeing all of the amazing things that it can do. Great post for helping others get better photos.
In my opinion, the faces in the “after” photo are too over-exposed. The grass on the left side behind the children also looks over-exposed. I would bet the histogram would confirm this. The grass looks dead. It would be better to take the children and put them on a better background.