
Got an Instant Pot and feeling overwhelmed? Not sure where to start? Sharing a simple guide that shares step by step help for how to use your Instant Pot. Also sharing how to use the Instant Pot venting knob, which for me was the most intimidating aspect of my Instant Pot!
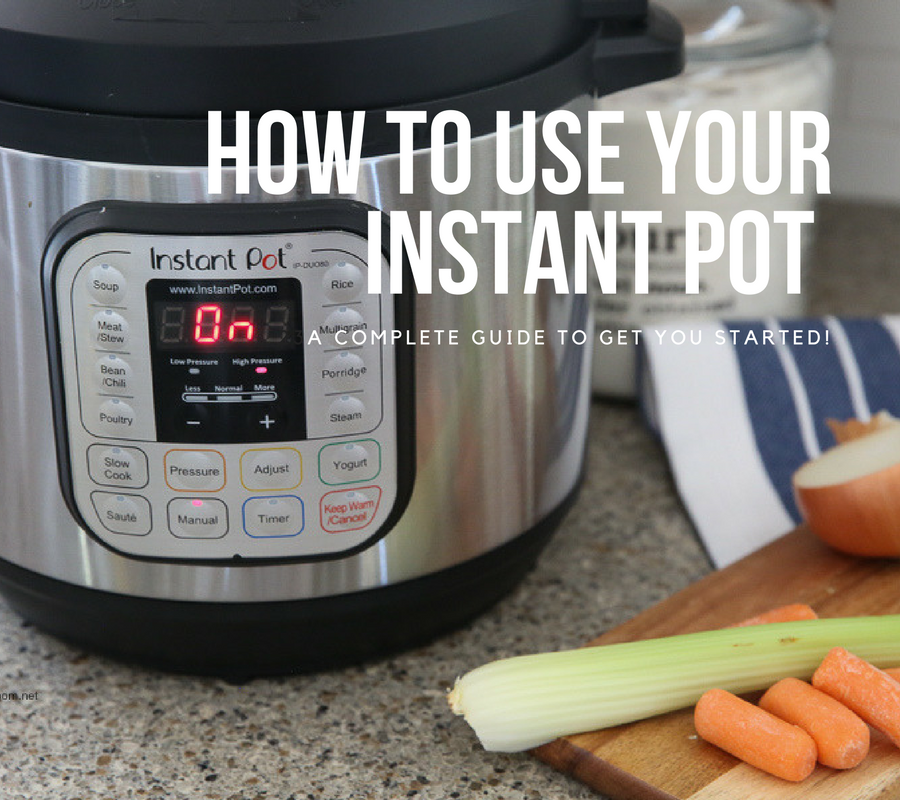
GOT AN INSTANT POT? NOW WHAT?
Got an Instant Pot and feeling overwhelmed? Not sure where to start? Sharing a simple guide that shares step by step help for how to use your Instant Pot. We also teach you how to use each instant pot function and share common instant pot cooking times! So you got an Instant Pot and pulled it out of the box…now what? Don’t let all the buttons intimidate you or lack of helpful information in the instruction booklet intimidate you! You can use your Instant Pot without fear if you read my helpful tips below! We can have you cooking dinner tonight and you will quickly be on your way to becoming an Instant Pot pro in no time! It took me a while after I bought my Instant Pot to actually use it because I felt intimidated by it. I was also admittedly a little bit nervous about using the Pressure Cooking setting because of the memories I had of my Mother’s Pressure Cooker whistling away in all of its foreboding scariness! But after much research and finally gathering the courage to use it, I tried the Instant Pot, and it has quickly become one of my favorite cooking appliances. I use it all of the time now and no longer pull out my Slow Cooker or my Rice Cooker because it is just too easy and convenient to use! And I LOVE having only ONE kitchen appliance on my counter-top!WHY GET AN INSTANT POT?
The Instant Pot has a lot of functionality for one appliance, and at a decent price point. Most of all, I love the convenience and speed of it. I can set it and walk away and not have to think about what’s for dinner in the mad rush of the after school chaos OR I can forget about dinner until 4:30 pm and have something on the table in minutes (which lately has been more my style). It also saves you time by cooking foods quickly that usually have a longer cooking time like beans. Grab the entire Printable Instant Pot Guide by entering in your information below: Click Here For Free Guide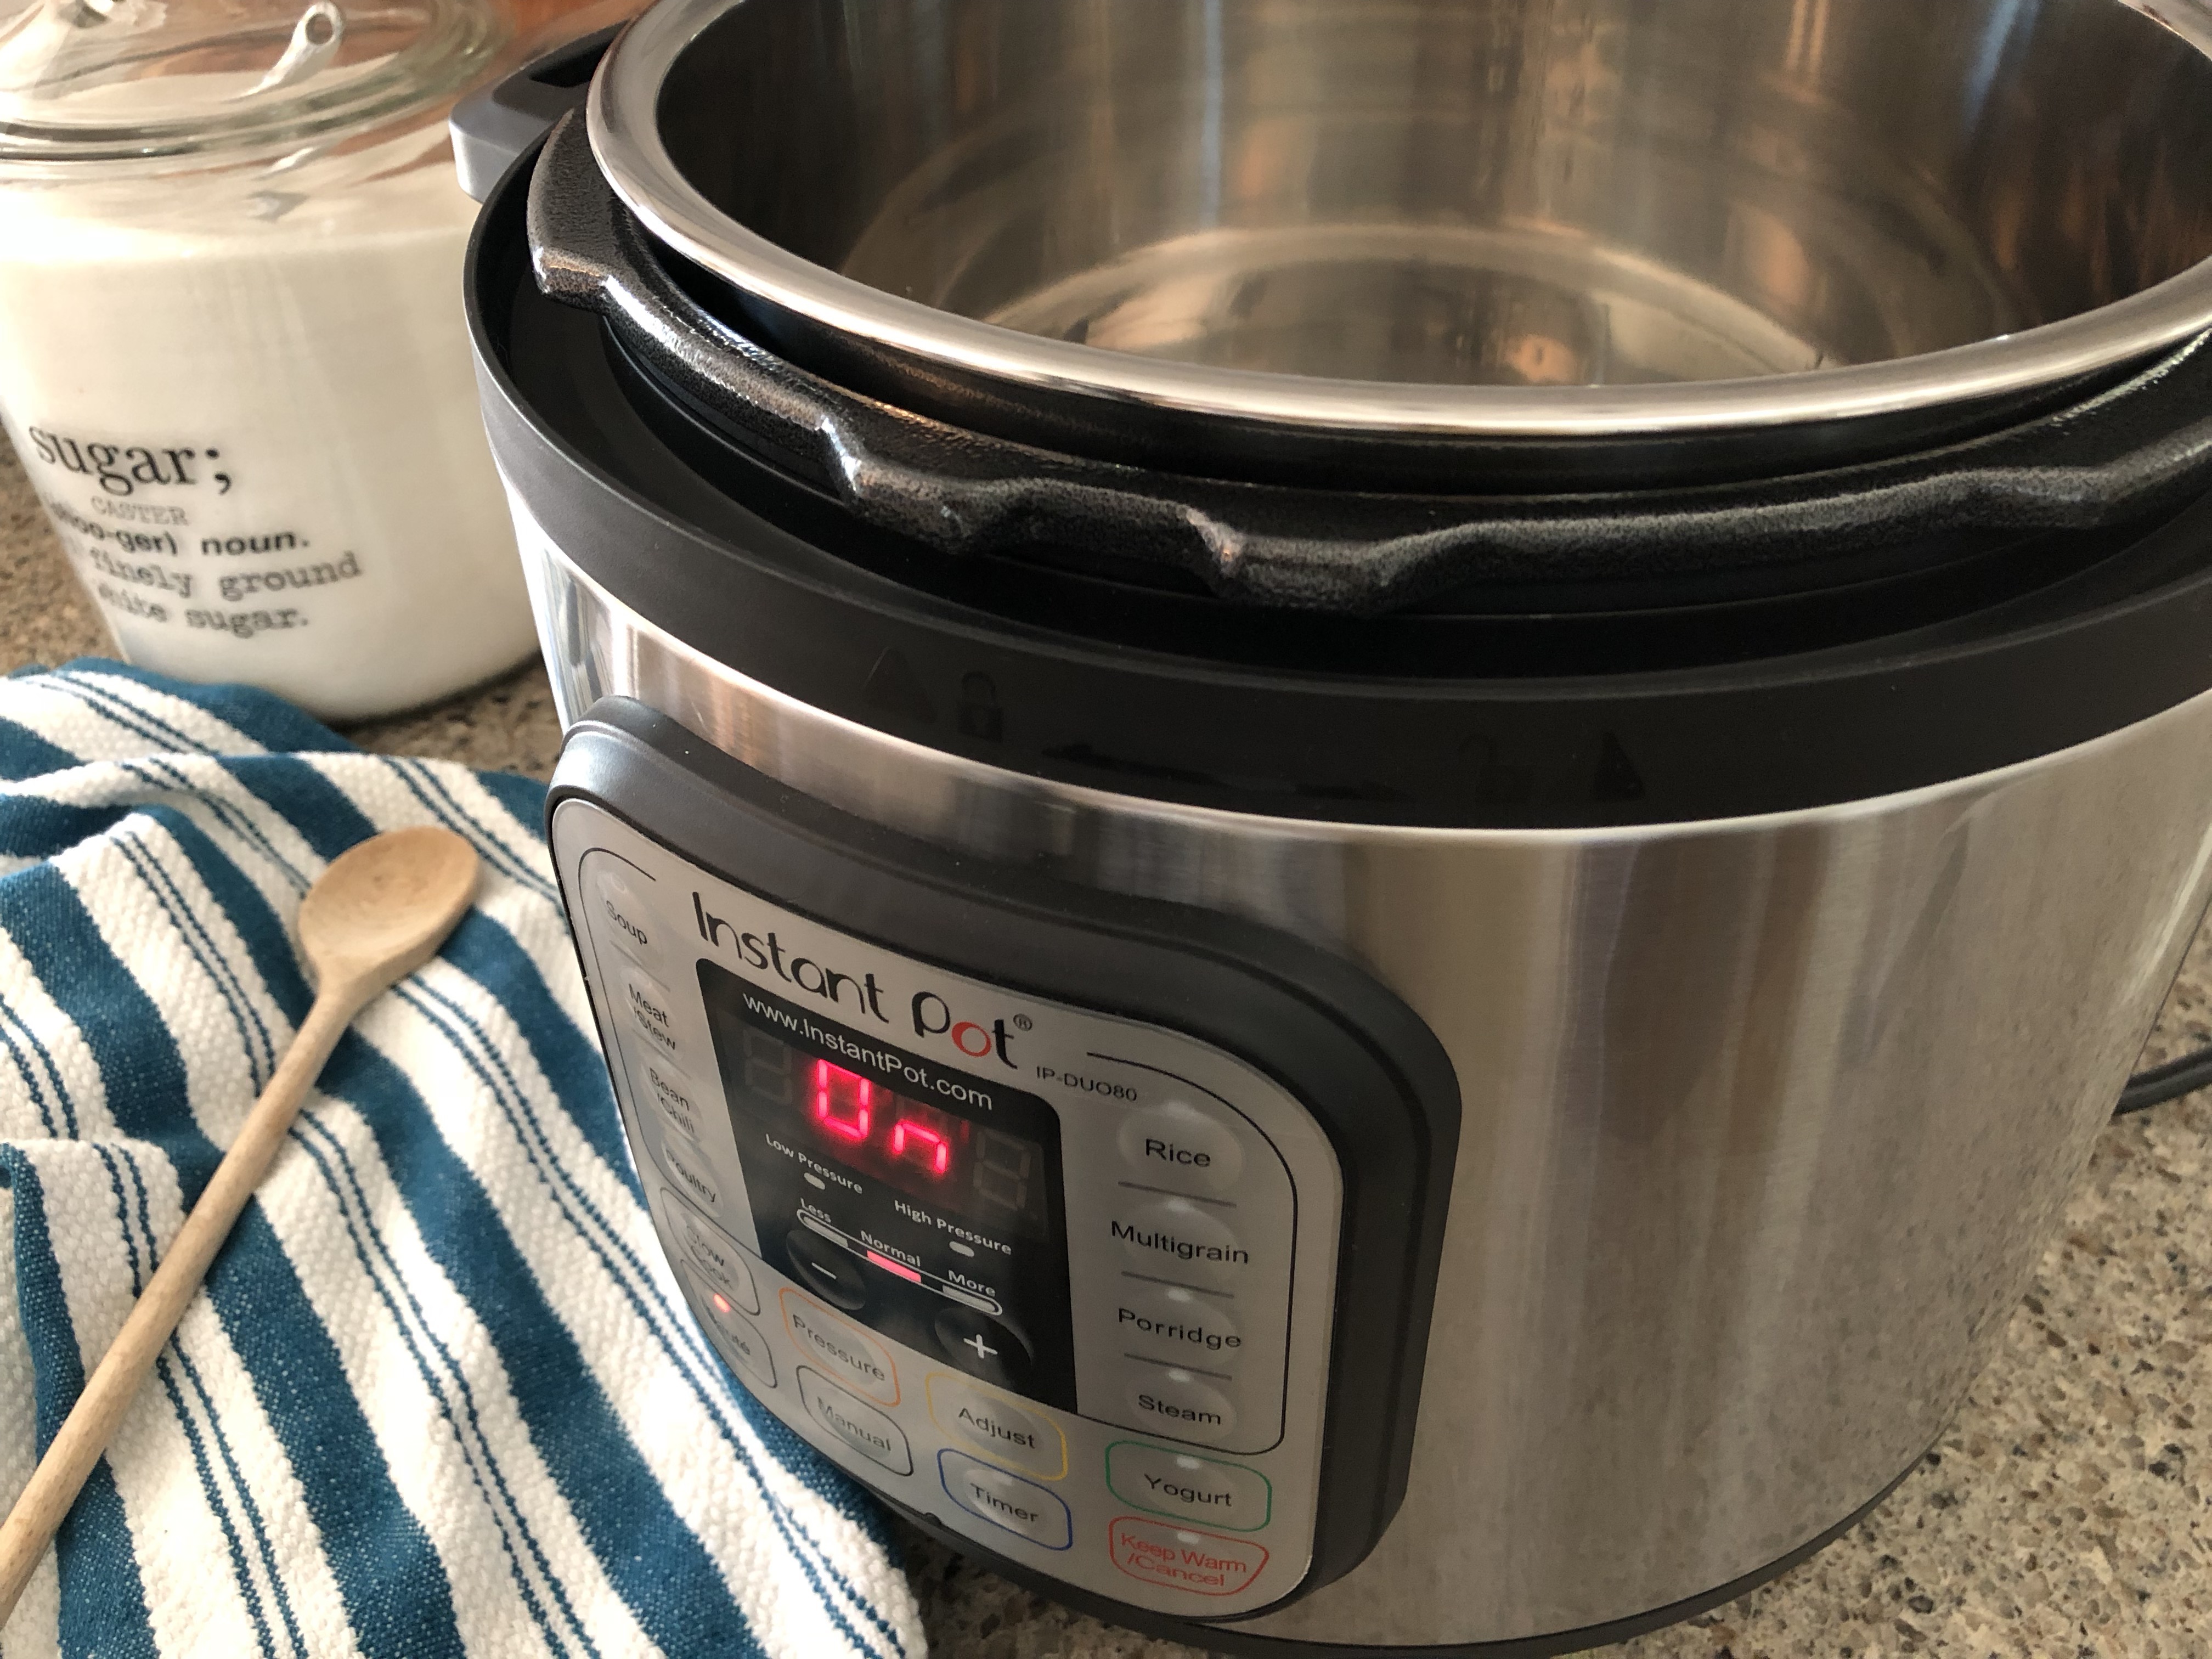
WHAT CAN AN INSTANT POT DO?
The Instant Pot DUO is a multi-cooker that offers the same functionalities you’d find in the following:- Pressure Cooker
- Slow Cooker
- Rice Cooker/Porridge Maker
- Steamer
- Saute/Browning
- Yogurt Maker
- Warmer
HOW TO SET UP YOUR INSTANT POT
The Instant Pot comes with some tools some of which I use and some that I don’t. The electrical cord is pretty obvious a needed part so be sure to pull that out and plug it into the pot. Some come with a measuring cup that you may or may not want to use. I personally don’t use mine as I prefer my own measuring cups. I also don’t really use the utensils that come with it either.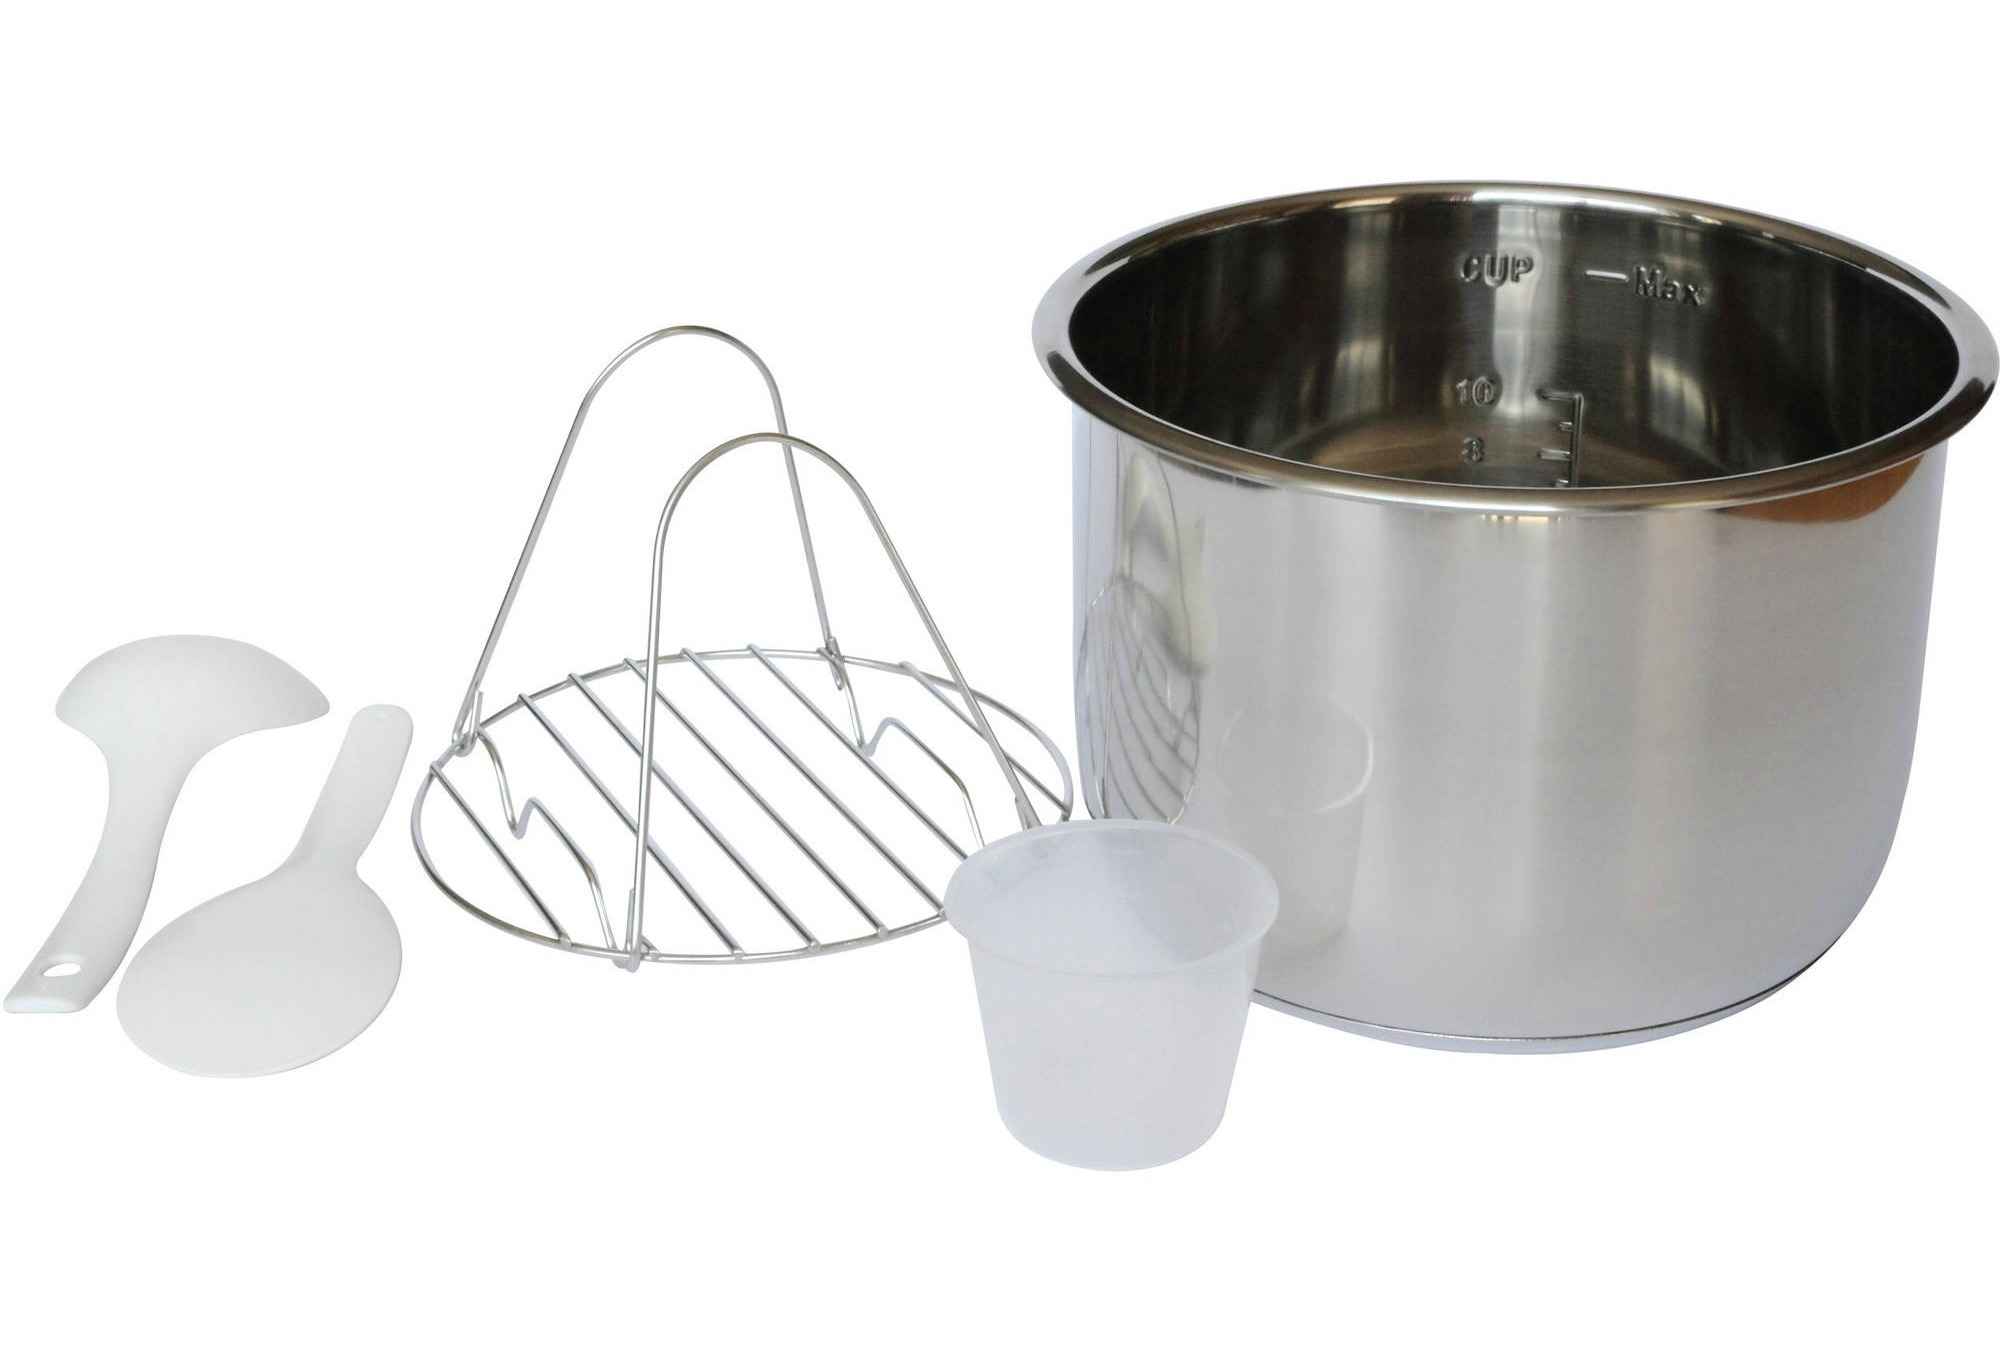
STEAM RACK (or Steam Basket)
Now here’s a handy accessory! The steam rack. Use this to hold vegetables, pans (for when you make things like meatloaf or cheesecake), or anything that you don’t want sitting in the cooking liquid. If your model doesn’t come with a steam rack, you may consider getting one. They’re really handy. You might also want to pick up a steaming basket. Small vegetables and other foods tend to fall through the steam rack. To solve this problem, you can put the steam rack in the Instant Pot and put the steamer basket on top of it. Works great for steaming your veggies quickly!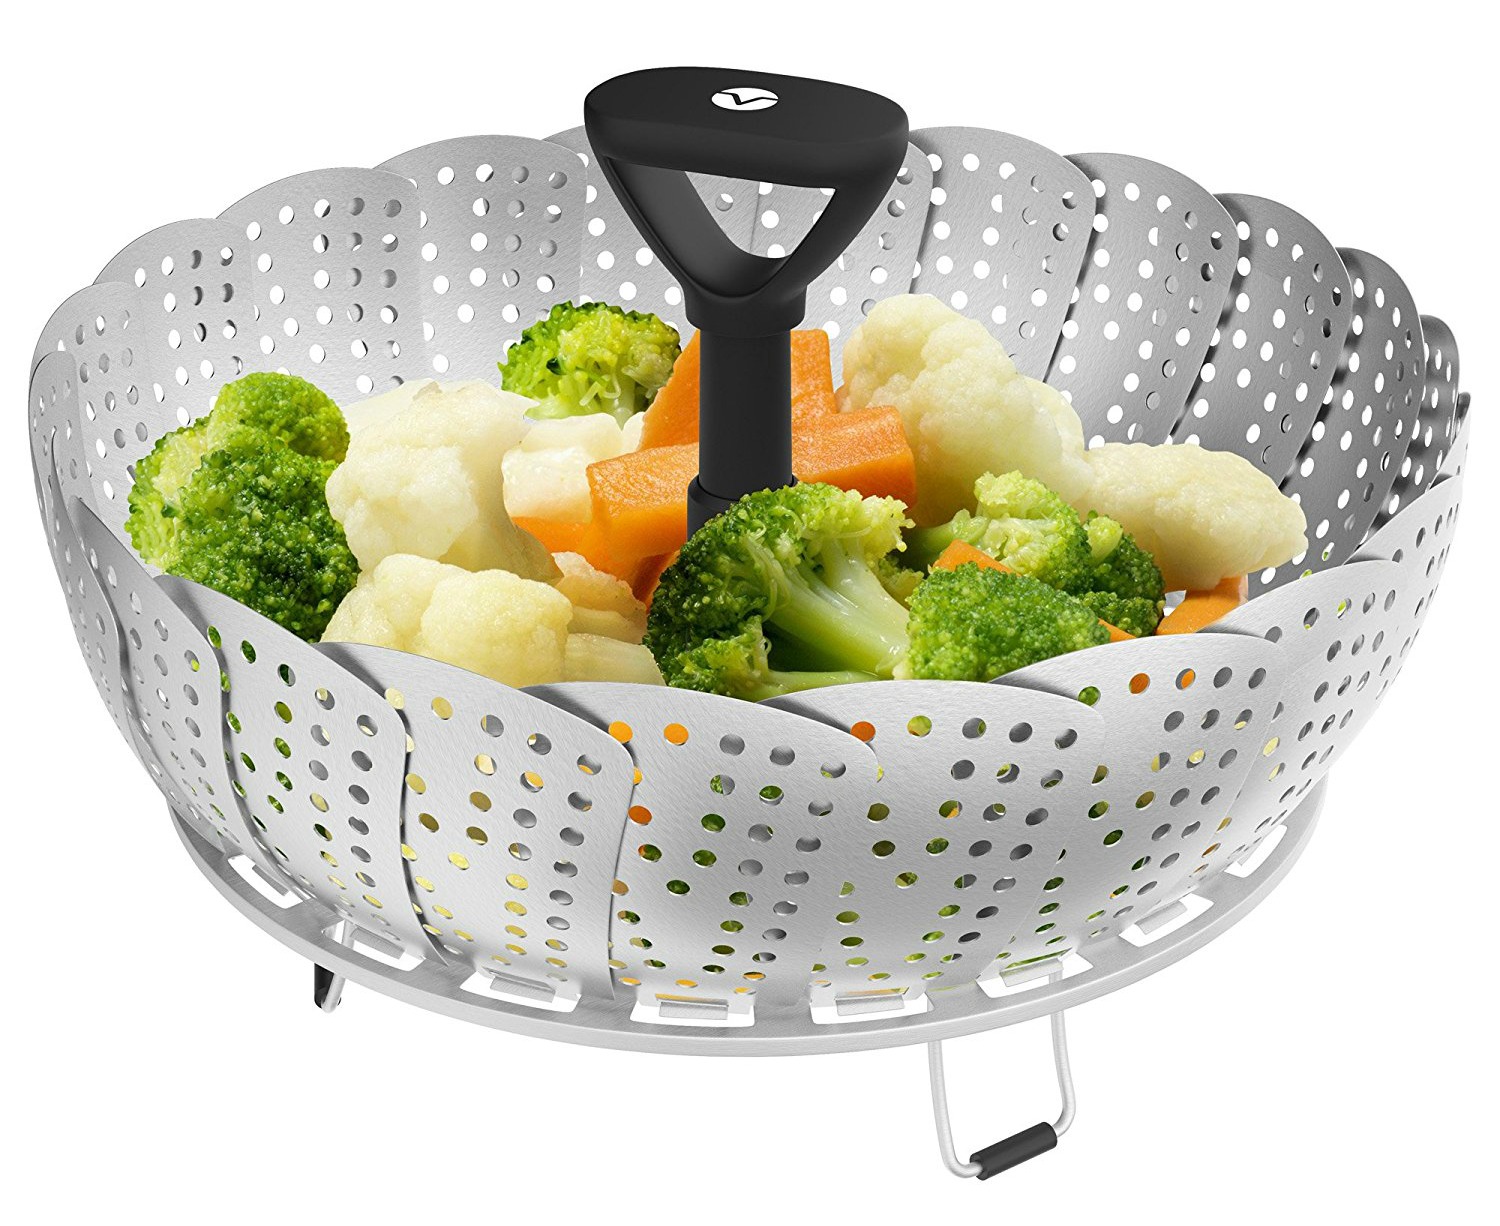
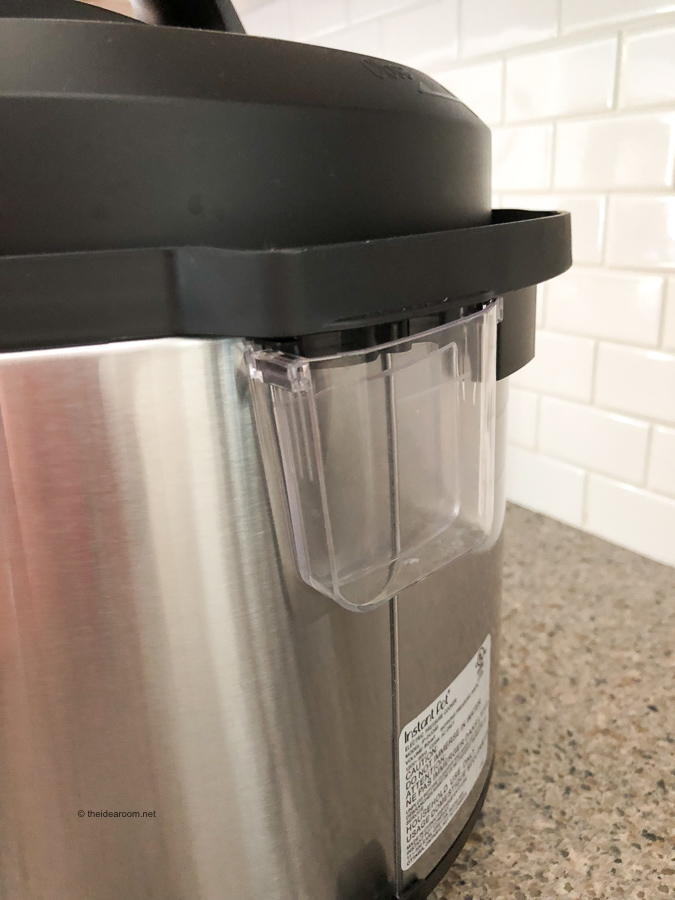
INSTANT POT CONDENSATION COLLECTOR
This little cup hooks on to the side of the Instant Pot. It’s supposed to keep condensation from hitting your counter during cooking and cooling. Don’t toss this…you will want to use this. Slide it onto the side of the pot and it should click into place. You can remove this and clean with warm, soapy water as necessary.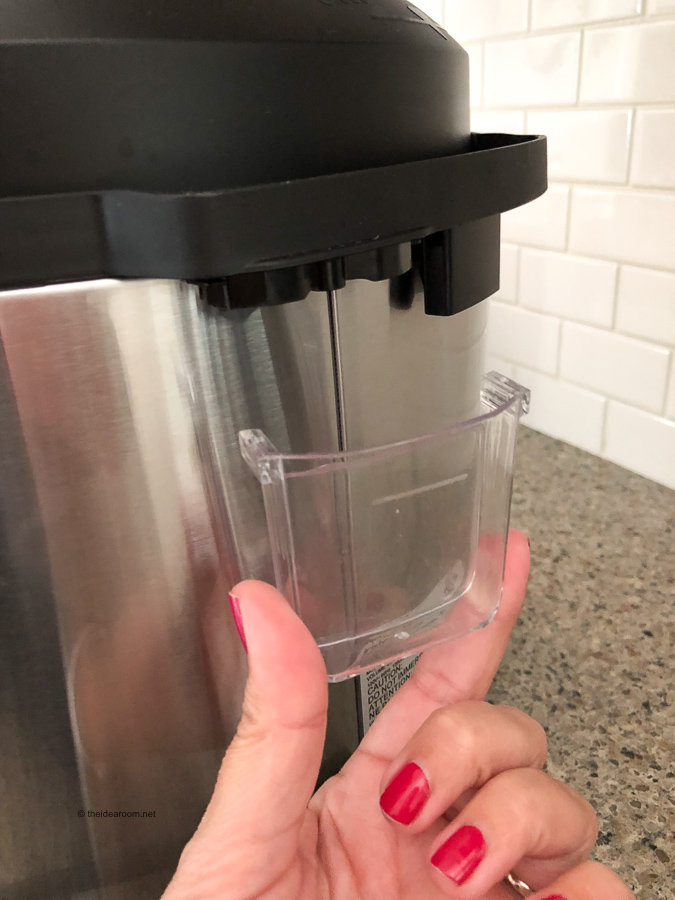
DON’T FEAR THE INSTANT POT VENTING KNOB!
One of the things I hear most from new Instant Pot users is that they are afraid of the Instant Pot Venting Knob! I am not going to lie…I felt the same way at first and was really intimidated at the prospect of using it. I had visions of my mom’s old pressure cooker venting away and was worried about it exploding because of her many dire warning that it could blow at any minute. Haha! These Instant Pots are not your mom’s old Pressure Cooker.UNDERSTANDING THE INSTANT POT LID AND INSTANT POT VENTING KNOB
The lid of a pressure cooker is an integral part of the machine. Without this lid, you can’t cook foods under pressure.Instant Pot Venting Knob:
This is the steam release valve. It has two settings: sealing and venting.1. Sealing the Instant Pot Venting Knob:
When cooking food under pressure, close the lid and line up instant pot venting valve with the “wavy” lines. This position seals the pot. It allows pressure to build as the food inside heats and produces steam. The instant pot venting valve won’t lock into place when set too sealing. For safety reasons, it will always wiggle a little. To set the instant pot venting knob to the sealing position, turn it clockwise as far as it will go. (This is for DUO machines. LUX machines have a different sealing position.)2. Venting
How to Release Pressure from Instant Pot Venting Knob
Once the pressure cooker completes its cooking cycle, there are TWO ways to release the pressure built up. –- Quick release. You will use the quick release for items that have a quick cook time and that you want to stop cooking immediately. To do a quick release, you will have to push the Instant Pot Venting knob yourself. The quick release method is engaged when you turn the valve on top of the pot from the “sealing” setting to the “venting” setting. This turn can be a little nerve wracking the first time, but if done right isn’t scary after your first attempt…I promise! To release the pressure, I like to use a long handled object like a wooden spoon and keep my arm and objects away from the vent. Push the valve to the venting position and the steam should release quickly from the pot. You can safely open the pot when the pressure valve has dropped to the lowest position and the venting has stopped.
- Natural pressure release. If you do NOT do a quick release by pushing the Instant Pot Venting Knob to the venting position, the Instant Pot will naturally begin to release the steam on it’s own immediately after the programmed cooking time is over. This allows the pressure to naturally dissipate on its own. It will start counting to let you know how many minutes it has been releasing the pressure. Usually this takes about 10-20 minutes depending on what and how long you have been cooking something.
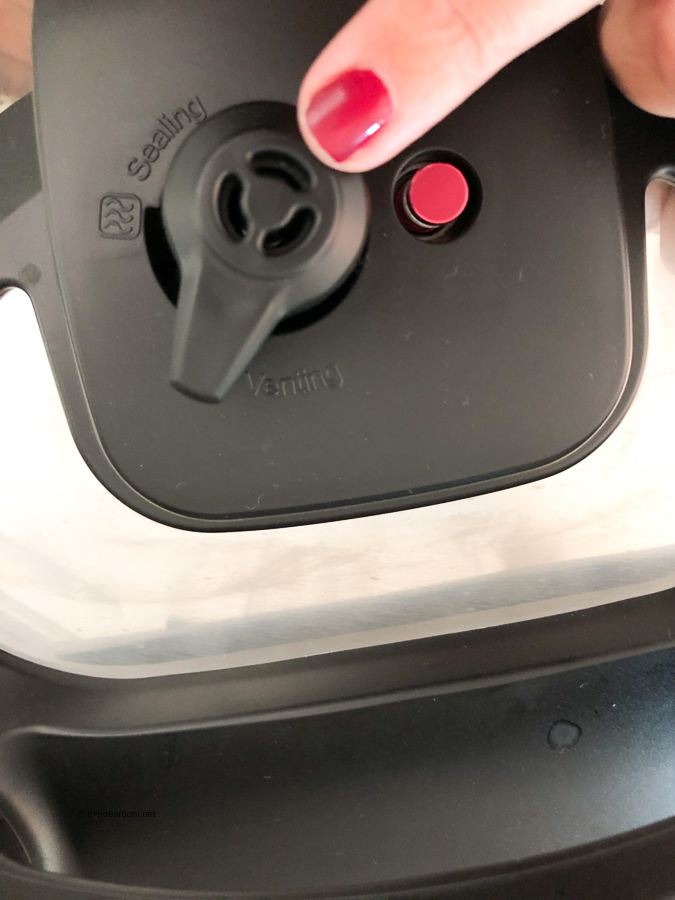
Is the Instant Pot Venting Knob supposed to be Loose?
Yes. It is normal for the venting knob to be loose when it is not in use. When you turn on your Instant Pot and need the pressure to begin building when you are using the pressure cooking setting be sure to turn the venting knob to the sealing position. The knob will not be loose until you release the pressure after cooking.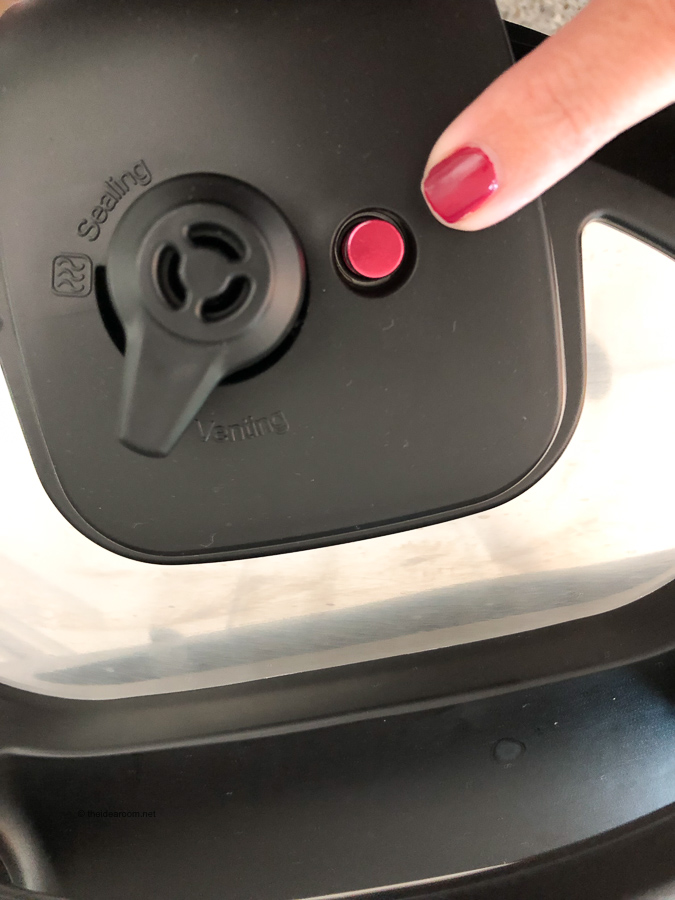
THE UNDERSIDE OF THE INSTANT POT LID
The underside of the Instant Pot contains four important parts. Depending on whether you have a version one DUO or a version two, the shield will either look like a small oval cage covering both the float and pressure release valve or a small round piece just covering the pressure release valve (pictured below).THE ANTI-BLOCK SHIELD
The anti-block shield prevents small foods and foam generated during cooking from clogging the pressure release valve and causing an unsafe amount of pressure to build. It’s an important piece. Don’t run your Instant Pot without it in place. The cover can be removed for cleaning with warm soapy water. Make sure the cover is in place before using. This prevents food from getting in the valve which can cause problems and create safety issues later.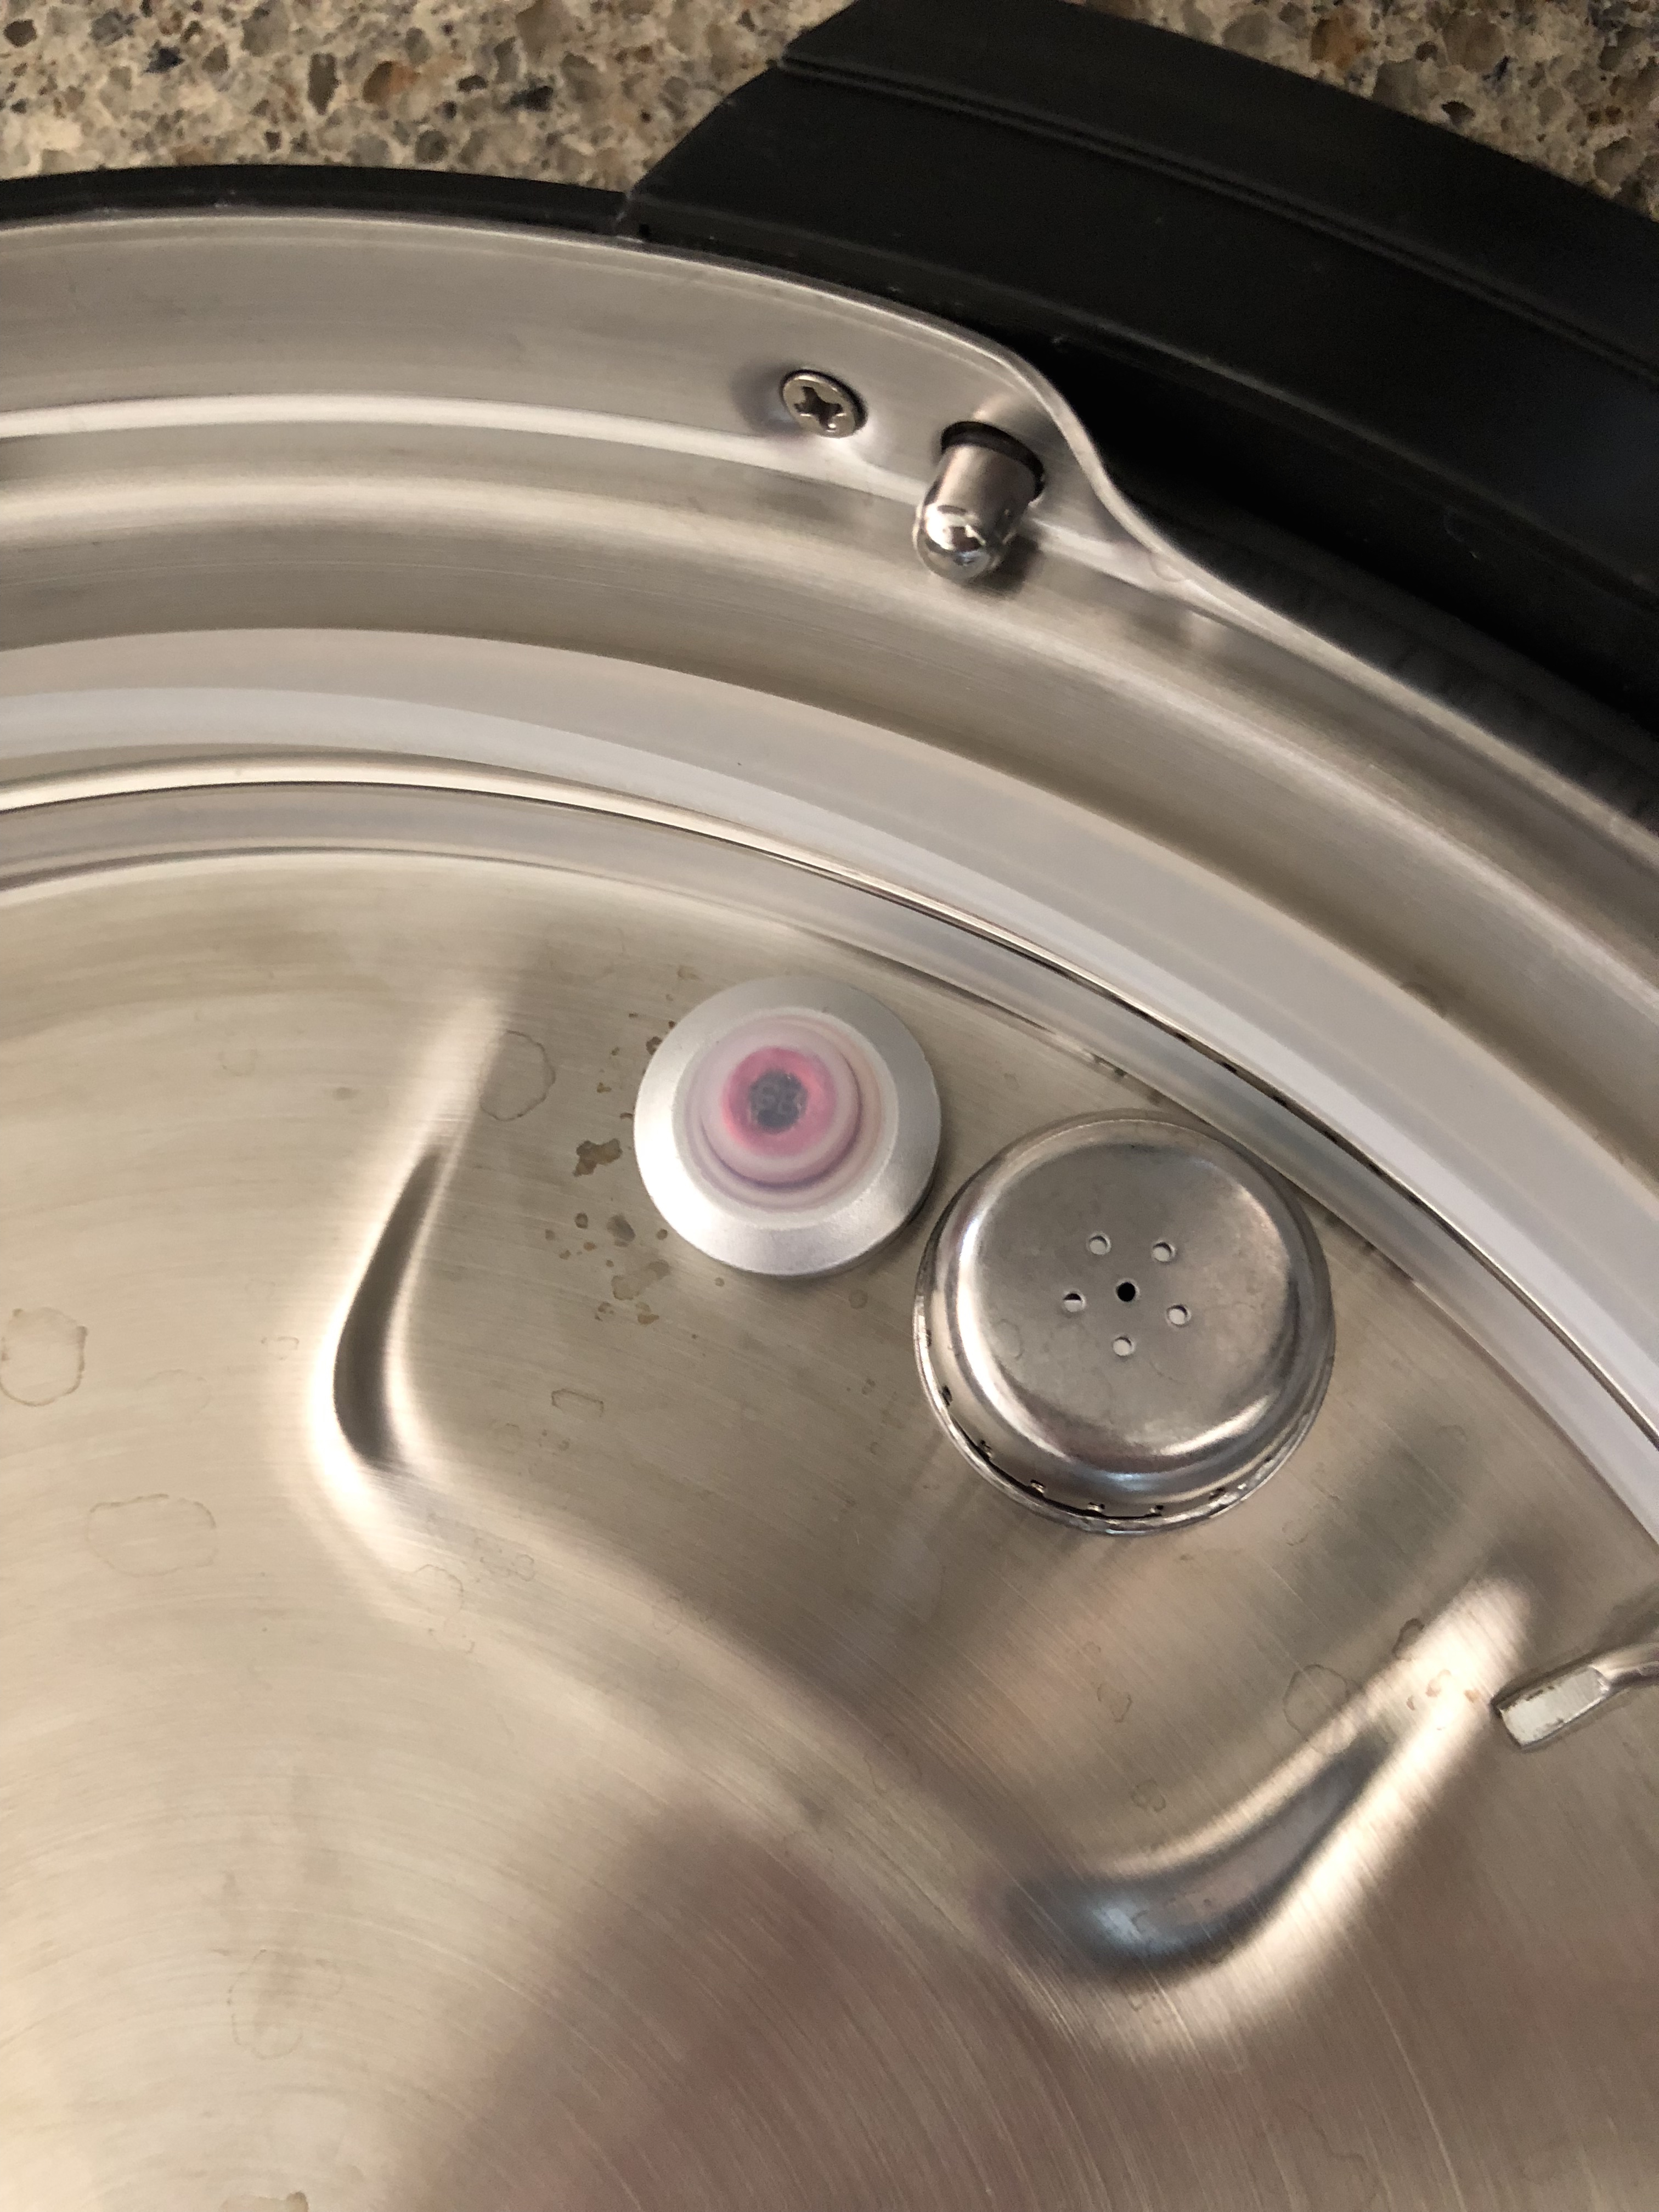
INSTANT POT SEALING LID
The white silicone ring is an integral part of the Instant Pot. Without it, pressure can’t build. During heating, the sealing ring expands to create a seal that allows pressure to safely build inside the machine. If the sealing ring isn’t inserted correctly or is worn or out of shape, steam can leak from the lid and the Instant Pot won’t seal.HOW TO CLEAN INSTANT POT LID
To remove the ring for cleaning, allow the lid to cool and then pull gently on the sealing ring. To clean, use warm soapy water or run through the dishwasher. Dry the ring thoroughly before placing it back into the lid. To put the sealing ring back properly, insert the sealing ring snugly in the wire sealing ring rack. When inserted, the sealing ring should lay flat against the lid and shouldn’t pull out easily if you give it a soft tug. You may want to keep an extra sealing ring on hand in case you notice a tear or a rip. The silicone sealing ring may also retain some odors of the food you cook. If you plan on making yogurt or desserts with a milder flavor, using this extra ring can prevent these foods from picking up the odor from the stronger foods you have cooked.HOW TO USE YOUR INSTANT POT FOR THE FIRST TIME
According to Instant Pot’s official website you should follow these instructions to test your Instant Pot for the first time to get comfortable with how it works and to test everything out.- Secure the power cord to a 120V outlet. If your power cord is detachable, ensure that it is plugged firmly into the base connection socket on the back of the cooker base.
- Add 3 cups (24oz / 750mL) of water to the inner pot.
- Insert the inner pot into the cooker base. (Note: The inner pot must be used for cooking. Never pour food or liquid into the cooker base without the inner pot in place.)
- Ensure the sealing ring is installed correctly on the sealing ring rack. When in place, you should not be able to remove it easily.
- Place the lid and turn clockwise until it is fully closed. The cooker will chime when the lid is opened and closed.
- Set the steam release to the “Sealing” position.
- Ultra automatically sets the steam release to the “Sealing” position when you close the lid.
- Select Manual or Pressure Cook.
- Use the + / – keys or the dial to adjust the cook time to 5 minutes. (Note: The display will indicate “5” on some models, and “00:05” on others.)
- The cooker will begin the pre-heating cycle after 10 seconds. The display will indicate “On” while the cooker heats. Refer to “What to Expect During the Water Test” (below) for additional information.
- Ultra, select Start.
- Once the cooking cycle has completed, the cooker will beep and switch to Keep Warm if it is ON.
- Use the Quick Pressure Release venting method to release pressure or let it release naturally.
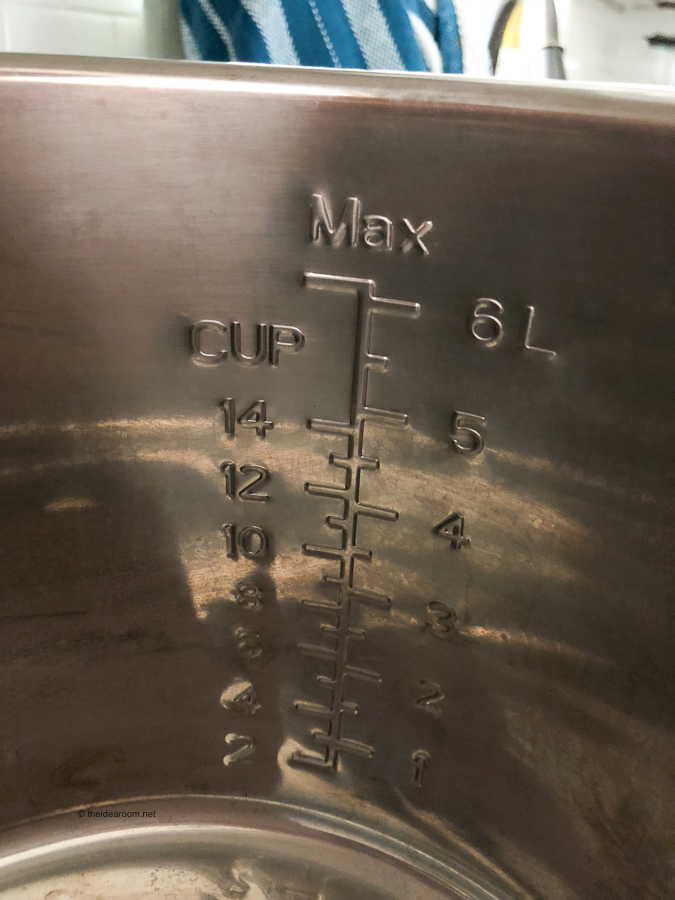
DON’T OVERFILL YOUR INSTANT POT
When using the Instant Pot for pressure cooking, NEVER fill the pot more than 1/2 full. If a pressure cooker contains too much liquid, the hot liquid can spray out of the pressure release valve, causing severe burns. As long as you respect the maximum fill on a pressure cooker, you’ll be fine. *The Max Fill Lines on the Instant Pot Cooking Insert are very confusing and you should NEVER fill it to the maximum levels when pressure cooking. Food will expand when it is under that intense pressure/heat and this is where you can run into safety problems. You always want to make sure you have enough liquid in your pot when using it so make sure you don’t overfill it.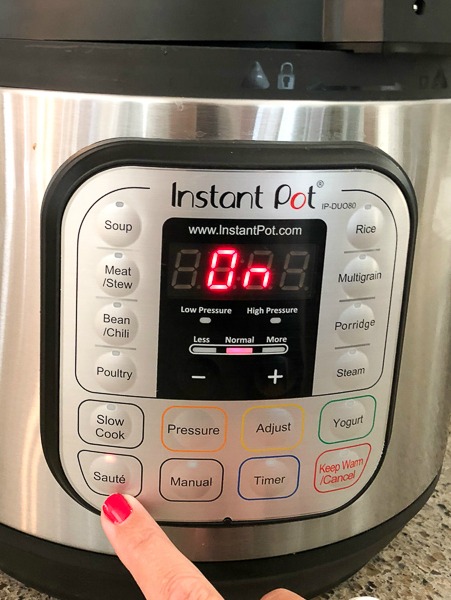
HOW TO USE YOUR INSTANT POT BUTTONS
There are 16 settings on the Instant Pot, which can be very intimidating. Each button designates a type of cooking. The buttons have preset cook times to make things easier for you and to take the guess work out of the cooking times for different items. The setting on the buttons also help you to know if the pot will be locked to capture steam in a pressure cooking setting, or if you will be using the Instant Pot like a regular cooking pot or a slow cooker which cooks without pressure.Soup Button
High pressure 30 minute cook time. Press soup and the Adjust button once (more) to cook for 40 minutes. Press soup and the Adjust button twice (less) to cook for 20.Meat Button
High pressure 35 minute cook time. Press the Adjust button to navigate to the Less setting to cook for 20 minutes or navigate to the More setting to cook for 45 minutes. Bean/Chili: High pressure 30 minute cook time. Press the Adjust button to navigate to the Less setting to cook for 25 minutes or navigate to the More setting to cook for 40 minutes. Poultry: High pressure 15 minute cook time. Adjusted to more – 30 minute cook time; adjusted to less – 5 minute cook time.Rice Button
Cooks on low pressure and is the only fully automatic program. It’s for cooking white rices and will adjust the cooking time depending on the amount of water and rice in the cooking pot.Steam Button
High pressure 10 minute cook time. Adjusted to more – 15 minute cook time; adjusted to less – 3 minute cook time. Use this function with a rack or steamer basket because it heats at full power continuously while it’s coming to pressure and you don’t want food in direct contact with the bottom of the pressure cooking pot. Once it reaches pressure, the steam button regulates pressure by cycling on and off similar to the other pressure buttons. Slow Cook defaults to a 4 hour slow cook time. Use the adjust button to slow cook on low (190-201°F), normal (194-205°F ) or high (199-210°F). Use the “+” and “-” buttons to increase or decrease the cooking time.Pressure Button
Switches between low and high pressure.Adjust Button
Use this button to cancel a function or turn off your pressure cooker. On the Smart, you can use the Adjust button to reduce or increase the keep warm temperature from 145° (normal) to 133° (less) and 167° (more).Yogurt Setting
Used for making yogurt in the pot or in individual jars.Sauté Setting
Use the Sauté button to sauté in the pressure cooking pot with the lid off. You can also press Sauté and the Adjust button once (more) for browning. Press Sauté and the Adjust button twice (less) to simmer.Manual Setting
An all-purpose button. Use the manual button if a recipe says to pressure cook on high pressure for a specific number of minutes. Use the “+” and “-” buttons to increase or decrease the cooking time.Timer Setting
Is for delayed cooking. You need to select a cooking function first, make any adjustments, then press the timer button and adjust with the “+” and “-” buttons.Keep Warm/Cancel Setting
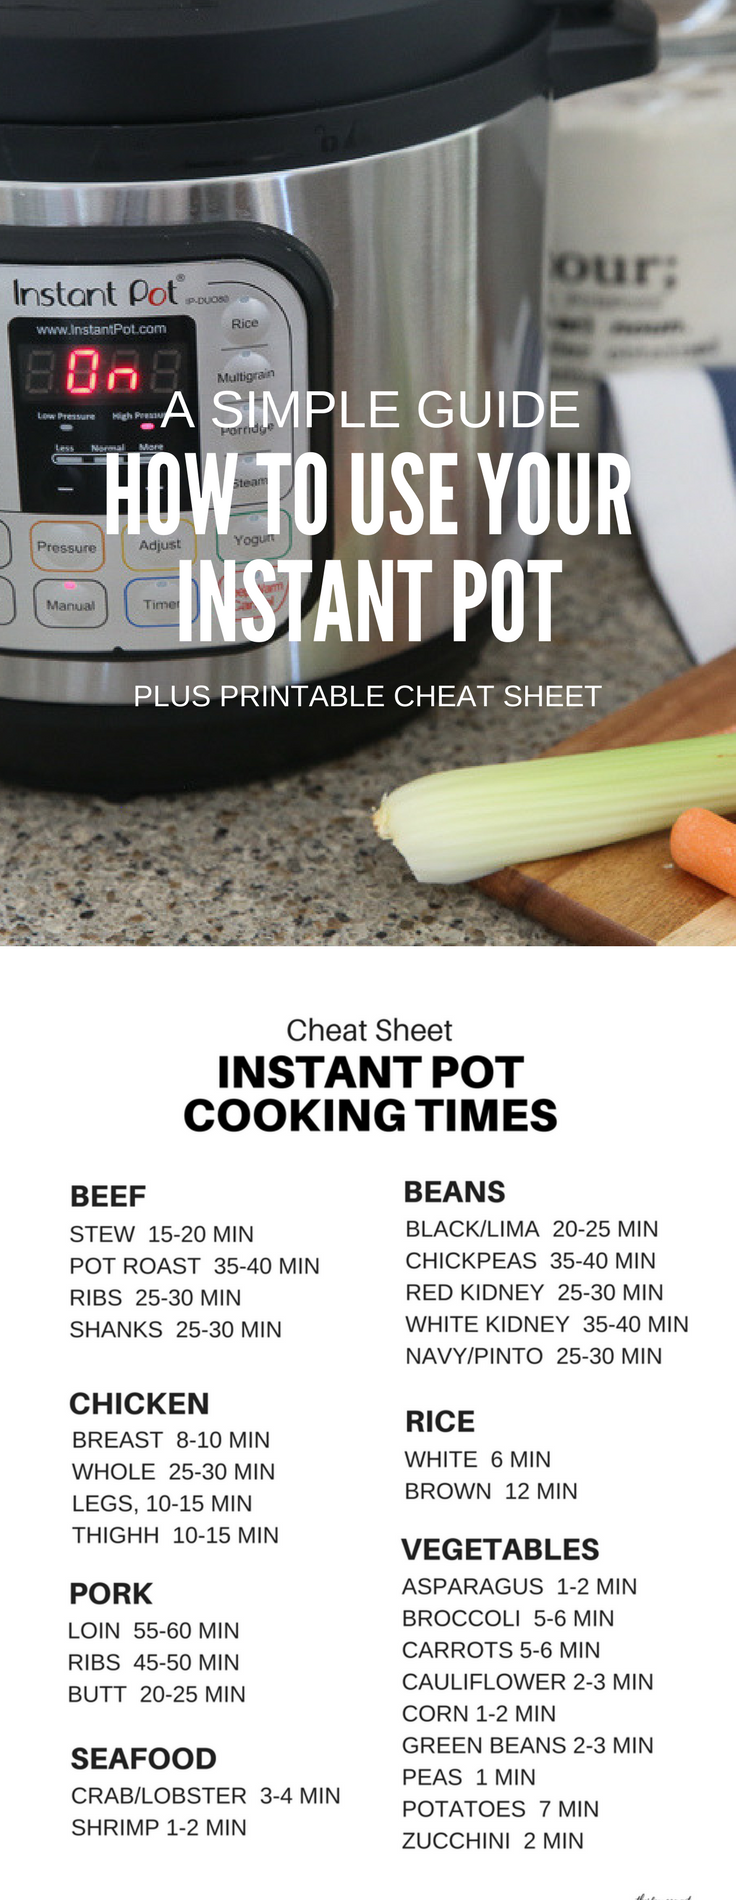
Use this button to cancel a function or turn off your pressure cooker.FREE PRINTABLE INSTANT POT CHEAT SHEET
This question depends on a lot of different factors. Is the item frozen? How many ounces is the meat or poultry? So the guidelines are just best guess suggestions. As you cook with your Instant Pot you can make adjustments based on your personal preferences. I have created a FREE Printable Instant Pot Cooking Times Cheat Sheet for your convenience.
HOW TO DO AN INSTANT POT WATER TEST
Now we are ready for your initial test run of the Instant Pot. This is a good way to test your machine and give you some confidence to get started!- Make sure the steam release handle and float valve are unobstructed and that the sealing ring is properly align with the lid.
- Add water to your instant pot stainless steel inner pot up to the inner mark “3”.
- Close the lid and make sure that the steam release button is pointing to “Sealing”.
- Press the pre-set Steam Button.
- Press the (-) minus sign to change the time to 2 minutes.
- At around 10 seconds, the Instant Pot pressure cooker will be in a pre-heating cycle. Within minutes, the steam will come out of the valve until the float valve pops up and seals the cooker. When this valve is up it will be flush with the lid.
- Once the countdown is finished, the instant pot will beep and automatically go into “Keep Warm” mode.
- You can either release the pressure immediately by doing a quick release (as we mentioned above) or let the Instant Pot complete a natural release on it’s own. Give it about 10 minutes and then push the vent valve before opening the lid to ensure there is no more pressure in the pot.
MORE INSTANT POT RECIPES
- Pulled BBQ Chicken
- Chicken and Rice Burrito Bowls
- Pot Roast (Gluten Free)
- Chicken Tacos
- Chicken Tortilla Soup
- Baby Potatoes
- Hot Cocoa
- Instant Pot Potatoes
- Instant Pot Rice
- Boiled Eggs
GRAB MY PRINTABLE INSTANT POT GUIDE
Want to get all this information and more in an easy printable Instant Pot Guide? It also includes a printable Instant Pot Cooking Times Guide. Perfect for easy reference when working with your Instant Pot. Grab the Printable Instant Pot Guide by entering your information below.JOIN OUR NEWSLETTER
Would you like more Recipes, DIY, Printables and Organization Ideas?
Subscribing to the newsletter will enable us to periodically send you creative content exclusively for Idea Room subscribers.
*View our Privacy Policy here.


Thanks much for your posts. I love them and help me to use IP clearly.
Yen- Thank You!
Thank you! I like the fact that you showed us where to look for things & their uses. I admit some of us are challenged when it comes to anything digital.
Donne- Thank You!
The cheat sheet. Is that for pressure cooking only
Yes…for pressure cooking!
do you have to preheat the instapot i tried chicken and rice and it didnt cook right
Lisa- There’s no need to defrost first when using frozen ingredients in your Instant Pot, just increase the cooking time slightly and When using your Instant Pot as a pressure cooker, you need at least 1/2 to 1 cup of liquid in your recipe, otherwise the unit won’t fully pressurize. Hope this info helps.
Your measuring cup may be for rice. It looks just the the one I have for my rice cooker. The flat paddle utensil is for scooping your rice. I’ve been too intimidated by the Instant Pot to even consider buying one. Maybe I’ll have to look into it more. Thanks for the post!
Thank you for this awesome post, Now I need one exactly like it for my food processor and all of its blades. (It was a gift that I’d gladly use if i knew how)
Shannon- Glad you found this post useful!
Can the instant pot be used for pressure canning?
They can not be used for canning. Great question.
I can’t turn my anti block shield. 3 people tired and failed. Is this just because it’s new or should I take it back?
I have to admit, I’m intimidated by this machine, but so many people love it, I want to give it a good try before I throw in the towel.
Debbie- I would try looking up a youtube video on it before returning it. Hope this helps. Thanks.
I can’t find anything that tells me how much liquid to add to pot to cook, meats or beans.
Charolotte- This may help. Thanks. https://mycrazygoodlife.com/convert-recipes-instant-pot/
IS the cheat sheet for frozen meat
Dani- This may help…https://www.hippressurecooking.com/how-to-pressure-cook-frozen-meat/
Just FYI I had used mine several times fine than one day after all the steam was released I turn the lid which doesn’t come off if steam is left or pressure. The liquid bubbled over and caused third degree burns all over my chest stomach and pelvis be careful with them
Ronna- I am so sorry! That is terrible! Thanks for making me aware of this.
I’m still confused after reading… one question I have is can the instant pot be used to pressure can veggies??
Susan- Yes it can.
We live Colorado and wonder if we need to adjust the recipes for the altitude.
If you are living in Denver, your altitude is at 5280 ft. According to the chart above, you will have to increase our recipes’ cooking time by 15%.
Both times I e used my UP it shows “burn”. I waited my roast then pressured it like the recipe on the booklet said. Burn showed up. It was little on the bottom but still moist and tender. Stew did same but had plenty of liquid and was good. Manual says nothing about burn. ???
Some things that might help… cut back on the cooking time. Add any thickening agents, dairy after the cook. Add a bit more liquid to the cook and then thicken up at the end (with something like tomato paste for marinara or chili or a tablespoon of potato starch in some milk for a gravy sauce). When cooking these types of foods, it works best to put the food in order of less likely to stick into the pot first. With chilli, I put the meat in first, a little broth, beans and then tomato ingredients on the top ….. and do not mix it together, leave it in layers. The cooking action will mix it up a little and then it can be fully mixed together after removing the lid.
I know this is silly, is there a difference in brands? Can I follow these same tips and recipes if it’s a Cosori brand?
Kim- I have only used the instant pot brand. I would think that it would be about the same though.
I’m new to the instapot world and have made 3 or 4 things in it and have followed the recipes to the letter and all of them turned out a little too dry. Two of the recipes called for quick release and as I was waiting for that to finish venting it flashed “burn” any thoughts or suggestions for me?
Chriss- You many find this article helpful: https://www.pressurecookrecipes.com/instant-pot-burn/
Thank you for your article! I’ll admit – I jumped in and tried cooking chili right away… And it did fine – although, I found it lacked flavor. Maybe I need to adjust my seasoning… I’m not sure. But my question is – after all ingredients were in my pot, I set the Manual setting for 10 minutes. After the ten seconds the display went to ON… Great, I thought… Then after the ten minutes, it began to count down from ten… So I was a little confused as to when it was cooking. Was it the first ten minutes or the second ten minutes or was it going through the Natural Release….idk. Can you give me a hint? Lol!
Thank you!
Becky- Yes, it can take 10-15 minute if you are using the Natural Release. Great question.
Is there a printable copy of this article
thanks
Amy- I don’t. I may have to look into making one though. Great suggestion.
I received an 8qt Instant Pot for Christmas. All the recipes I’ve seen talk about using the “Manual” key. My 8qt doesn’t have that nor does it have the “Adjust” key. Which keys do I use instead of those?
Thank You.
Pat- You might find your answer here: https://www.pressurecookrecipes.com/instant-pot-buttons/ Hop this post helps.
Thank you for taking time and sharing this, it has helped me so much because I’ve never owned one and never grew up with one, and now that I have one I love it.
Pearl- So happy you found this post useful!
Thank you so much for this. So glad I am not the only one intimidated by these pots. I have 2, an instapot duo and a pressure cooker xl, and I love the insta pot more. I really like the size of the pressure cooker xl, but the insta pot is so much easier to use.
Michele- So happy you found this post helpful.
How do the slow cooker Times convert to the instant pot? If recipe calls for 5-6 hours on low for slowcooker, how do I convert that to my instant pot?
This post may answer your question. Thanks. https://www.kitchenstewardship.com/make-slow-cooker-recipes-for-instant-pot/
There is nothing written about how much liquid should be used. I have no clue how much liquid to use cooking 6 large chicken breasts. HÉLP
Lynette- 1 Cup Water or Broth is sufficient. Great question.
Hi! I just happened upon your blog through Pinterest and I just wanted to say I love it! Your posts are so thorough and you explain things so well with great pictures too. You also have great content. I especially love the instant pot posts. Thank you for taking the time!
Melissa- Thank you so much!Thanks for following along!
Don’t follow a lot of these time chests they’re way to long, especially for the pork loin and ribs. I just did two racks of pork ribs in my 8qt in 20 mins and they literally fell off the bone… next time I’m doing 18… YouTubers recommendations run anywhere from 15-25 on average. I can cook a pork loin in the oven in an hour! Instant Pot will do it much much faster!! Just YouTube/ Google first what you want to cook for time ideas.
Cara- Great tips. Thank you so much for sharing.
The cooking times are incorrect for pinto beans. Mine cooked in less then 20 min. with a 3 qt pot. I am assuming that the times are for a larger pot?
Size does matter! LOL
Ann- Yes, these are for the bigger pot. Thanks for bringing this to my attention. I will have to note that in the post.
What a life saver you are! I was ready to give my pot away.. you give simple info like every day cooks needed..Thank You for your time!
Bonnie- So happy you found this post helpful. I need things simplified. Nobody has time to mess around trying to figure things out. Hope you have found some yummy recipes to use in it.
Is the cheat sheet all quick release?
Yes, You can either release the pressure immediately by doing a quick release or let the Instant Pot complete a natural release on it’s own. Give it about 10 minutes and then push the vent valve before opening the lid to ensure there is no more pressure in the pot.
My insta pot doesn’t have Manuel or adjust buttons. So how do I adjust time?
Anne- Does your have these buttons: Manual button is an all purpose button. Use the manual button if a recipe says to pressure cook on high pressure for a specific number of minutes. Use the “+” and “-” buttons to increase or decrease the cooking time. Newer Instant Pots now have a Pressure Cook button instead of the manual button.
So glad I found your site as I just got an IP. We tried chicken tonight as our first attempt and it was so moist and tender. Quick questions – how do you control the steam that comes out without it going all over the upper cabinets (it’s sitting on the counter under the cabinets). Thanks!
Karen- The steam is needed to be released. I am afraid you may need to move the instant pot to a new location.
Thank you!!!
Karen- Thank you.
I like the cheat sheet, but it doesn’t say whether the recipe is for quick release or for natural release. If you follow the times on the cheat sheet is it natural release?
James, it is for natural release. Thank you.
the cheat sheet timing for the meats. Is that per pound?
Keri- Yes
I was wondering how do you set the time for the instant pot?
Judi- You can use the manual button to do this and use the adjust button to set time or turn on and off the instant pot. This may help better understand your instant pot: https://www.theidearoom.net/a-simple-guide-how-to-use-your-instant-pot/
Judi- You can use the manual button to do this and use the adjust button to set time or turn on and off the instant pot.
In reference to the cheer sheet do I add liquids to what ever I’m cooking and if so how much do I add for each item ?
Alexandra- Yes, you will add liquid to whatever you are cooking. It differs from recipe to recipe. So I can’t really answer that for you. Sorry.
Super helpful and really easy to understand! Thank you so much for sharing your idea!
Allyssa-Thank you.
What great tips!! It took me a while to figure it out & this would have been so helpful!
Natalie- It does take awhile to get use to but once you get it, the Instant Pot is a game changer.
I love my instant pot!! I know they can be tricky to use at first. This will help anyone wanting to learn!
Kristyn- I love mine too!