
Hello Idea Room Readers! My name is Amy and I blog over at Ameroonie Designs {aim-er-oo-nie}! I love to share project ideas, decorating tips, blog/ html advice (on the rare occasion I actually figure something out ;) ) and on Mondays we have “Mom”-day where I share my adventures in mothering and dole out wisdom (not often) and ask for advice and understanding (way more often) on parenting and dealing with children/ housework.
When Amy invited me over to guest post, I was thrilled- I mean she’s so awesome and has such great readers- how could I not be anything but overjoyed? So the next step was figuring out a project worthy of such an amazing place. Well, I don’t know if it is worthy, but this is what I came up with:
The Bunny Hop Pillow Tutorial

Okay, I have to admit to being a teensy bit thrilled with how the color combination turned out! Sometimes I get lucky. :)
So, on to the tutorial part. This pillow uses a reverse applique technique as well as some strip work piecing (just a bit). It’s fancy enough that it looks really complicated, but in reality it’s not very hard. The measurements I am giving are for a 17″ X 17″ pillow form, if yours is a different size, you will need to adjust accordingly.
You will need to cut five strips of the white fabric (mine was a bottom weight fabric- no idea what that means- it was a remnant I found at Joann’s, but it has a good weight to it, almost as thick as canvas but not so stiff.). The first strip will be 6″ X 18″ (this is where the bunnies will go), then you will need 2 strips 1 1/2″ X 18″ (these are the strips between the bunnies and the patchwork strip) and then 2 more strips cut at 5″ X 18″ (the top and bottom pieces). Next you will need your accent fabric. Cut one piece of each color in a rectangle approx. 4″ X 5″ (or generously larger than your bunny shape). All seam allowances will be 1/4″ unless stated otherwise.
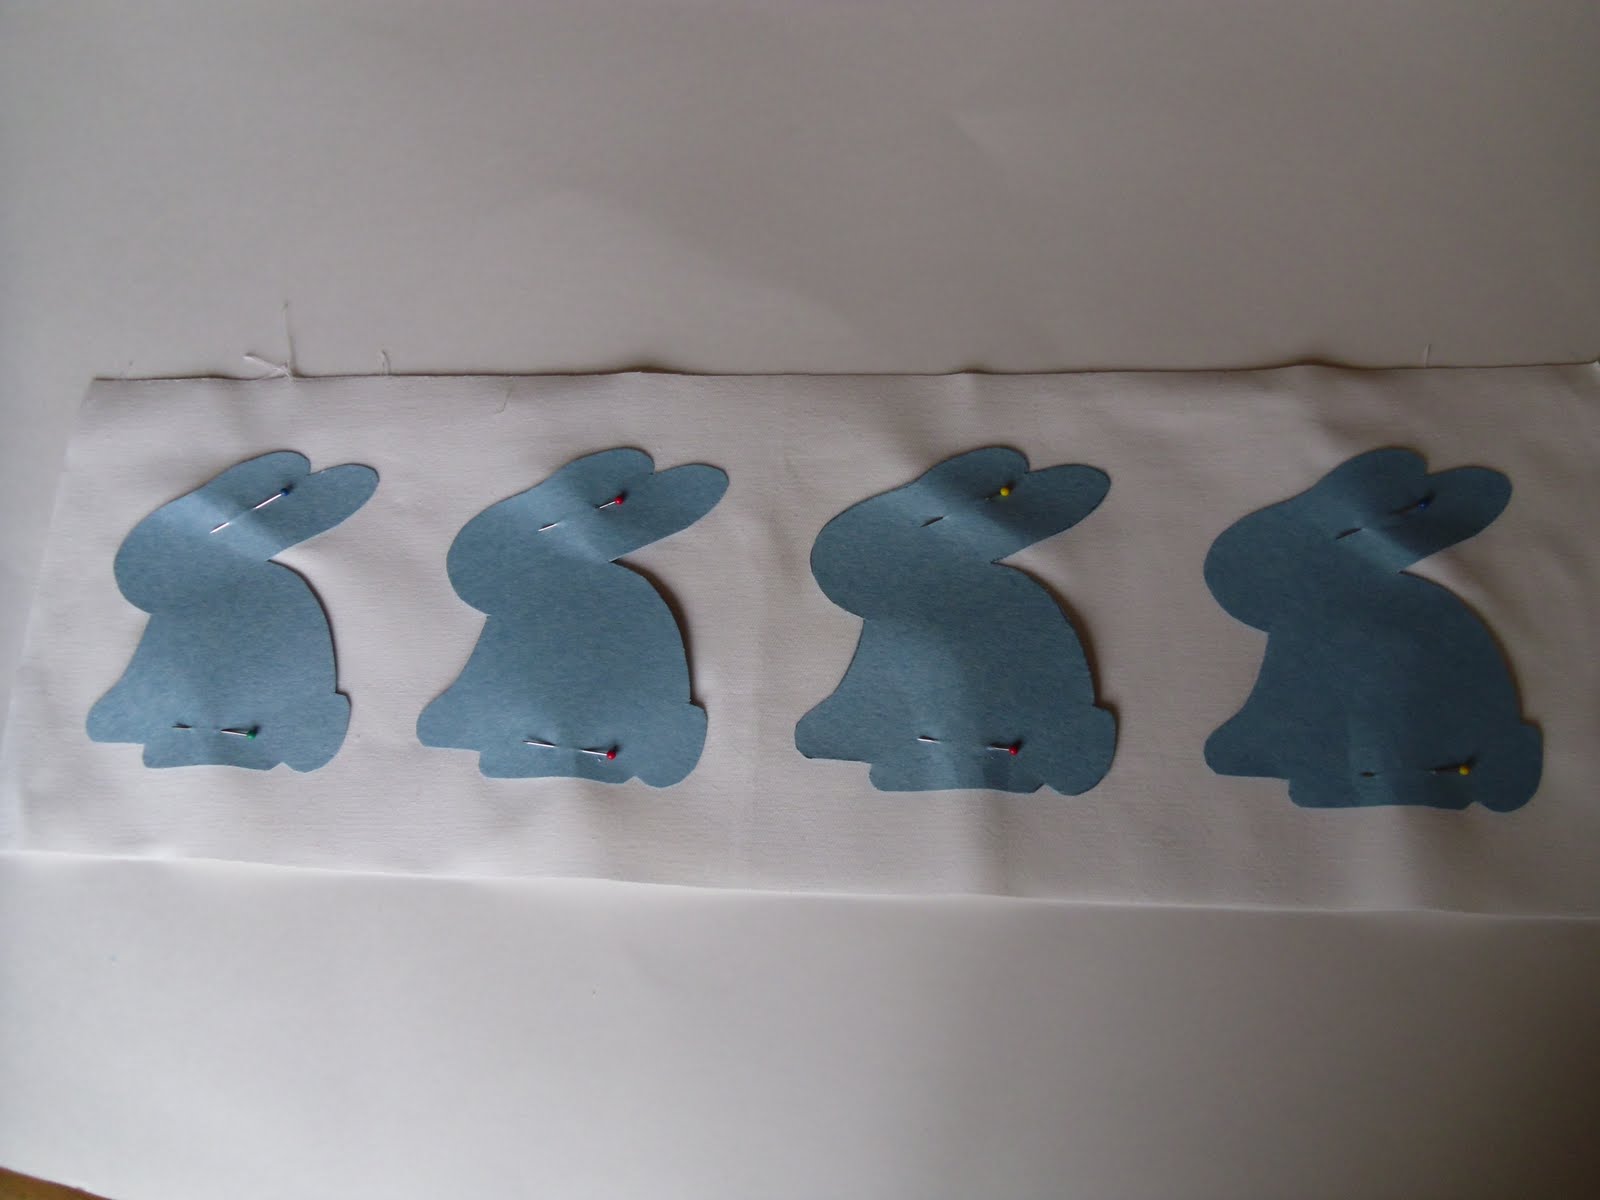
The second step after cutting is preparing the bunny strip. I took my bunny shape (I traced a cookie cutter for my template- e-mail me if you would like a copy) and traced and cut it out 4 times onto paper to make templates. (trace once, cut four layers at the same time) Then I arranged them on the right side of my center strip. I am not a measure exactly kind of person- so I just eyeballed the placement. You might want to be more precise. :) Pin the templates in place and *lightly* trace with a pencil.

Pin your accent fabric behind the first bunny. (this is a mock up of this step- ignore the size of the white fabric. ;) )
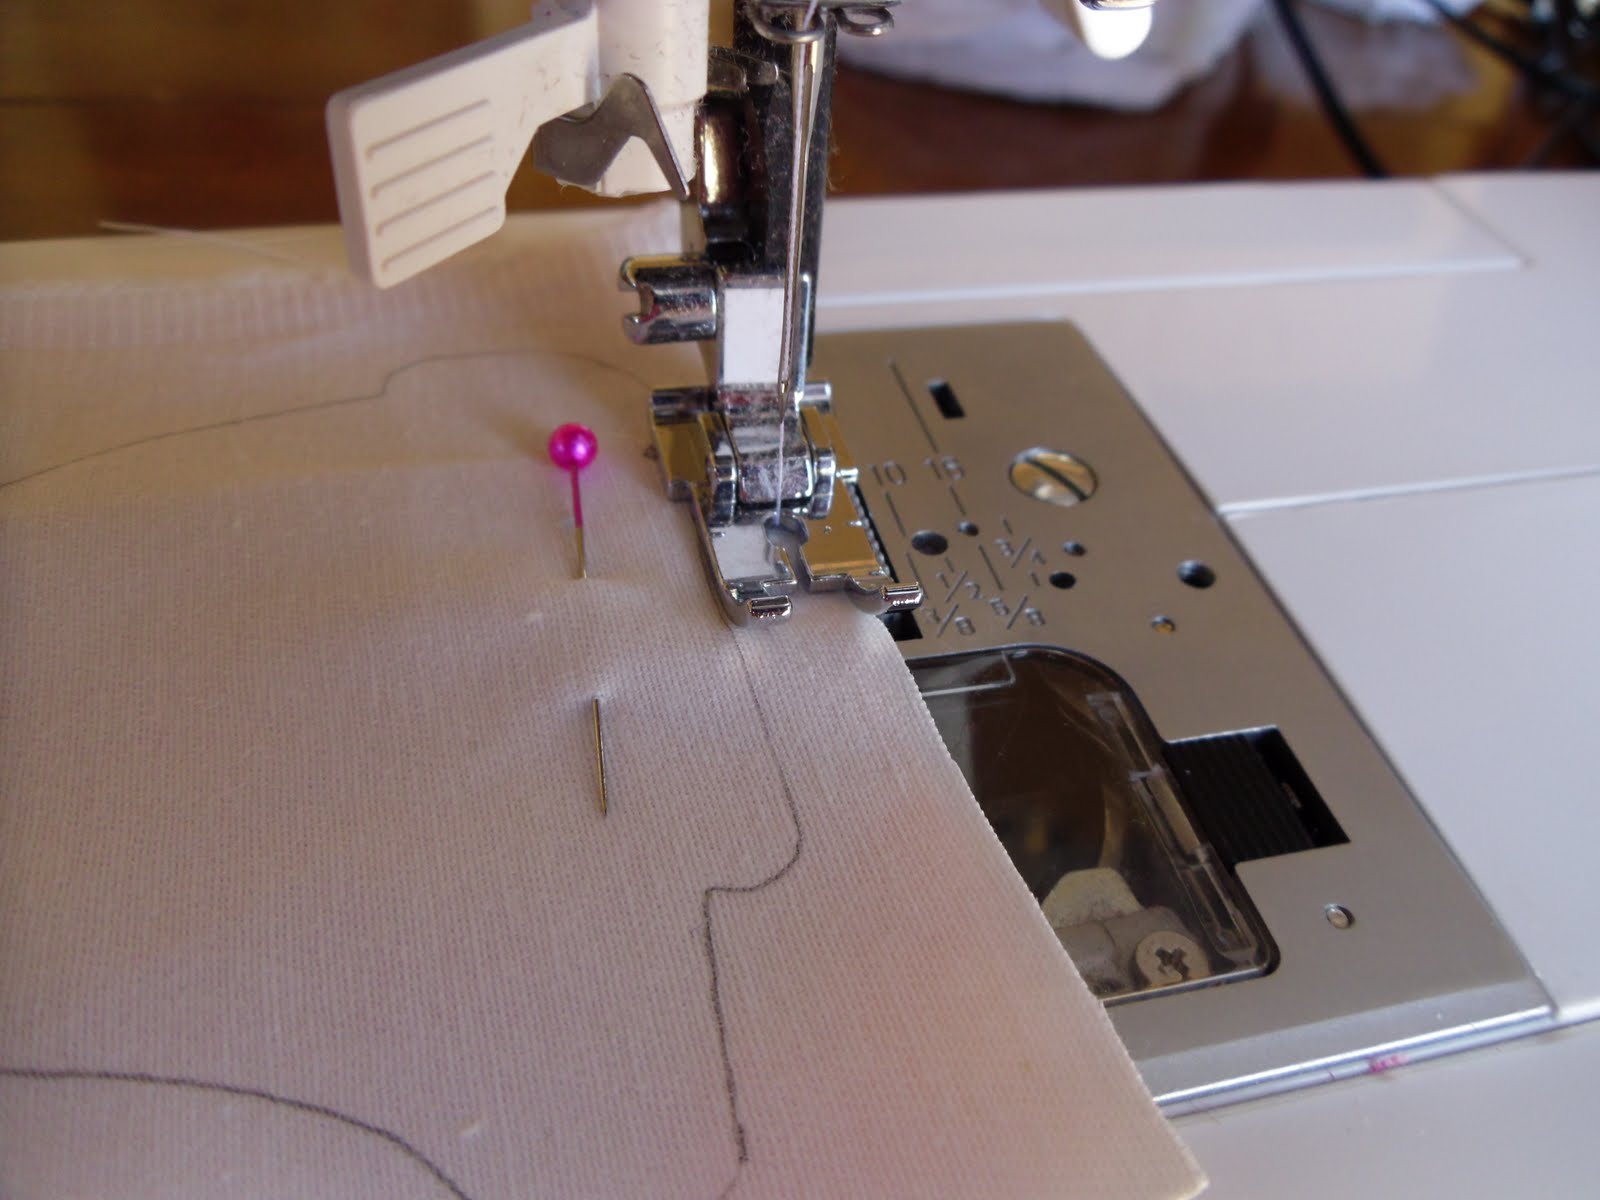
Using the traced line as a template sew around the shape 1/4″ away from the line (sew to the outside of the traced line. In this photo I have my 1/4″ foot on my machine to help with this step, but it’s not necessary.)

Using a pair of sharp scissors cut through the top layer (be careful on this step) just on the outside of the traced line. It is more important to cut accurately than it is to sew accurately around the bunnies.
Repeat this step for the remaining bunnies.
Now it is time to make the patchwork strip. Cut strips of your accent fabrics at varying widths. Mine ranged from 1″ to 2 1/2″ by about 4″ long. Sew the strips together along the long sides, with right sides together, varying the placement of the colors, until you have a strip at least 18″ long. Press all the seams to one side. Trim one long edge so it’s even, then cut 2 strips 1 1/2″ wide by 18″ long.
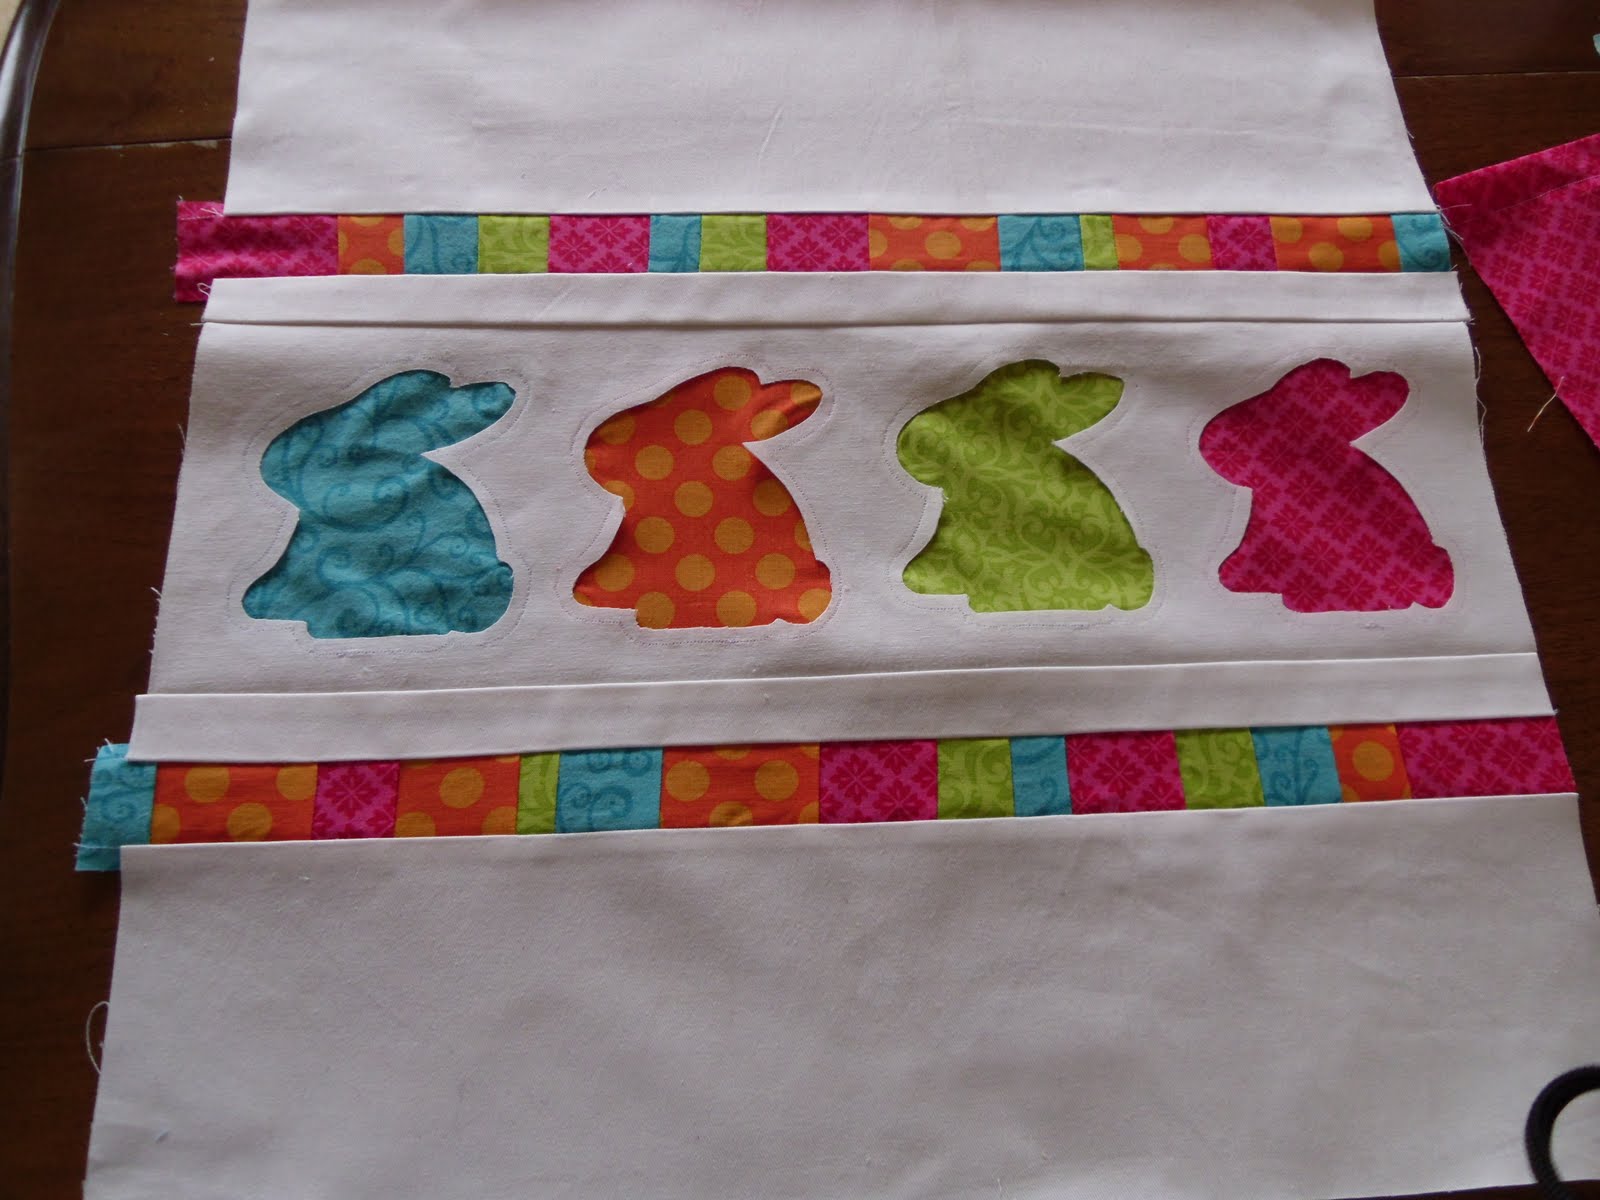
Now we’re ready to assemble the pillow front. Take your small white strips and sew them to the top and bottom of the bunny panel. Press the seam allowance away from the bunny panel. Pin and sew the patchwork strips to the small white strips. Press seam allowance toward the small white strip. Finally, sew the larger white strips to the patchwork strips. Press seam allowance toward the white strip. Your pillow front is complete!
Finish the pillow any way you prefer and enjoy!

**Click here for free Bunny Hop Pillow template.
I hope you enjoy this little splash of Easter fun and will come over and visit me at Ameroonie Designs any time!
xoxo,
Amy


This is so flipping cute, Amy! I LOVE the colors, and I love the bunny shape. The little patchwork strips are the perfect way to frame the bunnies. Awesome pillow!
This is so cute Amy! You always make the cutest pillows. I love the colors too! Do you think any of you pillow making skills will rub off on your roommate this weekend?
how darling! and what a clever name :) Great tutorial!!
This is super sweet! So creative! I’d love for you to come link up!
Smiles,
Melanie
Reasons To Skip The Housework
Tuesday Time Out Link Up Party
How stinkin’ cute! You used my favorite colors, the colors of my three girls’ rooms!
This is such a cute pillow. I’m a fan of reverse applique also.
oooh i love the new Millie Cross Body!
I’m a new public follower of the idea room! :)
That is a super cute pillow. I’m getting more into sewing, perhaps when I feel adventurous I will try something like that.
Now that is a cute pillow! I love the bright colors.
OMG – so cute!!! I love the cut-out bunny look!
Thank you so much Amy for sharing this with us! Absolutely adorable!!
Love it! I can’t wait to try this one!
Too cute! Going to give this a try this week. Maybe make some with other shapes too! Love it!
Will the bunnies fray?
I asked Amy and here is her reply…:The answer is that they may fray slightly, but because the cuts are mostly on the bias, they shouldn’t fray much. And, I don’t plan on washing mine all that often so I’m not worried about it. If they want them frayed, they will probably want to snip the edges to help it along”.
I would like a copy of your bunny template. Thanks so much and have a wonderful day.
Is it possible to get a copy of the bunny template? Thanks! I LOVE this!
Amy for Ameroonie Designs is working on it and will let me know when she gets the link up. As soon as I find out I will share it with you all!
Would love a copy of your bunny template….SO cute!
I would like a copy of the bunny you used for your Bunny Hop Pillow. Would you share? Thank you, in advance for your time and trouble. Very cute project!!
Diane
OH’ MY’ that is such a darling pillow, I LOVE IT. Great tut. too. Way to go. winks- Jen-C.O.M.